Update Rewrote this tutorial for the updated “Workflow” app which is now known as (Siri) “Shortcuts”.
I wrote this tutorial for those that, just like me, are not to fond of having their NAS devices run all day without going into hibernation. In this tutorial we are going to write a script with the app called “Shortcuts” that will allow us to start/stop the RoonServer package on our Synology NAS with a single press of a button on our iOS devices. This will allow your NAS to go into hibernation mode when not using Roon. But also to quickly start it when we want to listen to some music.
These buttons/scripts will let you start/stop RoonServer on your Synology NAS. You could also turn off


In this case pressing the Start button will instruct my NAS to start the RoonServer package, and the Stop button will instruct it to stop the package. Which will allow my NAS to go into hibernation.
I assume that you have some basic knowledge with Linux commandline language, if not you can find plenty about it on the internet. If you think this is abracadrabra then you should probably take a pass on this as it can easily screw up your NAS.
In order to be able to use the Workflow buttons to start/stop Roon the following modification needs to be made to the sudoers file on your NAS otherwise the superuser command in “Shortcuts” will grant the following error message:
Error 54 sudo: no tty present and no askpass program specified.
The reason for this is that the Shortcuts app cannot run superuser commands that require passwords. Luckely for us we can alter the need of a password for commands that need superuser priviliges. This might sound complex but in fact its really simple and fairly easy to accomplish. Just be aware that we need to edit the sudoers file which contains some vital information and you should be VERY CAREFULL editing this file. I take no responsibility in anyway so the following part of this tutorial is your own responsibility. If you have any doubts about wether you should edit the sudoers file or don’t have any experience editing files like these in linux I advise you to quit and just wait untill Crieke may fix the hibernation problem. If above does not apply to you or you are just feeling adventurous but understand the possible risks you can read on.
Alrighty, first off all lets start with what you need. I am using IOS and MacOS devices, so this tutorial is focussing on those devices. Offcourse there are Windows equivalents, so you can probably use the head liners of this tutorial and translate them into Windows software bits.
For iPhone or iPad you need the following apps: Shortcuts
On your MacBook or iMac: Terminal (MacBook comes installed with this app)
- Open Terminal on your MacOS device and ssh into your Synology NAS. This can be done by entering the following command:
ssh (account name)@(synology ip adress)
in my case:
- You should now be prompted for your Synology account password, type your password and hit enter. Notice that will not be able to see your typed characters.
- Now lets modify the sudoers file. Note that i am using vi to edit the file. If you are unfamiliar with vi please use google to look for instructions. Modify the sudoers file by entering the following command:
sudo vi /etc/sudoers
Once again you will be prompted for your password, enter it and press enter.
- You will now be inside the sudoers file. Add the following line to the end (again if you don’t know what that means please do some research on the internet):
username ALL = NOPASSWD: /usr/syno/bin/synopkg start RoonServer, /usr/syno/bin/synopkg stop RoonServer
Where username is your synology account name with administrator rights. In my case:
Tinus ALL = NOPASSWD: /usr/syno/bin/synopkg start RoonServer, /usr/syno/bin/synopkg stop RoonServer
- Save and close your edited sudoers file. If it gives you a warning that it is read only you can force save by typing the following command:
:w!
followed by
:q
- We are done with the hard part, to exit the secure shell type:
exit
- Open the App Store and download and install Shortcuts on your iOS device.

- When you are in the main menu you can create your RoonServer workflow. In the library tab press the “+” button in the top right corner. Afterwards a nameless shortcut will be created.
- You can press the “switches” button to modify the name of the shortcut and pick a color plus icon. You can even enable Siri and add a passphrase to control the activity by using Siri.
- Back in the shortcut creation screen go to the search pane and type in “choose” and press on the script called “Choose from menu”.

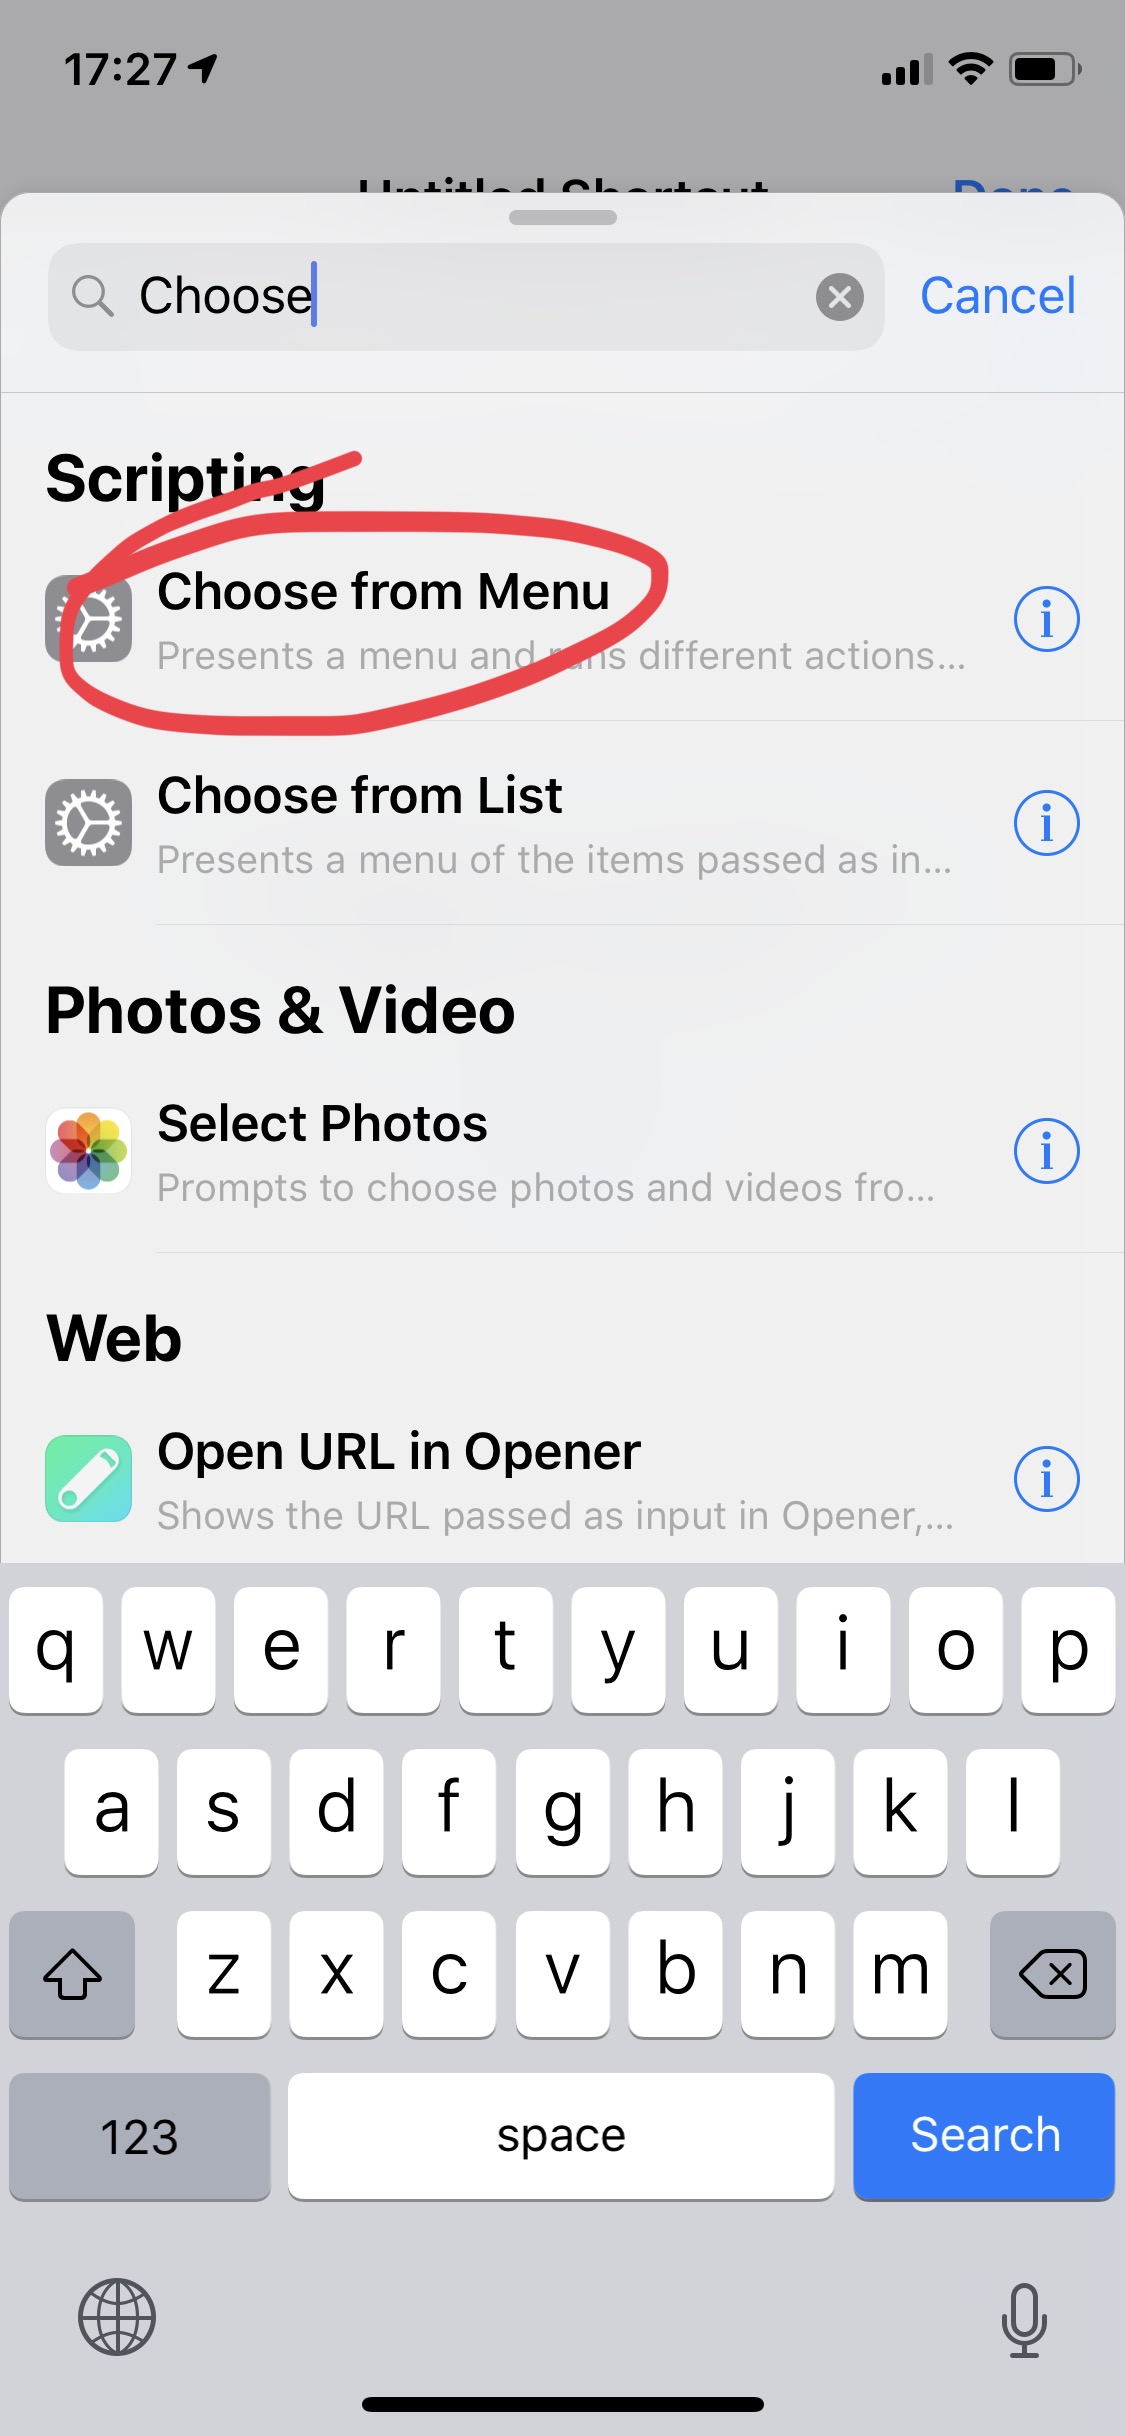
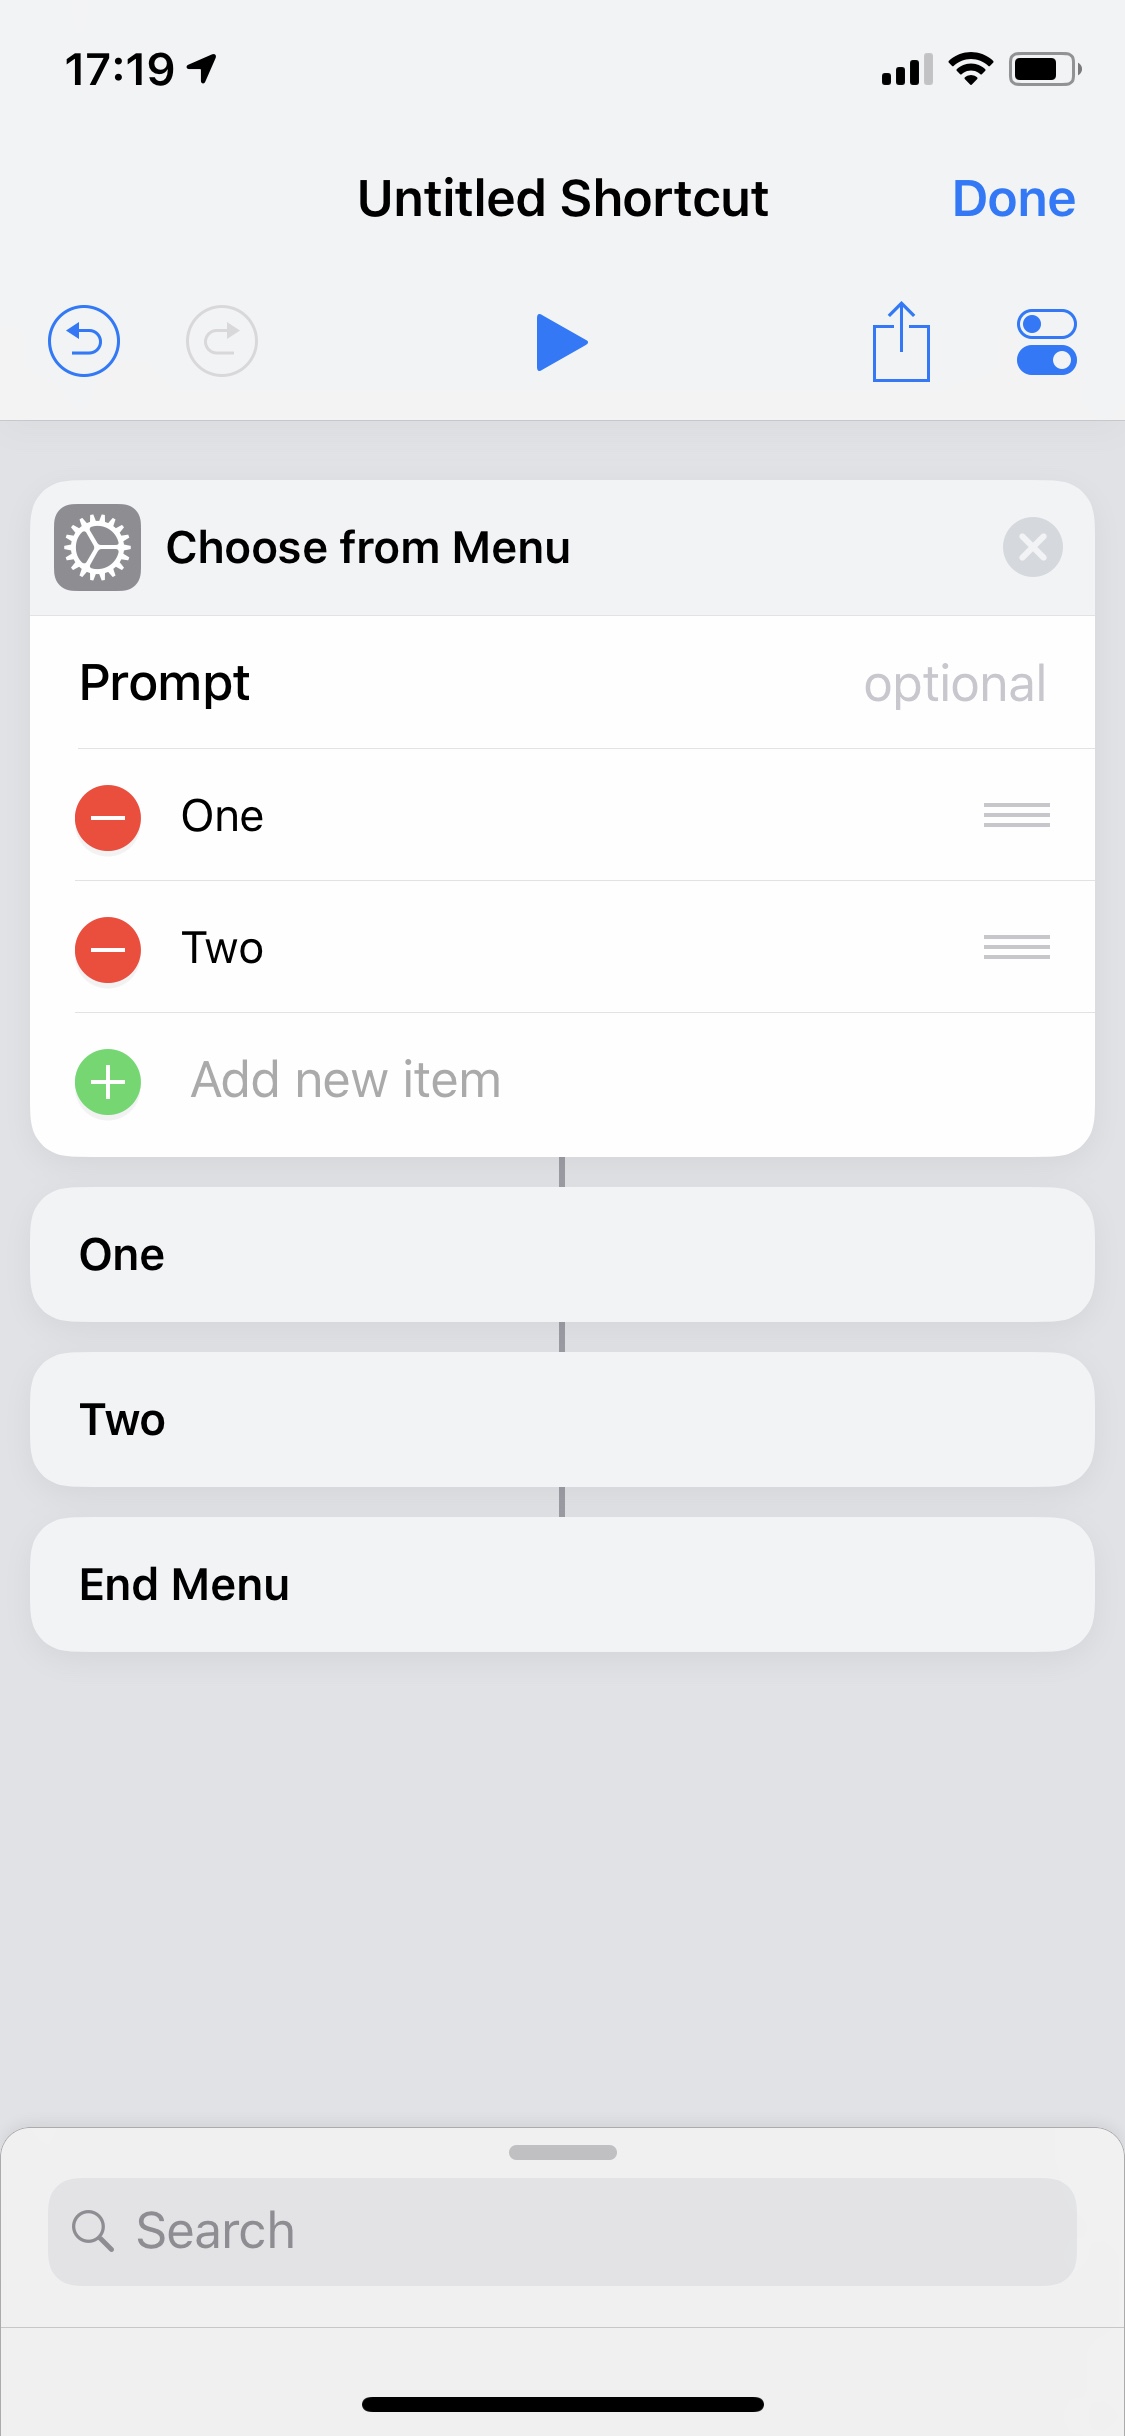
- You will notice that the app pasted a “Choose from menu” prompt with description “One” and “Two”. You can rename these Start and Stop ie. or whatever name you want to give the actions, by pressing on the names. Underneath this window you will notice that the name you gave these actions have a corresponding field underneath the “Choose from Menu” prompt we just created.
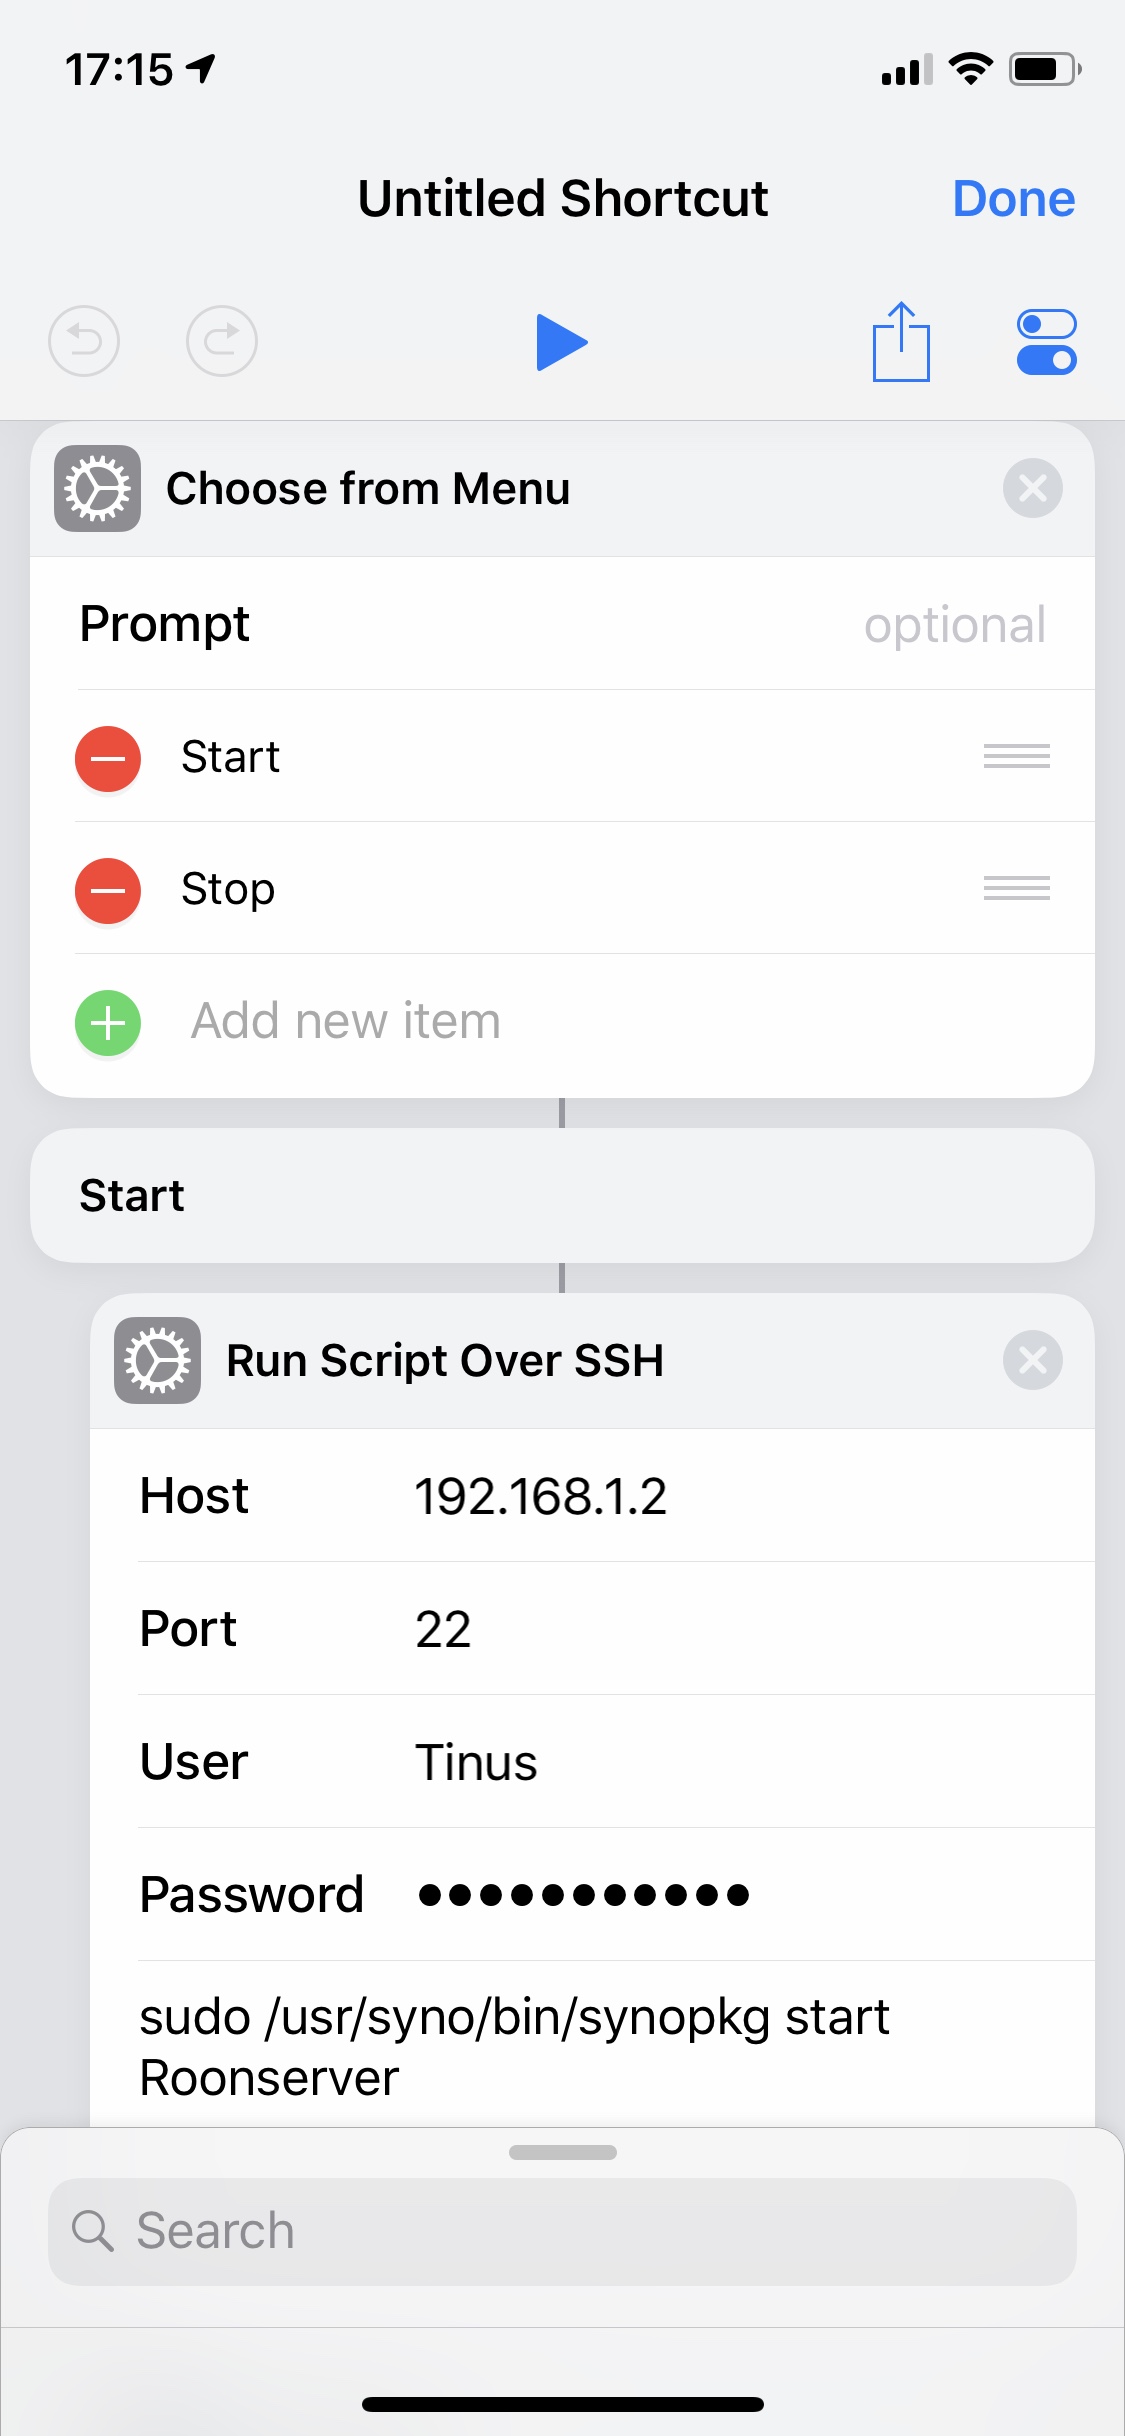
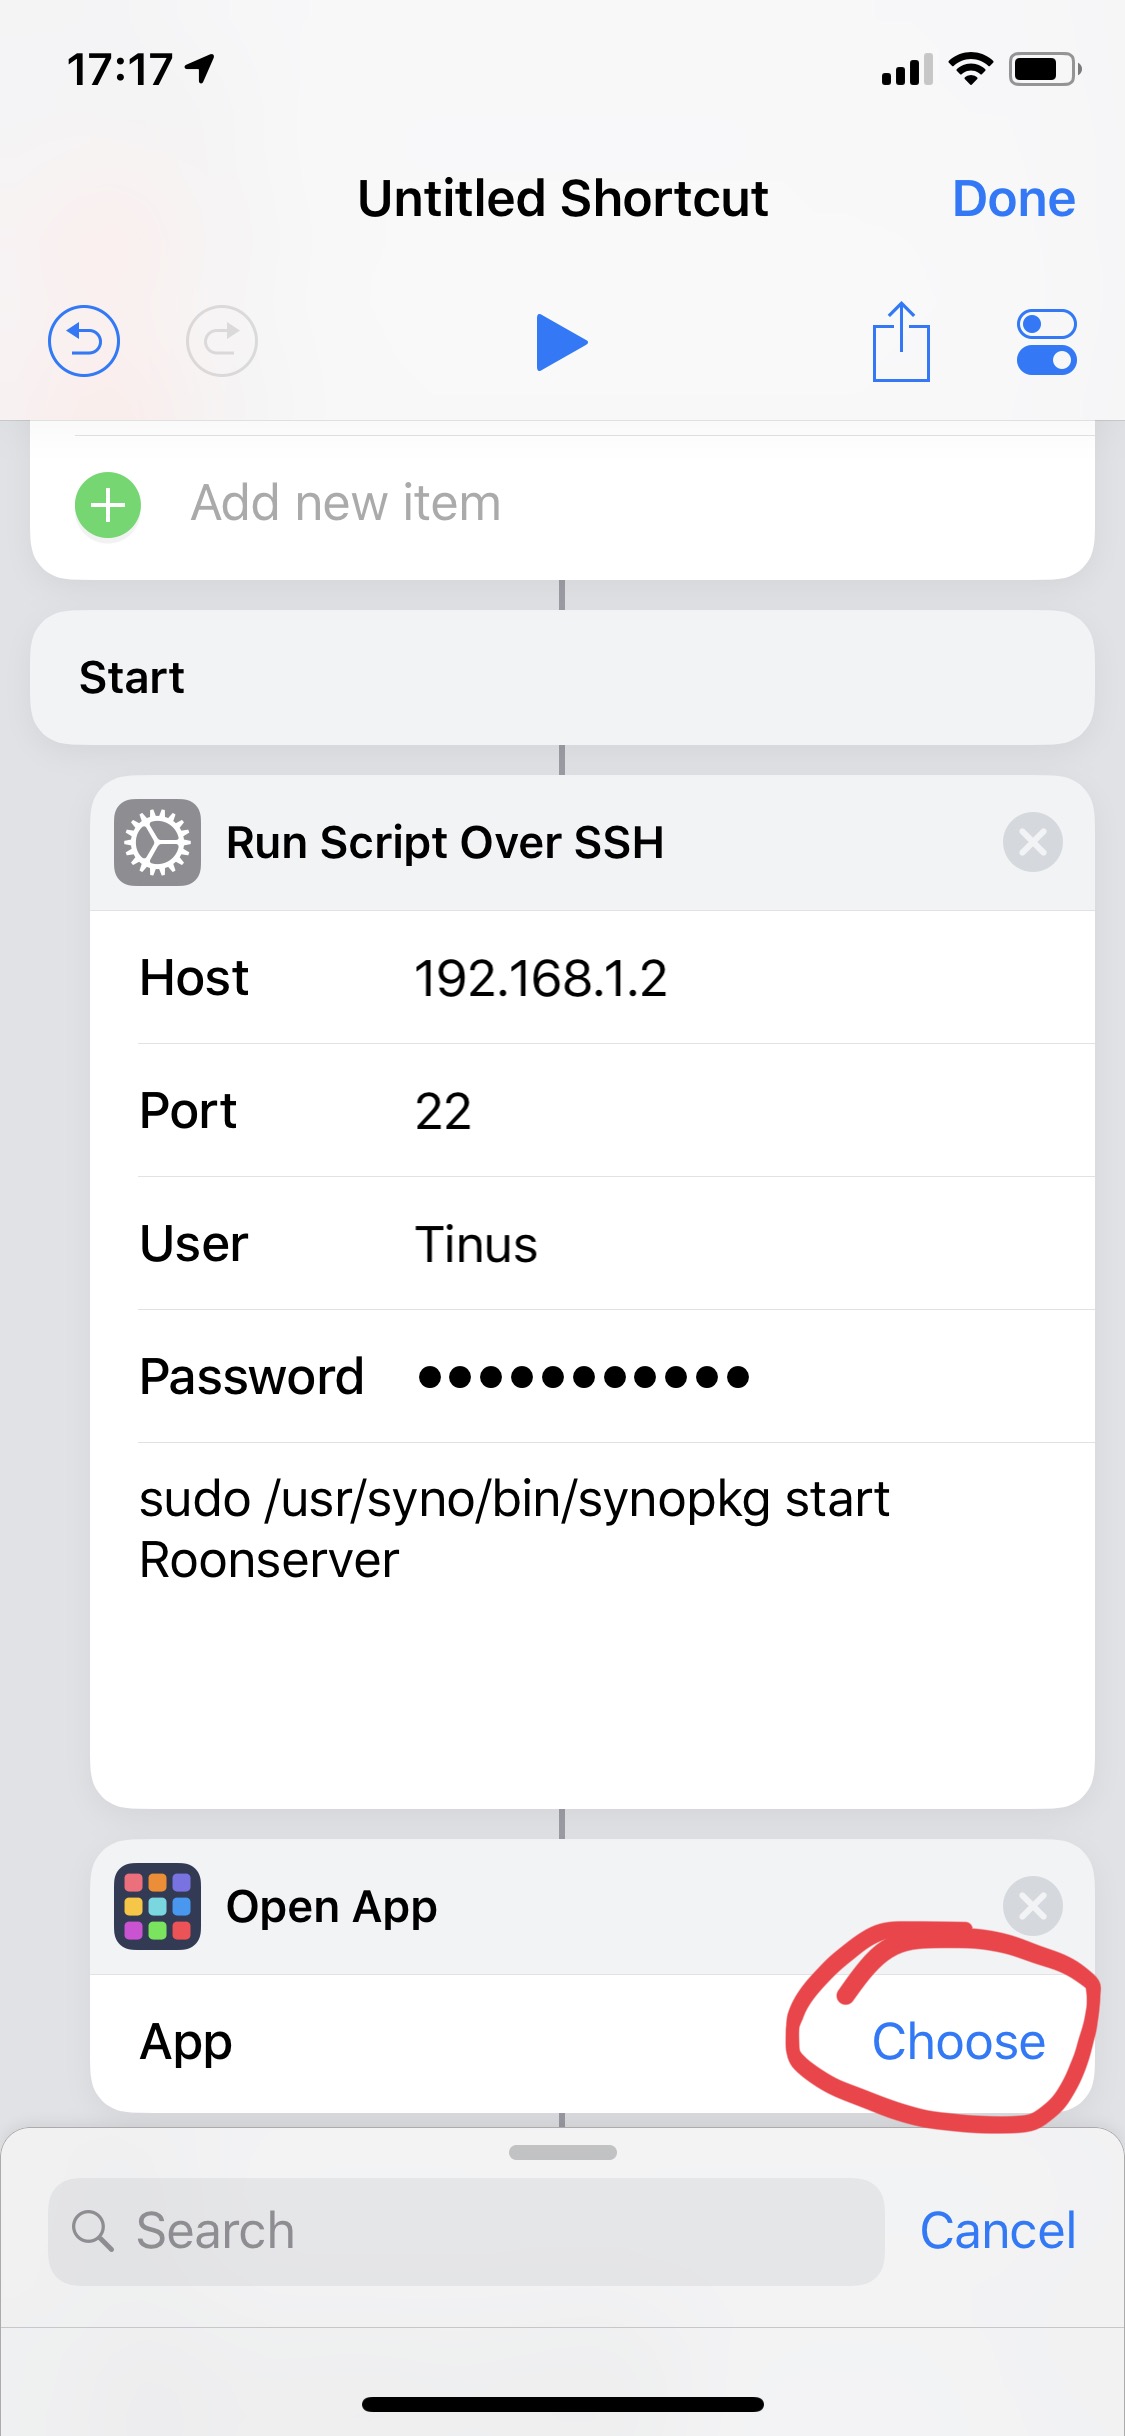
- Next up we are gonna add a “Run Script over SSH” action. So search this activity in the search pane and press on it. It will appear on the bottom of your activity. Press and hold on the “Run Script Over SSH” box and drag in underneath the “Start” pane. Repeat this process and add a similar SSH script underneath the “Stop” bar.
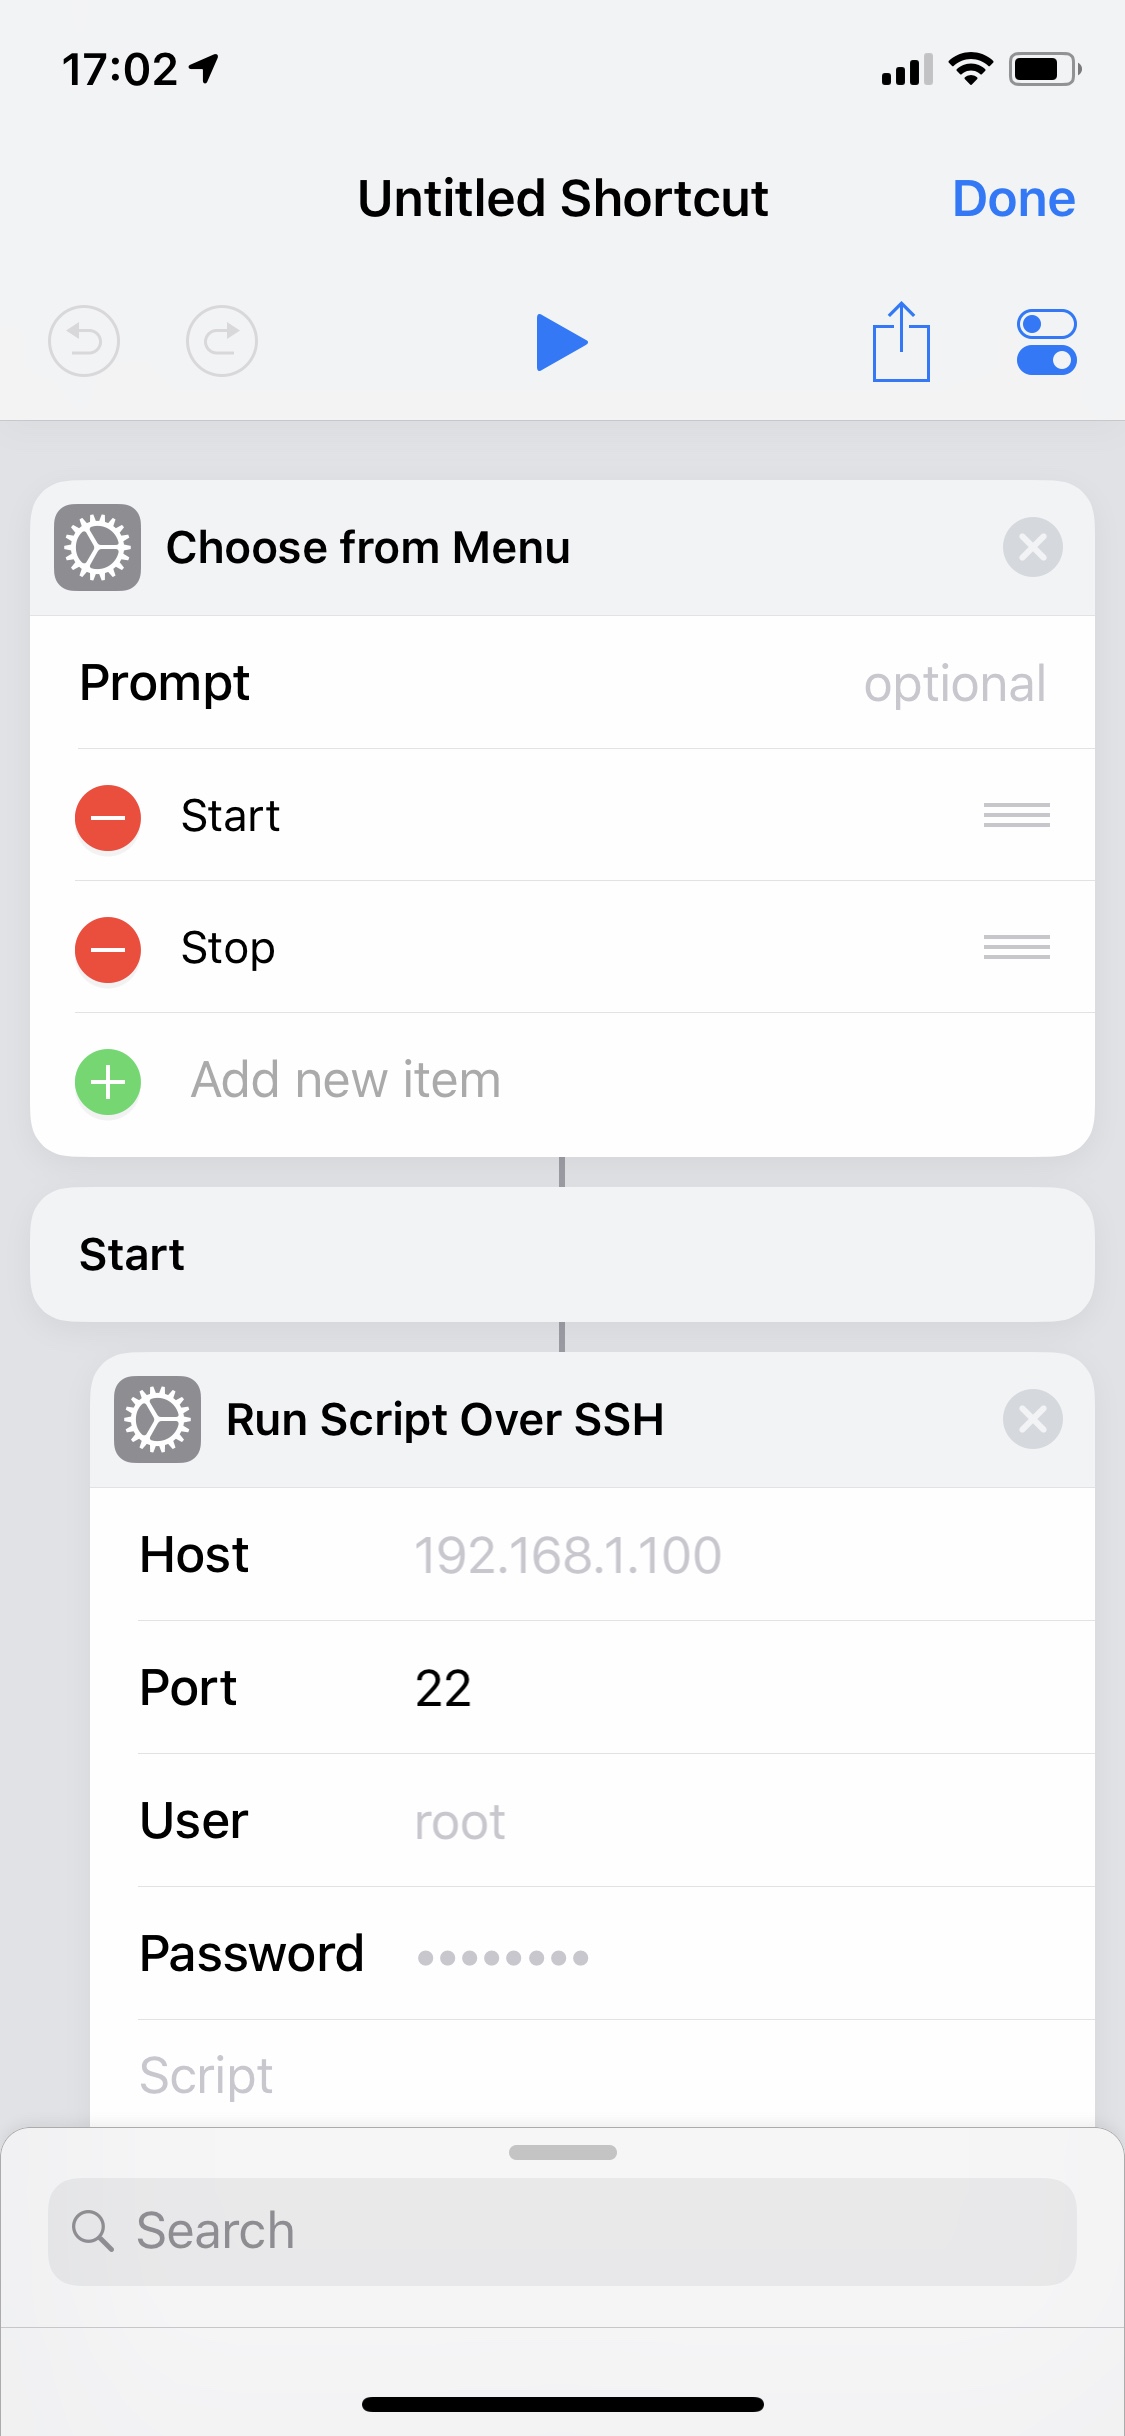

- Next up we need to configure the SSH script to start and stop the Roonserver. The Run Script Over SSH box has some information which need to be filled in.
Host: requires you to specify the IP-adres of your NAS device. I recommend giving your NAS a static IP adress. Otherwise the usability of the created buttons will be limited.
Port: Your SSH port, unless you have altered the port in your Synology this should be 22.
User: The accountname that has admin rights on your Synology device and which you used in step 4.
Password: The password of the account you specified under user.
Script: You will need to type the following command line:
sudo /usr/syno/bin/synopkg start RoonServer
- Next up type “open app” in the search pane and press on “Open App”. Drag the “Open App” box underneath the “Run Script Over SSH” in the “Start” part of the shortcut. Afterwards press “Choose” and select the Roon app in the list.

- Now we have arrived to the Stop part of the script.
Host, Port, User and Password are the same as you used at step 13
Script: This time you will need to type the following command line:
sudo /usr/syno/bin/synopkg stop RoonServer
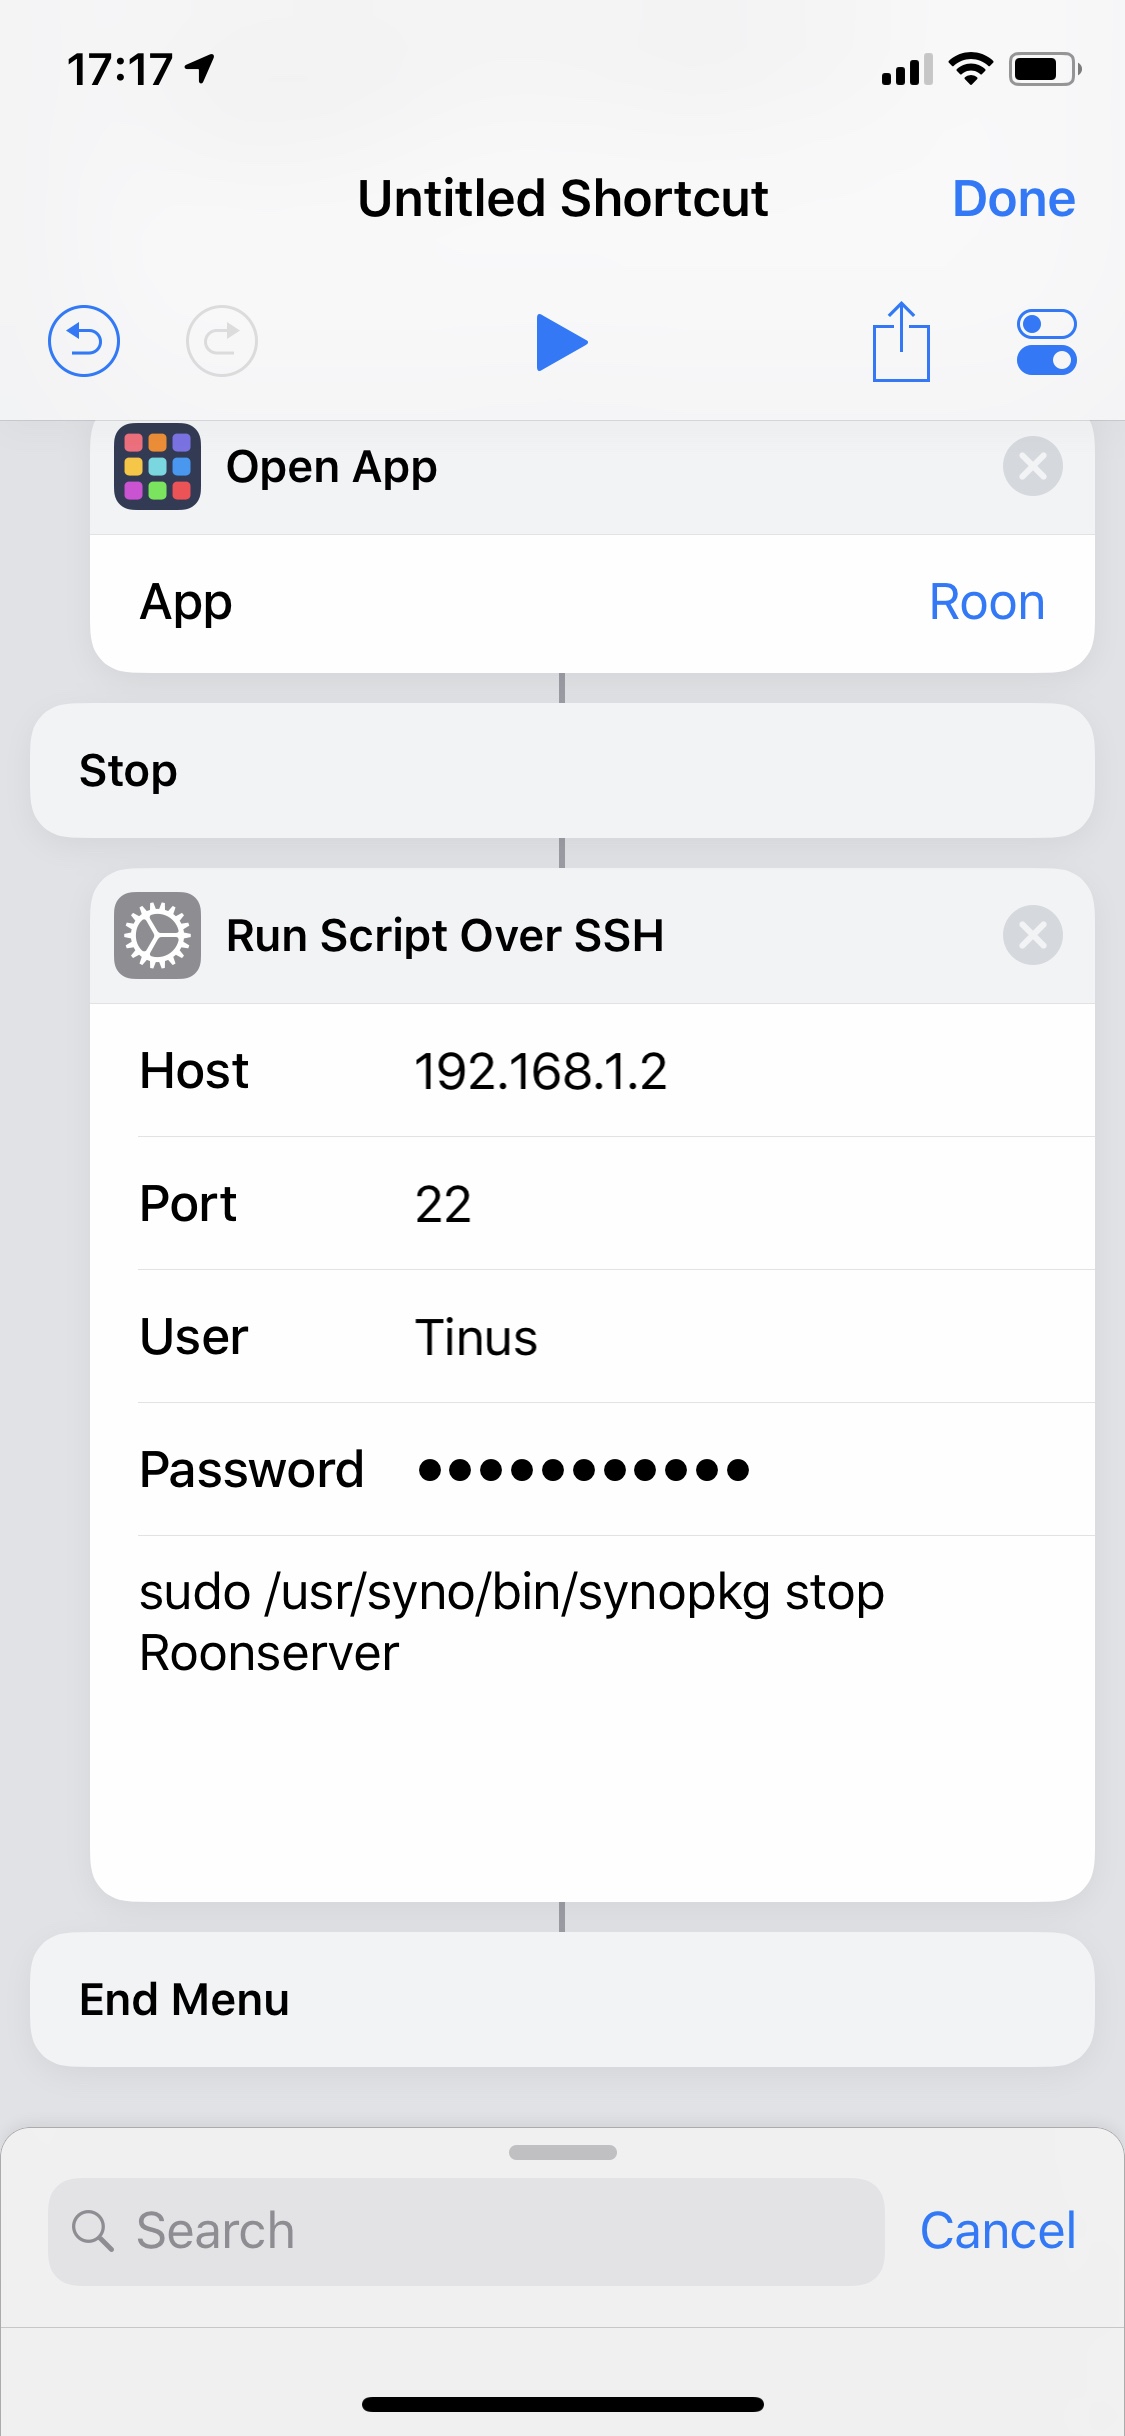
- Press “Done” in the upper right corner.

- Your shortcut is now saved and you can add the “Shortcuts” widget on your widget screen by swiping to the right on your home page.
- Enjoy!
