Hi all,
I’ve set up Roon and HQPlayer on a i7 NUC running Ubuntu OS.
All works well with an external USB HDD attached but I have an internal SSD that Roon doesn’t see.
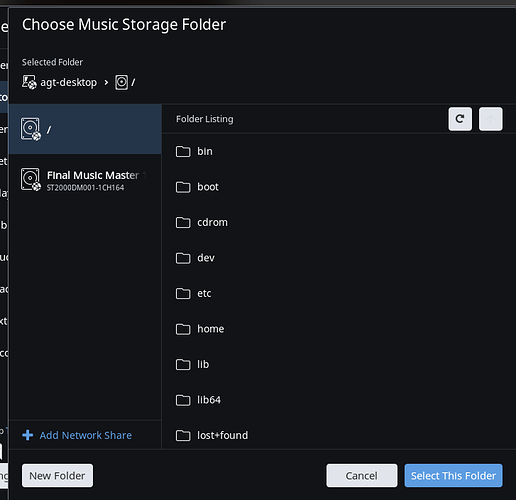
When I hit browse only the external HDD shows up.
I have reformatted as NTFS, Ext4 and Fat but no change.
Any advice please?
@support
Maybe I’m not being specific enough in my question, hence no answer so far.
I’ve set up Roon and HQPlayer on a i7 NUC running Ubuntu OS. The setup was pretty straightforward for someone with NO computer skills. I chose Ubuntu because I wanted to use HQ Player as well.
Roon detects any external HDD and I can play music fine from the external HDD.
I have an internal SSD that Roon doesn’t see. It shows up on Ubuntu and I have been able to reformat it OK.
When I hit browse as above only the external HDD/s shows up.
How do I get Roon to recognise the internal SSD? What format does Roon recognise?
Cheers
Your internal SSD is permanently mounted somewhere in Linux, right? You should navigate there to add it. We do not display non-removable drives in Linux – only “/”.
Hi @danny,
I’m not sure what that means.
The SSD is in the NUC slot/cradle that the internal drive sits in. The OS is on the M2 drive. I can see the SSD on Ubuntu and I have reformatted it to all the different formats in an attempt to get Roon to see it but when I hit the browse button to find any attached drives only the M2 drive and the external HDD show up. See the photo above.
Have I done something wrong? My Linux knowledge is very limited unfortunately but I have managed to install Ubuntu, Roon and HQ Player and get it all working. Just this small glitch now.
FYI I was using Rock before but wanted HQ Player hence the change to Ubuntu.
Thanks
Have you mounted the drive? Or were you using the GParted app? In Linux you first partition and then create a mount point, e.g. /media/usb.
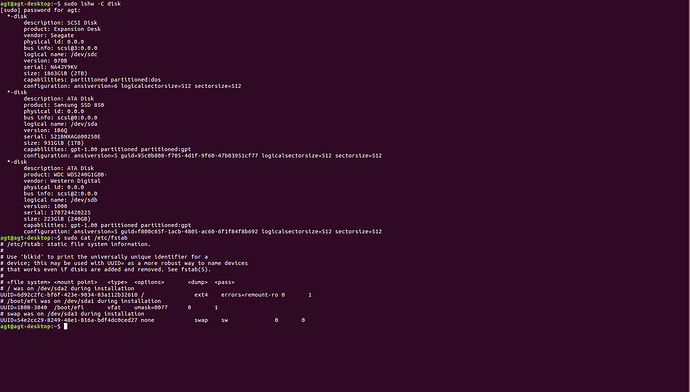
If you’re happy using the terminal, type the following so we can see what’s happening:
sudo lshw -C disk
sudo cat /etc/fstab
Please share the the output for each.
Thanks for the reply Martin,
I’m not sure how to do the mount point.
I don’t know what GParted is.
Here is the screeshot.
Okay, I can take you through the steps. But first I need to confirm a few things.
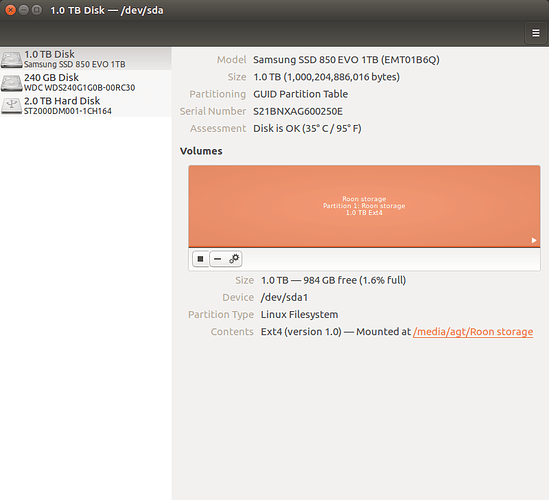
You have three drives:
-
A 2TB expansion drive. Is this a USB drive? And what do you intend to use this for? It should be mounted in a folder off
/media/agt. -
A 240GB SSD M2. Did you install Ubuntu on this? And Roon? That’s my guess.
-
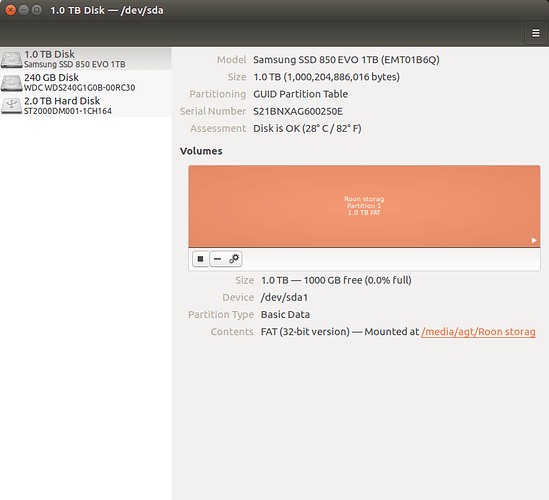
A 1TB SSD. What is the intended purpose of this drive? Why have you created a FAT partition?
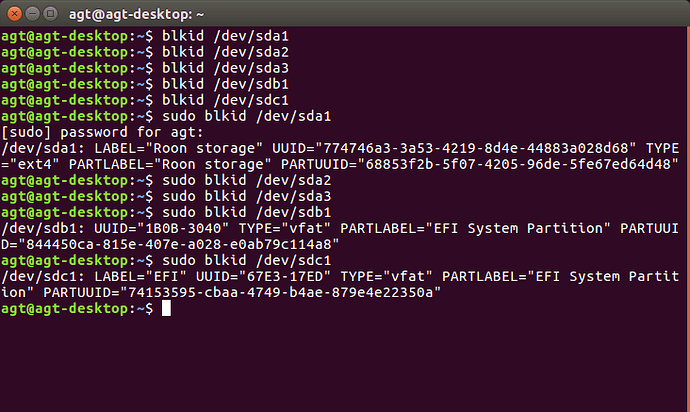
Also, please run the following from the command line. I want to confirm the drive UUIDs before giving you instructions.
blkid /dev/sda1
blkid /dev/sda2
blkid /dev/sda3
blkid /dev/sdb1
blkid /dev/sdc1
Once you get back to me it’ll be straightforward.
Thanks Martin,
I appreciate your help
A 2TB expansion drive. Is this a USB drive? And what do you intend to use this for? It should be mounted in a folder off /media/agt. When I couldn’t get the internal drive to be recognised I connected one of my music backup drives so I could listen to music.
A 240GB SSD M2. Did you install Ubuntu on this? And Roon? That’s my guess. Yes, Ubuntu and Roon are on this drive.
A 1TB SSD. What is the intended purpose of this drive? Why have you created a FAT partition? This is the drive I want to import my music to. I Tried formatting it to NTFS, Fat and Ext4 to get it recognised. It just happened Fat was the last format I tried. Since changed to Ext4. See next post.
Screeshot attached
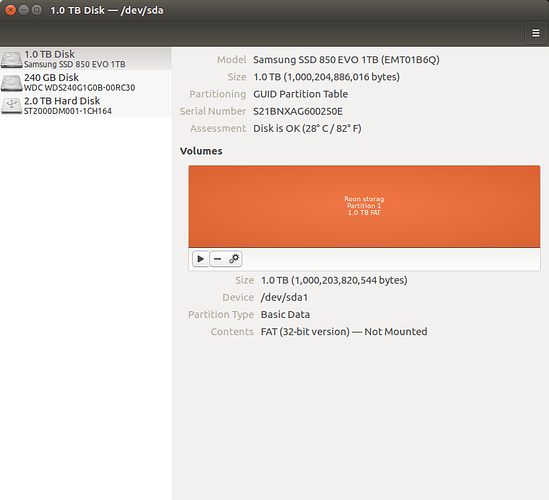
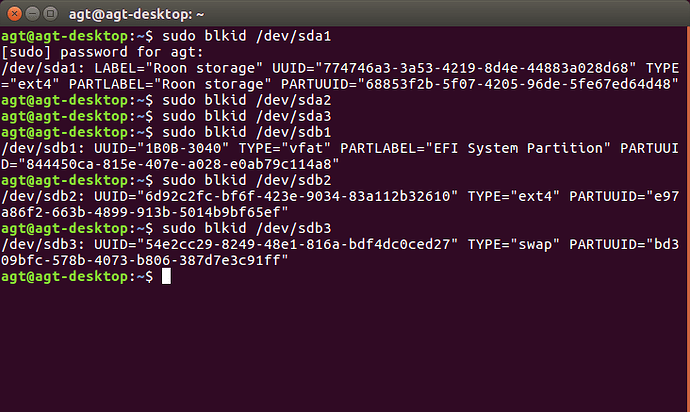
I’m not sure if the UUID is confusing. Since I took the top screenshot of disks I changed the formatting again for another try. I’ve attached the current one.
Okay, just one more check as it looks like /dev/sda is now /dev/sdb. This is why we use the UUID.
sudo blkid /dev/sdb2
Also, please confirm that the 1TB SSD can be formatted and you’ve no data on that drive. I also recommend that you umount your USB drive.
The steps we will carry out are:
- Format the 2TB drive
- Mount the drive to a folder of your choice, e.g.
/media/Music
We’ll do this from the command line and backup changes as we proceed.
Don’t make any further changes to the drives. Remove the USB drives and repeat the blkid commands for partitions /dev/sda1, /dev/sda2, /dev/sda3, /dev/sdb2 and /dev/sdb3. Some will return nothing. I know what’s happening, but want to be certain before committing to a format!
Hi Martin. Yes Don’t want to format the 2TB drive. That is a backup. I have removed it now. The Internal SSD is hard to remove so I have left it as is and anyway is the one to be reformatted.
Screenshot attached
Okay, we’re good to go.
The system drive is /dev/sdb (three partitions) and the 1TB SSD is /dev/sda.
Format the drive
From the terminal type the following commands:
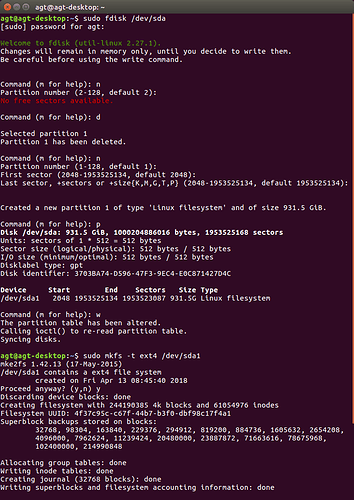
sudo fdisk /dev/sda
m to list the partition
d to delete the partition
n to create the partition, p to make a primary partition
w to write and exit
Now we will create the filesystem:
sudo mkfs -t ext4 /dev/sda1
sudo tune2fs -m 0 /dev/sda1
Create the mount point
sudo mkdir /media/music
sudo chmod 755 /media/music
You won’t be able to write to this folder, so you may want to change ownership:
sudo chown agt:agt /media/music
Now we can mount the drive to /media/music:
sudo blkid /dev/sda1
Copy the the value in quotes after UUID. This should start 774746a3, but check first.
sudo nano -Bw /etc/fstab
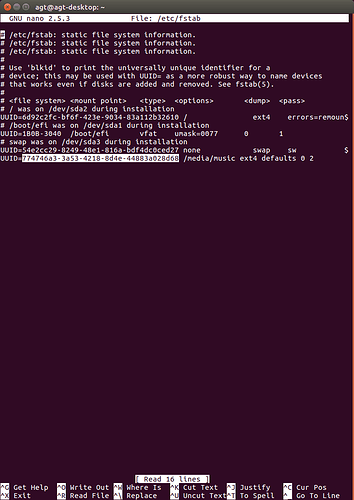
Paste the following line with your UUID at the bottom of the file. Don’t assume I’ve typed this correctly. 
UUID=774746a3-3a53-4218-8d4e-44883a028d68 /media/music ext4 defaults 0 2
Press Ctrl-X followed by Y to save and exit.
Finally, type sudo mount -a to mount the drive. Now you should be able to create/ copy a file to /media/music and browse to the folder from Roon.
Let me know how you get on.
Hi Martin,
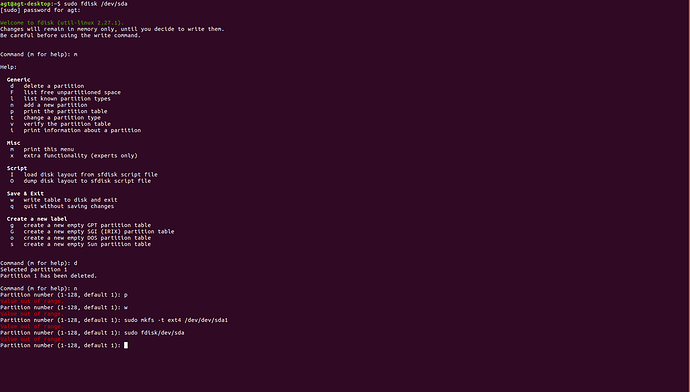
I tried the commands but can’t get past d.
I must be doing something wrong. I have to go to work now so will get back to it this afternoon.
Please don’t give up on me yet!
Cheers
Andrew
After you entered N, it is asking you to give the number of the partition. Thus needs to be done before you go to the P step.
Ahhh. OK I’ll try that tonight when I get home. I am UTC +8 time zone here.
Well I think I’ve tried every possible permutations of the commands above. No luck. I can’t get past the n and p commands.
Obviously I need some more basic instructions.
Cheers
Andrew
Try this, typing what’s in bold. Output will be slightly different to this:
sudo fdisk /dev/sda
[sudo] password for agt:
Welcome to fdisk (util-linux 2.27.1).
Changes will remain in memory only, until you decide to write them.
Be careful before using the write command.
Command (m for help):n
Partition type
p primary (0 primary, 1 extended, 3 free)
l logical (numbered from 5)
Select (default p): p
Partition number (1,3,4, default 1): <enter>
First sector (some numbers here, use default): <enter>
Last sector, +sectors or +size{K,M,G,T,P} (some numbers here, use default): *<enter>
Created a new partition 1 of type 'Linux' and of size size GiB.
Command (m for help): w
You should now be back to the prompt:
agt@agt-desktop:~$
Then follow the instructions from “Now we will create the filesystem” above.
