I just finished installing RoPieee and have a question.
For background, I’m new to the world of Raspberry Pi computers, Roon and RoPieee. I just put together a Raspberry Pi 4 kit from Canakit (model 4B with 4GB), installed Roon Core on my Mac computer and RoPieee on the Raspberry Pi. The Raspberry Pi is connected to my Oppo 105 via USB and I’m running Roon Remote Connection on my iPad to control things. I can access/run/stream music from Tidal and my iTunes library. So far, so good, everything seems to be working just fine.
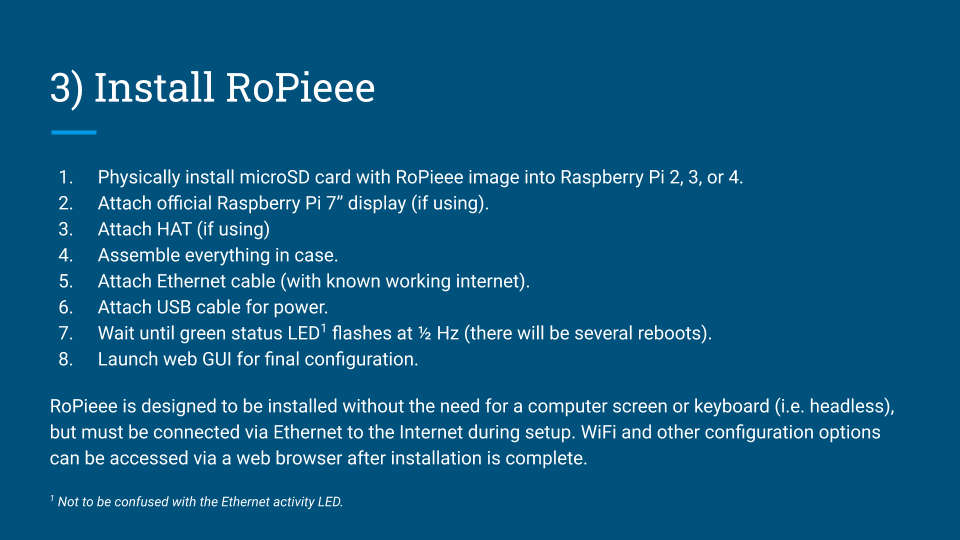
I’m leading up to the question. When I installed/booted RoPieee on the Raspberry Pi, I carefully followed the Raspberry Pi for Beginners document, which greatly helped me. But the green activity light on the Ethernet connector would never go to the 1/2 hertz blinking cycle. It did appear that there were multiple boot operations (as evidenced by the green light and the yellow/orangish light both going off and then back on after a short time).
Initially, I assumed I had done something wrong so I repeated the process of flashing the microSD card and once again booted the Raspberry Pi. Same outcome. Rinse and repeat, multiple times. Even waited over an hour to give things plenty of time to settle out.
Since I’m operating headlessly I could not tell anything further about what was going on. So, finally, I simply tried to access things via a web browser. Lo and behold, my lil’ device was running just fine. I could access RoPieee, could do the complete configure and update process and, as stated above, got everything working wrt to Roon, Tidal, iTunes, etc.
So, my question is simply this. Why is it that I never got to the 1/2 hertz blinking cycle with the green light on the Ethernet connector? Obviously this isn’t a great concern since everything else seems to be working just fine. But inquiring minds want to know.
Thoughts anyone? And thanks in advance for any provided.
That makes sense. I had already installed the Raspberry Pi board into the Canakit case so was generally unable to see the LEDs on the Pi board itself. I therefore assumed that the instructions were referring to the LEDs on the Ethernet connector rather than to the ones on the board itself. But, as I said, what you’re saying makes sense. Thanks u_gee!
Just an FYI in furtherance of this thread. Having now moved my Raspberry Pi4 from the plastic Canakit case to the aluminum Flirc case, I can now more readily see the LEDs on the Pi4 board. As much as I like the Canakit starter kit approach of “here’s all the pieces you need in one order,” I really do like the Flirc case better.
If you order the parts individually, you can get what you need from Amazon for $74 delivered in US. That is, if all you need is RPi 4, 16GB micro SD card, power supply, and FLIRC case. You’re not paying for bits and pieces you don’t need.
Thanks for your note, Jim. Yes, I was aware of that option. And it would have been nice to have saved a few dollars. But being a complete newbie to the world of Raspberry Pi, Roon, Ropieee, etc., I went for the easy route. And to be clear regarding my previous posting, I am happy with the Canakit starter kit. I just prefer the Flirc case and it has the advantage of being able to more easily see the Raspberry Pi LEDs, which was the source of my original problem/confusion and reason for starting this thread. Thanks again.