I have the Intel NUC, NUC7I5BNK (128GB ssd) running Windows 10 pro where Roon server is installed, transmitting roon to various roon endpoints in my house (including ifi streamer with hugo2, hp i7 laptop, android phone).
I would like to try HQPlayer and use its upsampling features.
Can I install it on my existing NUC (how much ssd memory is required)?
or,
Should I install it on my hp laptop (roon endpoint)?
Yes you can, it doesn’t take much space. Amount of memory needed depends on the chosen algorithms, but typically HQPlayer takes from 500 MB to 2 GB of RAM depending on configuration.
That is another option. Depending on which one of the machines is more powerful.
Out of these, if the iFi streamer is for example ZEN Stream, then it already includes HQPlayer NAA endpoint option which can be used. Of course your i7 laptop can also be used as a NAA endpoint. Android phone cannot be used as endpoint for HQPlayer.
Please remember to also check the official instructions here:
I’ve just used GPT4 to advise me on setup: it came up with an entirely plausible set of instructions and I now have HQPlayer working…
Help me set up HQPlayer with Roon and a DAC which supports NAA for the best possible sound quality
To set up HQPlayer with Roon and a DAC that supports Network Audio Adapter (NAA) for the best possible sound quality, follow these steps:
Install HQPlayer and Roon:
Download and install the HQPlayer software on your computer from Signalyst’s website (Signalyst).
Download and install the Roon software from Roon Labs’ website (Downloads - Roon Labs).
Configure Roon to work with HQPlayer:
Open Roon and go to “Settings” (click on the gear icon in the top right corner).
In the “Settings” menu, select “Audio.”
Locate the “HQPlayer” section and enable HQPlayer by clicking the “Enable” button.
After enabling HQPlayer, click on the gear icon next to it to access its settings.
In the “Device Setup” window, set the “Volume Control” to “Fixed Volume” for the best sound quality.
Set up the Network Audio Adapter (NAA) device:
Download and install the appropriate NAA software for your DAC from Signalyst’s website (Signalyst). It’s typically available for Linux, macOS, and Windows.
Connect your NAA-supported DAC to your network using an Ethernet cable, or through Wi-Fi if your DAC supports it.
Ensure that your NAA-supported DAC is powered on and properly configured, following the manufacturer’s instructions.
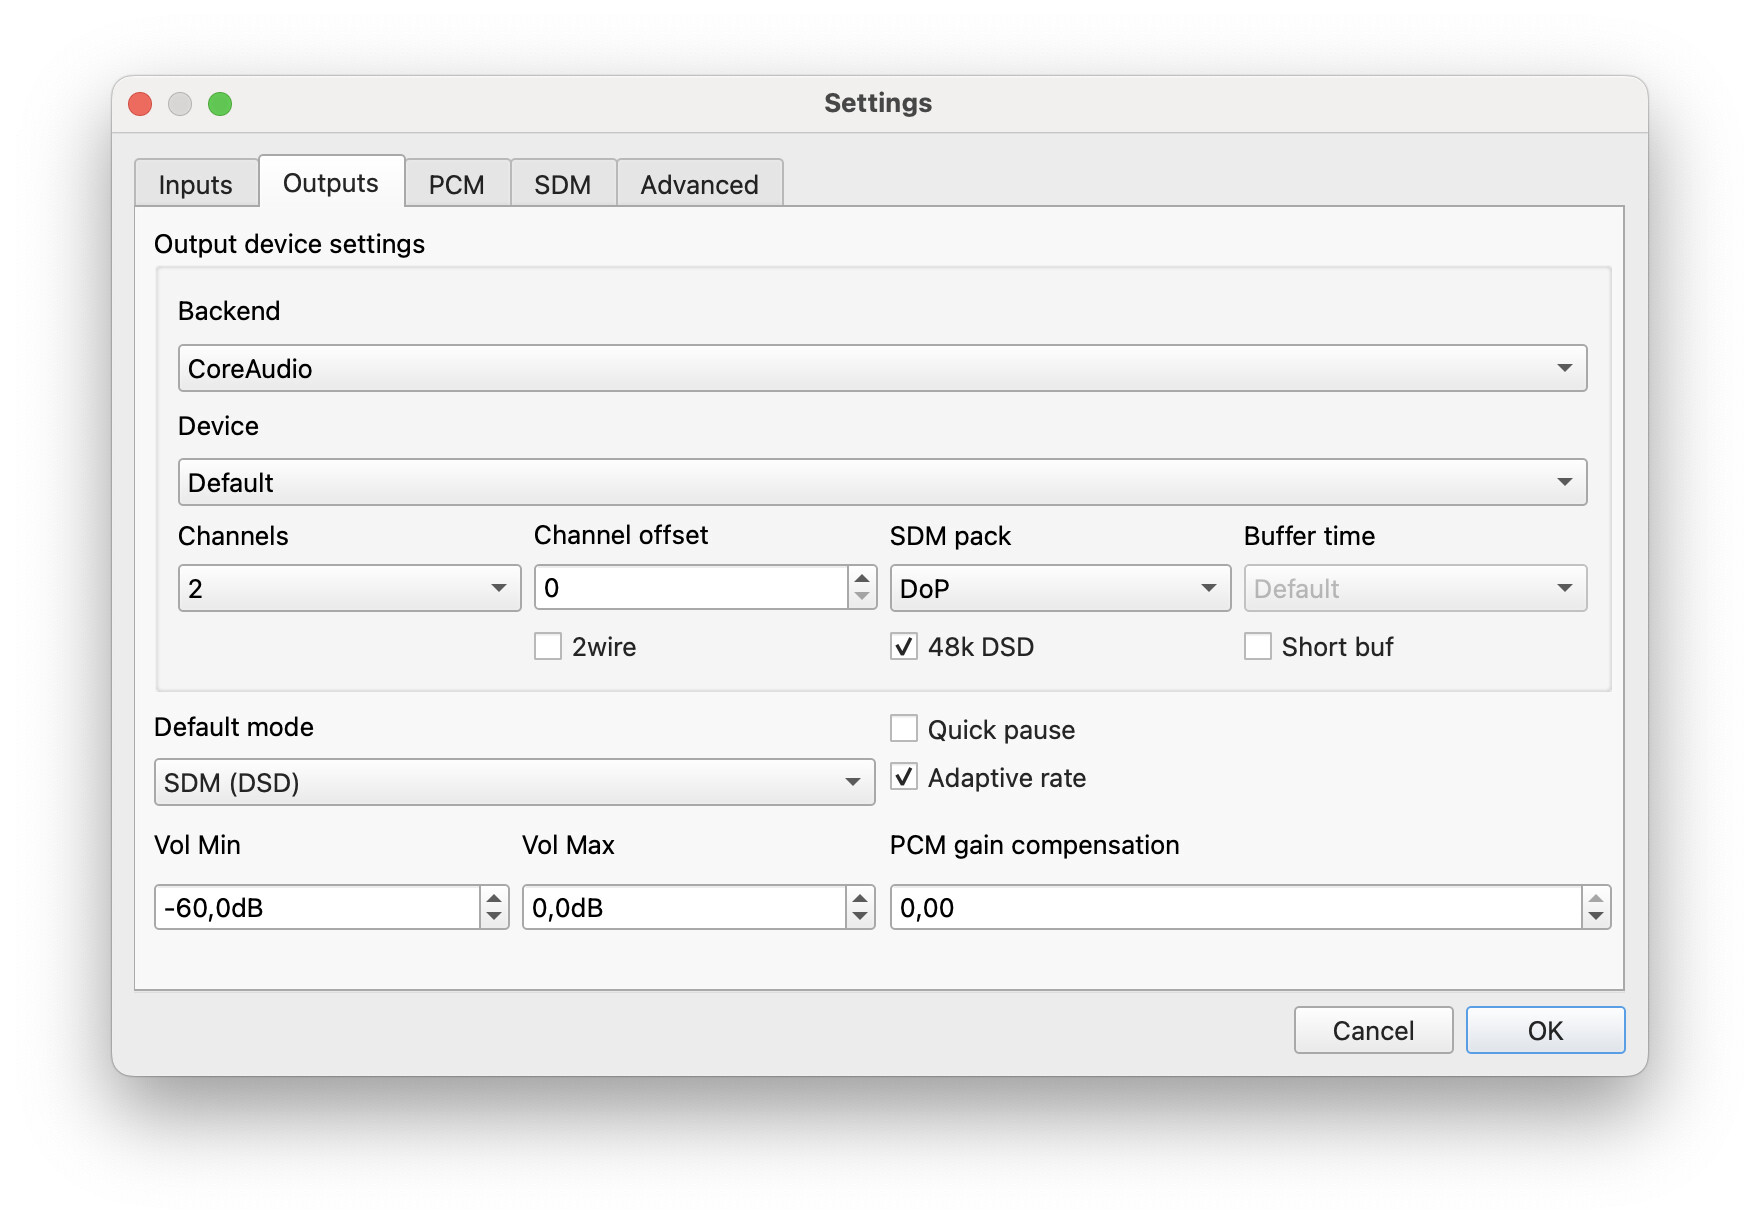
Configure HQPlayer:
Open HQPlayer and go to “Settings” (click on the gear icon in the top right corner).
In the “Backend” section, select “NetworkAudioAdapter” from the “Backend” dropdown menu.
In the “Device” dropdown menu, select your NAA-supported DAC.
Set the desired output format (e.g., PCM or DSD) and bit/sample rate according to your DAC’s capabilities.
Configure the “Filters,” “Dither,” and “Modulators” sections based on your preferences and DAC’s capabilities. You may need to experiment with different settings to find the best sound quality for your system.
Click “OK” to save your settings.
Test and optimize:
Now that you’ve set up Roon, HQPlayer, and your NAA-supported DAC, play some music through Roon and make sure everything is working correctly.
If you experience any issues, double-check your settings in Roon, HQPlayer, and your DAC.
Feel free to experiment with different filters, modulators, and dither settings in HQPlayer to find the best sound quality for your audio system.
Once everything is set up and working correctly, you should have an optimized audio experience with Roon, HQPlayer, and your NAA-supported DAC.
Yes, that’s the purpose. It replaces the computed fingerprint with a hardware device. The associated license key file works on any hardware where the dongle is plugged in without need to further key file updates. So it is good for people who like to frequently modify their hardware.
If the hardware doesn’t change, or changes infrequently (for example once per year), the traditional key file with fingerprint is cheaper and more practical.
Hi
I stream Roon from a Roon NUC server to iFi Zen Stream connected to Hugo2. I also have Ropieee Raspberry Pi with 5" touch screen grouped with the iFi Zen Stream and used only to visualize Roon album art and control the media.
I want to install HQplayer on my Roon NUC server.
Can I Group HQplayer music to both my iFi Zen stream (HQplayer support) and Ropieee Raspberry Pi (HQplayer NAA suport) at the same time? (I want at least to visualize the album art as well as use the touch screen for control).
Is it recommended to install HaQplayer server on the same Roon NUC machine?
I know nothing about Ropieee, so no comments on that particular one.
But you can run HQPlayer Client for example on Ubuntu Desktop 22.04 LTS on RPi4 to control HQPlayer. Please note that when using Roon as a source, HQPlayer doesn’t get any metadata. But you can still control filters, etc from the HQPlayer Client. And you can of course get full metadata, etc when playing with HQPlayer natively from local library or Qobuz.
Hi @jussi_laako, I have my Roon Core/Server on an Intel i7 Nuc going over my network to a Lyngdof TDAI-1120.
I loaded HQPlayer desktop and Mac OS NAA to my M1 MacBook Air.
I created a HQP zone in Roon using the IP address of my MacBook.
I entered the IP address of my Roon Server into the URL field in HQP desktop.
When I play a track in Roon, “Roon” shows in the description of wha’t playing in HQPlayer but no sound. Roon shows the track is playing in the HQP zone.
I have both input and output as NAA in HQP Preferences.
I’m trying to stream over my network wirelessly from Roon > HQP > Lyngdorf
I’m not even sure this playback architecture is appropriate. Can you advise? Maybe I’m missing a setup step on the Mac itself?
Have you set your Lyngdorf as output device in HQPlayer? But I doubt it supports HQPlayer NAA protocol. Thus you would need to use S/PDIF from some compatible NAA/DDC, such as Holo Red.
I think you’re probably correct regarding the lack of NAA support on the Lyngdorf. Where would that setting be made in HQP? I didn’t see anything obvious in preferences regarding an output device.