WOW! What did I do???!!! I created a thread that spiraled into a great conversation about security. I love it! I’m glad to hear others are running complex networks in their homes. Heaven help my wife if something happens to me. She’s going to need to power everything off and just use the ISP router. LOL
Anyway - I got everything working! 
As it turns out, it was a configuration issue on the Palo Alto Networks firewall.
First - I tried building an Ubuntu Server and installing Roon Server - it made no difference. The behavior was exactly the same as the ROCK (Intel NUC). Any time I launched the Roon client, it was unable to detect the presence of the ROCK (or Roon Server on Ubuntu) that’s on my other VLAN.
I tried building a router running VyOS (Vyatta router) as it’s a great software-based router and supports IGMP + PIM, but decided to abandon that effort because I had a funny feeling I did something wrong on the Palo Alto Networks firewall. I figured it would be a better investment of my time to figure out what was broken, rather than waste time trying to set up a VyOS router, then go to fix my firewall. That was the right move…IMHO.
There were two separate issues:
- Multicast routing was missing some options
- A security policy needed to be added to allow traffic from the security zone where the ROCK lives to the security zone where the Roon Client(s) live
The initial design goal was as follows:
Place the Roon Core/ROCK in an IoT security zone (separate IP subnet/VLAN) from where Roon clients exist. The firewall rules/security policy should only allow traffic to originate from the zone containing Roon clients TO the zone containing Roon Core/ROCK.
Remember - stateful firewalls only require a security rule to allow traffic in one direction. The response from the server is expected and stateful firewalls will automatically allow the return traffic.
All of the following examples are from a Palo Alto Networks firewall running PAN-OS 10.0.3. This should also be possible with any version of PAN-OS starting with 8.1.0 but your menus may look different. When in doubt, refer to the Palo Alto Networks TechDocs for your version of PAN-OS.
The original configuration was set as follows:
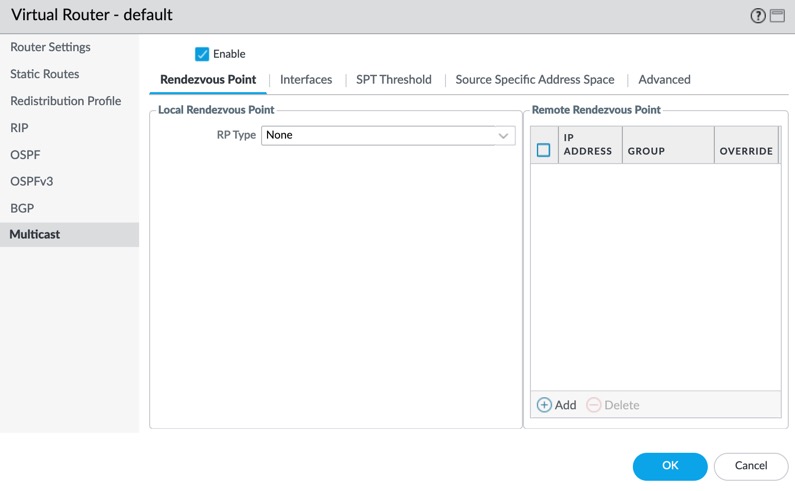
Under Network -> Virtual Routers -> ‘default’ (or whatever your Virtual Router is named)
Select Multicast
I had Multicast enabled, but I did not have anything selected under Local Rendzvous Point -> RP Type
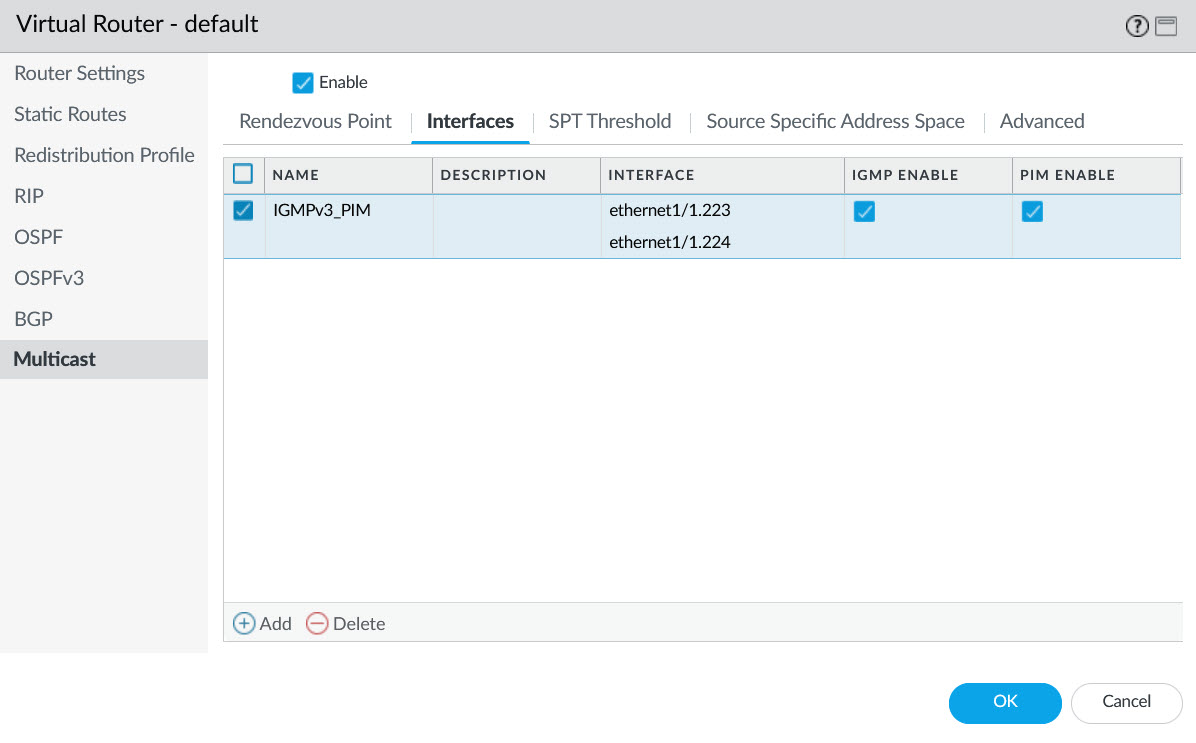
On the Interfaces tab, I added an entry called “IGMPv3_PIM” and checked to ensure that IGMP Enable and PIM Enable were both checked (this was done correctly)
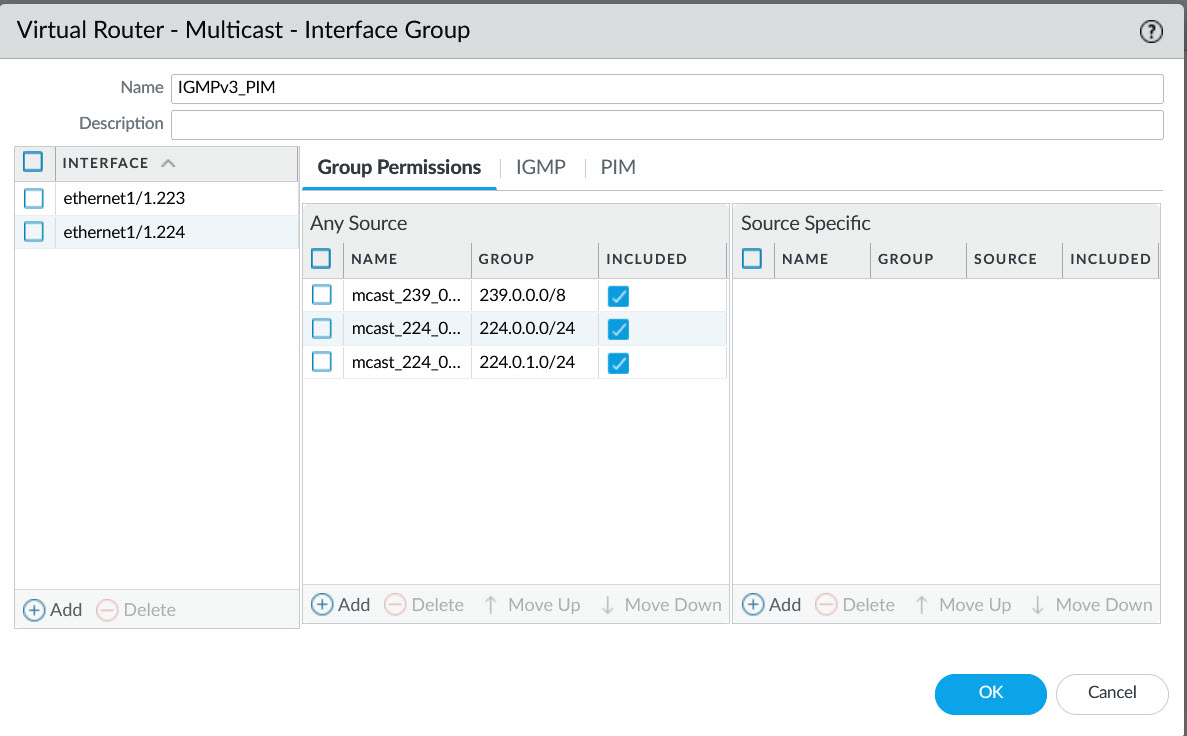
Within the ‘IGMPv3_PIM’ option, I added both network interfaces (ethernet1/1.223 is in the zone where the ROCK is installed & ethernet1/1.224 is where the clients are - they are in SEPARATE security zones). I also added three multicast networks - 239.0.0.0/8, 224.0.0.0/24, and 224.0.1.0/24). It looks like having 224.0.0.0/24 and 224.0.1.0/24 were incorrect/unnecessary (especially in the case of Roon as the Roon multicast network falls within 239.0.0.0/8). The other two multicast networks were intended to support other applications. (PARTIALLY correct).
I also had a security rule that allowed ANY traffic from both security zones to the special reserved ‘multicast’ security zone. Even that was insufficient as another security rule was required to allow the ROCK to initiate connections back to the Roon clients.
NOTE: I provided the previous steps to document what I had earlier that was NOT working. Now…on to how I fixed everything…
For reference purposes:
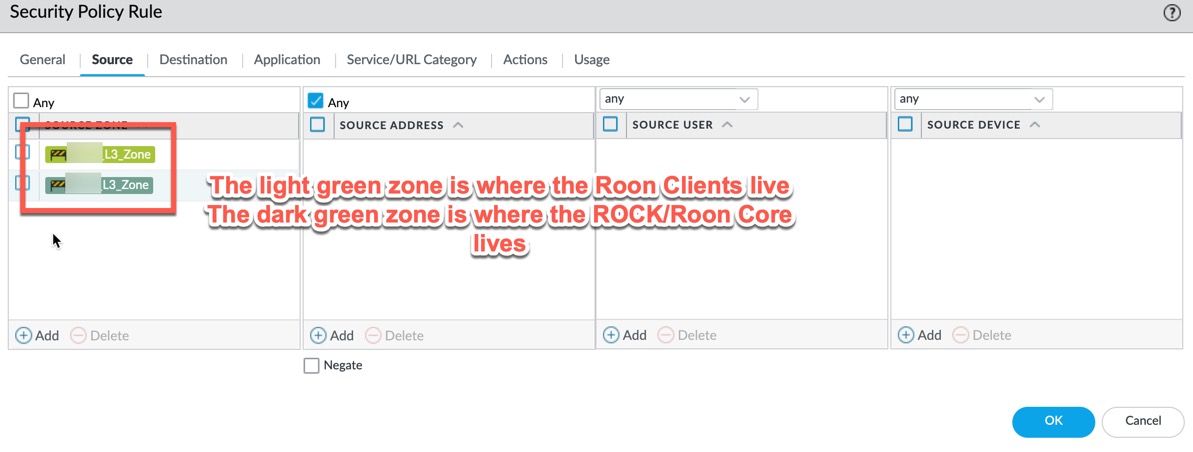
Trust_Zone: this security zone contains interface ethernet1/1.224 and is where the Roon Clients live
IoT_Zone: this security zone contains interface ethernet1/1.223 and is where the ROCK lives (as well as other IoT devices)
-
Deleted all of the previously mentioned Multicast configuration from the Virtual Router & removed the Security Rule allowing traffic from the Trust_Zone and IoT_Zone to the ‘multicast’ zone (a special zone that is pre-defined in PAN-OS - DO NOT attempt to create a zone called ‘multicast’)
-
Committed changes - then ran the following commands from the CLI to ensure that all multicast routing entries were removed
show routing multicast fib
show routing multicast route
show routing multicast pim state
-
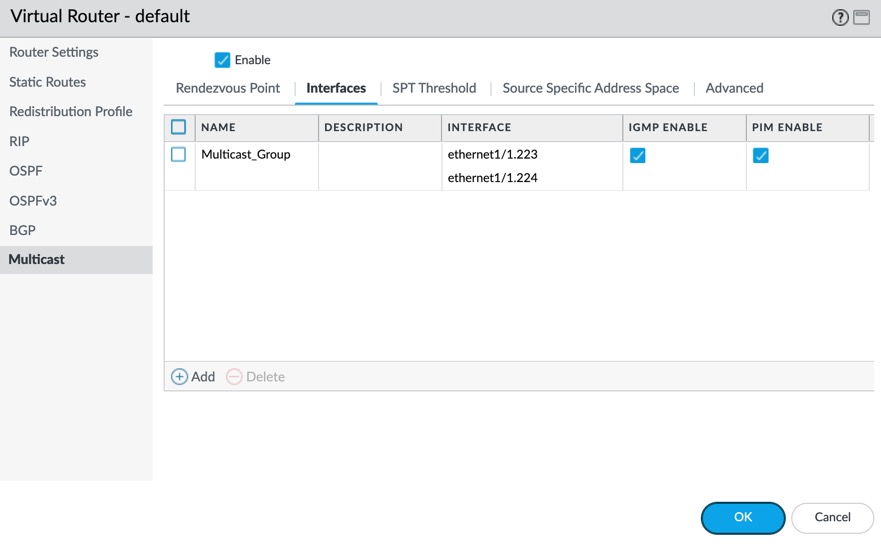
Navigate to Network -> Virtual Routers -> ‘default’ (or whatever your Virtual Router is named) - ensure that both interfaces containing the Roon Clients and ROCK/Roon Core are added to the Virtual Router
-
Select the Multicast tab
-
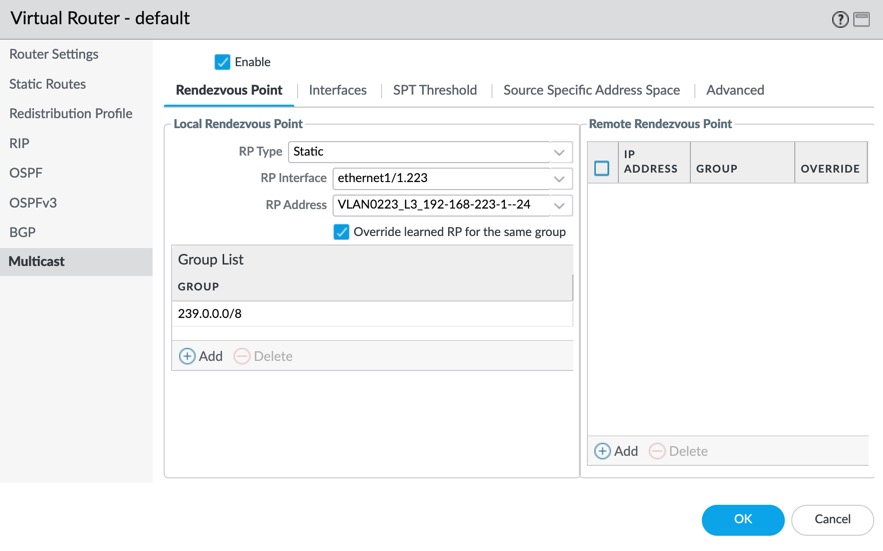
Check the box to enable Multicast & choose ‘Static’ for ‘RP Type’ under Local Rendezvous Point, select one of the interfaces for the RP Interface (I chose ethernet1/1.223 which is the interface where the ROCK/Roon Core lives), then select the IP address for that interface which should be automatically populated when you click the drop-down select. Mine is an Address Object that I used to specify the IPv4 address on the Interface object (VLAN0223_L3_192-168-223-1–24 which equates to 192.168.223.1/24). Lastly, add 239.0.0.0/8 to the Group List
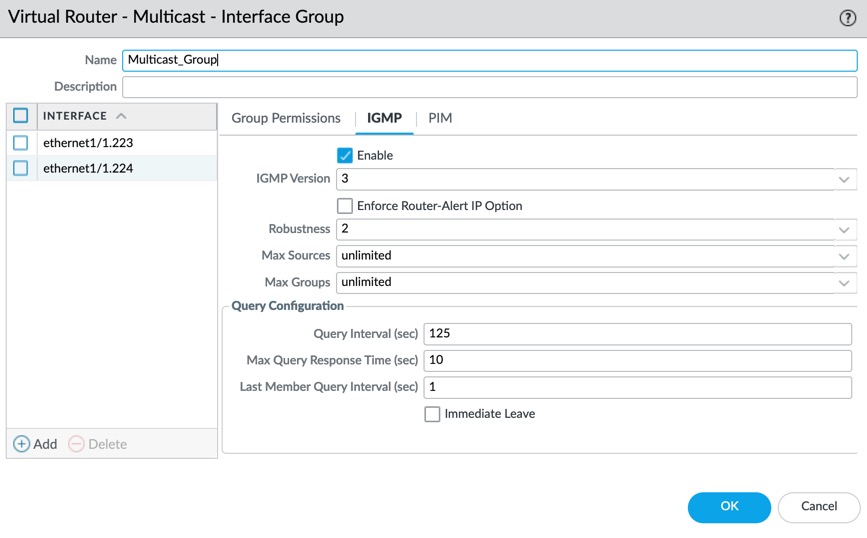
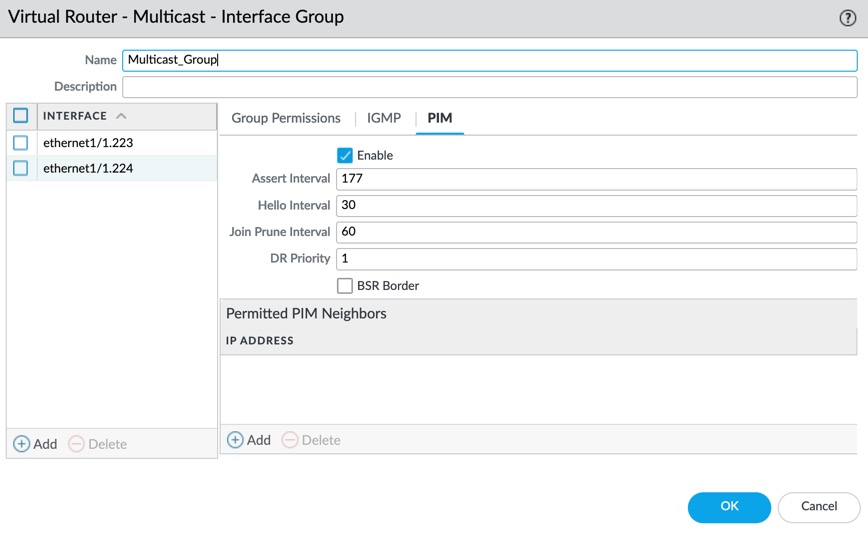
- Select the Interfaces tab and click Add. Provide a name (mine is ‘Multicast_Group’), add the two interfaces representing where the clients and servers live. Don’t add anything to either of the columns in the Group Permissions section
- Select the IGMP tab and make sure that the Enabled checkbox is selected
- Select the PIM tab and make sure that the Enabled checkbox is selected - then click OK to save that configuration
-
Click OK again to save the changes you made to the Virtual Router
-
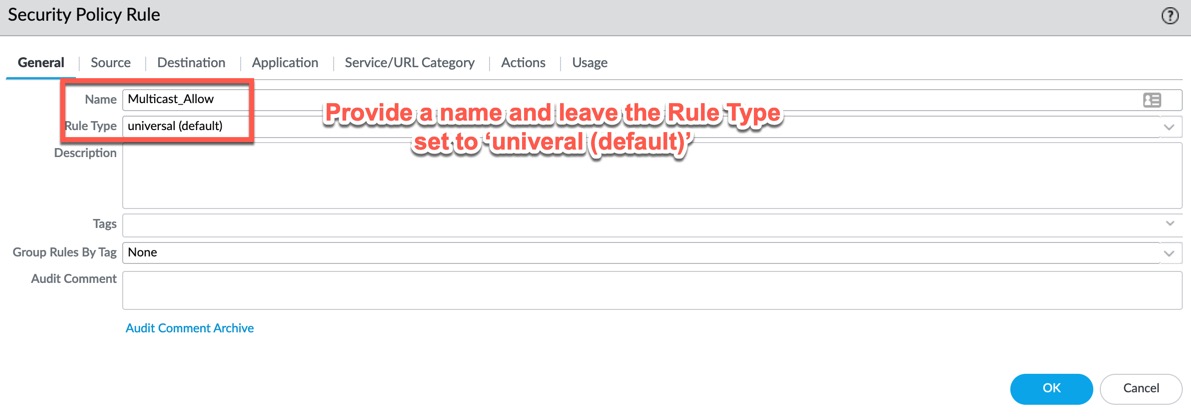
Navigate to the Policies tab -> Security & add a new rule - provide a name (mine is ‘Multicast_Allow’). Leave the Rule Type set as ‘universal (default)’.
- On the Source tab, add the Security Zones containing both the Roon Clients and ROCK/Roon Core - leave the Source Address set to ‘Any’
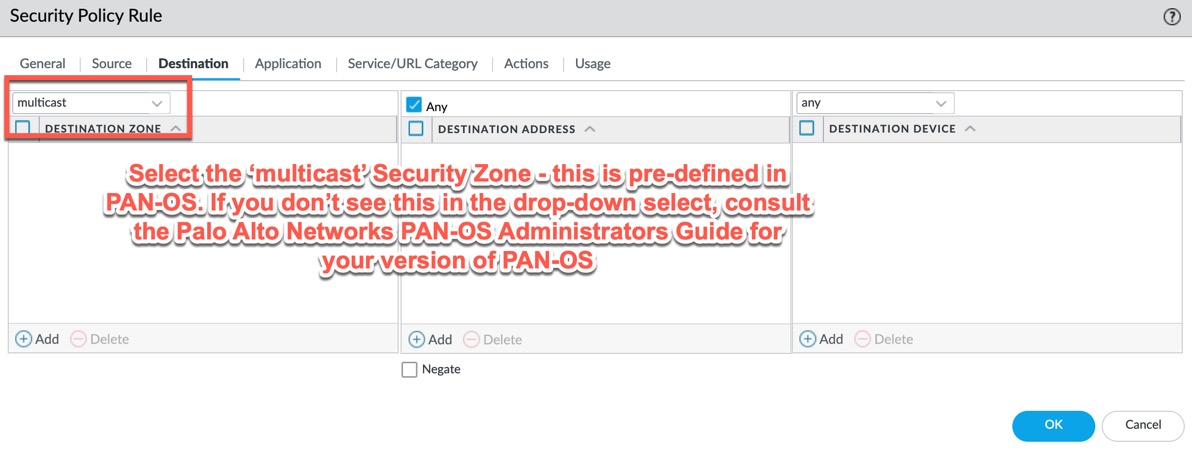
- On the Destination tab, select ‘multicast’ from the drop-down select above Destination Zone. Leave Destination Address set to Any
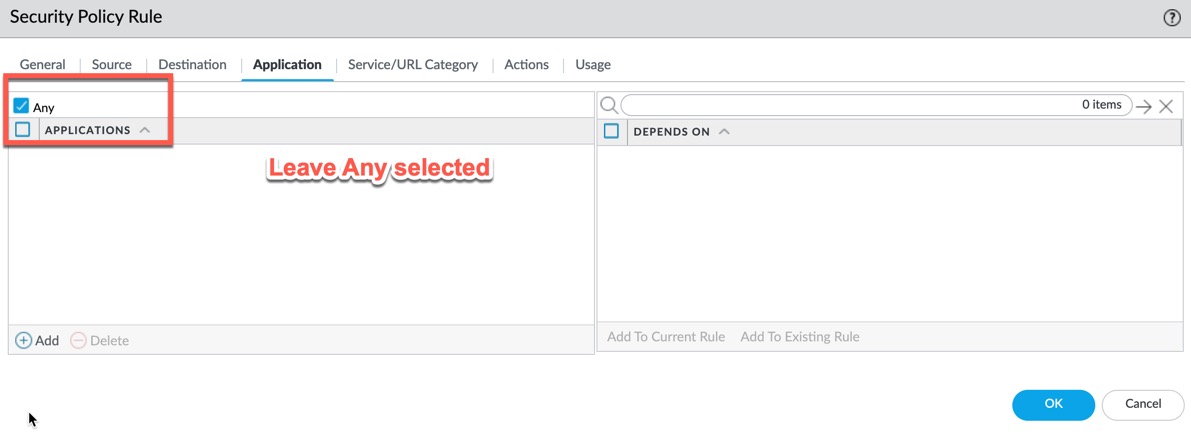
- On the Application tab, leave the Applications set to Any
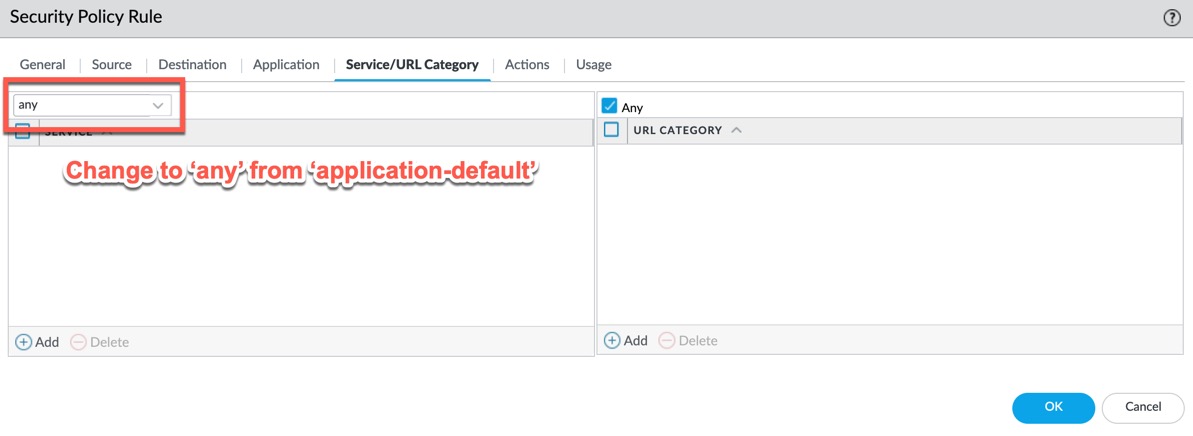
- On the Service/URL Category tab, change the drop-down select from ‘application-default’ to ‘any’ (the ‘application-default’ option performs additional protocol validation on traffic processed against the rule. If PAN-OS sees traffic it doesn’t recognize, or traffic on a non-standard port, it will be rejected/dropped. Leaving this set to ‘any’ will ensure that any proprietary applications or applications not recogized by PAN-OS are permitted)
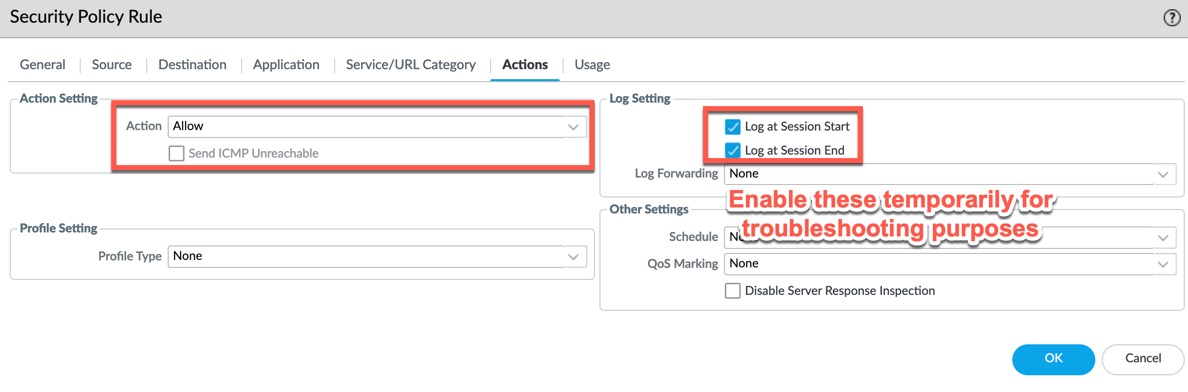
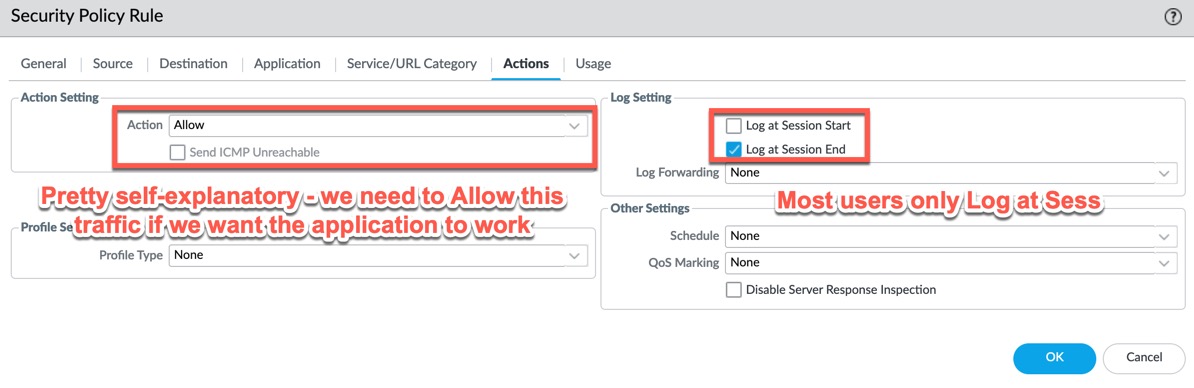
- On the Actions tab, set Action Setting to Allow. You can choose Log at Session Start and/or Log at Sesson End temporarily while troubleshooting, but you probably don’t want all of the multicast traffic polluting your logs. That is your decision. I do not log multicast traffic.
-
Commit your changes to apply the Multicast and Security Policy modifications
-
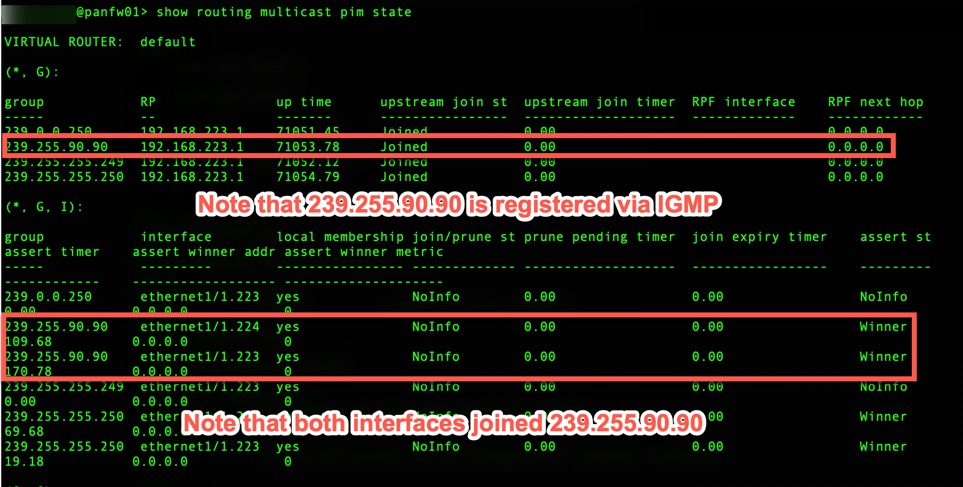
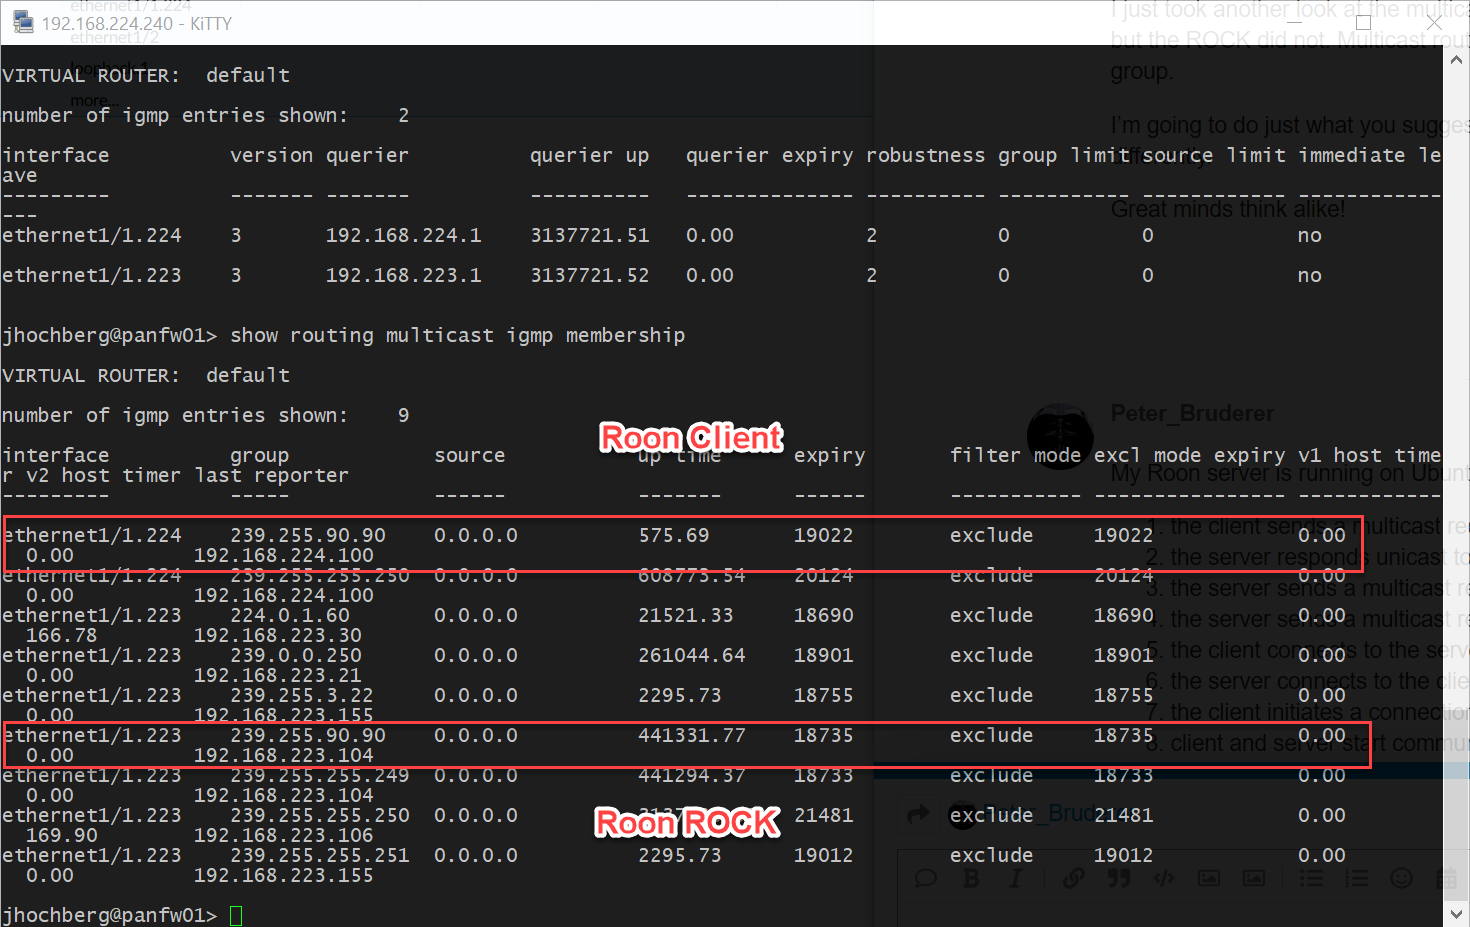
Make sure that ROCK/Roon Core and a Roon Client are running on their respective networks - otherwise you won’t see the following networks registered!!! Open an SSH session and run ‘show routing multicast pim state’
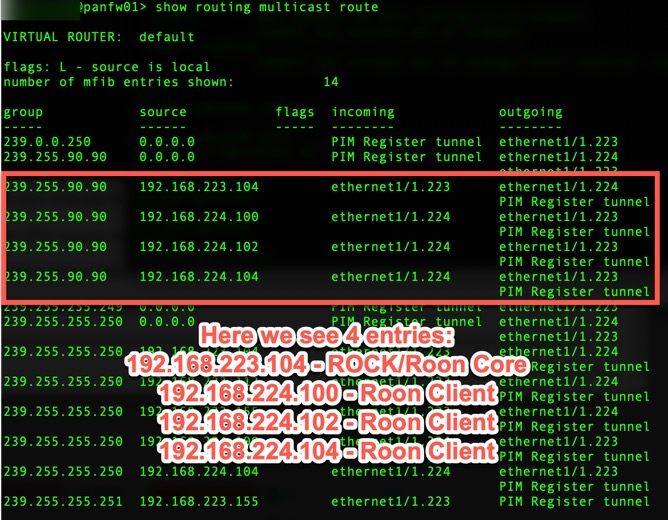
- Run ‘show routing multicast route’
- Run ‘show routing multicast fib’
NOW - all is still NOT GOOD!!! The client will still NOT see the server! Why?
Let’s look at the logs - navigate to Monitor -> Traffic log
Here we see traffic from the ROCK to one of the Roon Clients dropping on the interzone-default security rule. NOTE - the intrazone-default and interzone-default rules have logging DISABLED BY DEFAULT! You need to enable logging if you want to see what the firewall is dropping. Use the Override button to accomplish this (refer to the Palo Alto Networks TechDocs for more details - https://docs.paloaltonetworks.com/pan-os/10-0/pan-os-web-interface-help/policies/policies-security/overriding-or-reverting-a-security-policy-rule.html)
This tells us that the ROCK needs to be able to initiate a connection back to the Roon Clients as opposed to the Roon Client only being allowed to connect to the ROCK. I’m not sure why this is, but it is. This requires we create a security rule to allow traffic from the ROCK/Roon Core to the Security Zone containing the Roon Clients. Once you’ve monitored your logs for a while, you can restrict the traffic down to only the ports required.
This somewhat breaks the overall goal of the design as we’re trying to ensure that NOTHING in the IoT zone is allowed to connect to devices in the trusted network. If the Roon Core were to become compromised, an attacker would be able to connect to devices in the trust network. The only option here is to restrict the attack surface as much as possible.
-
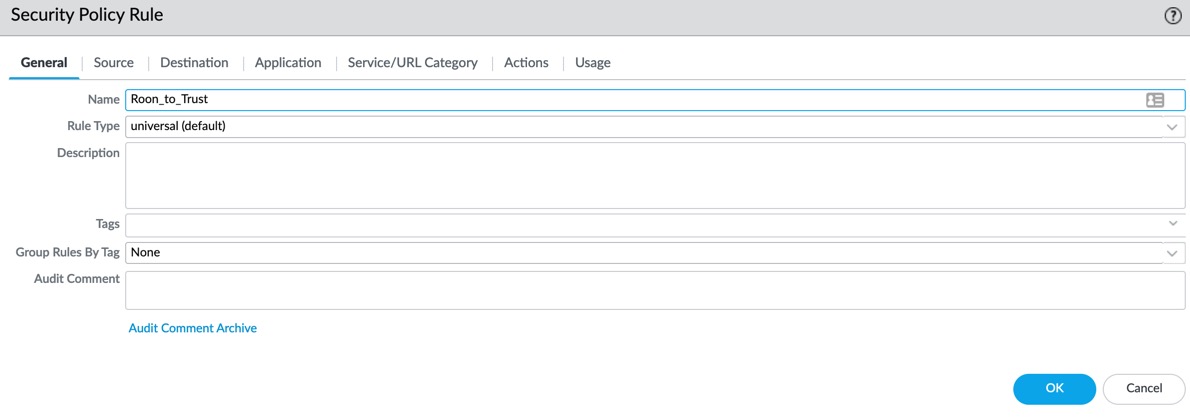
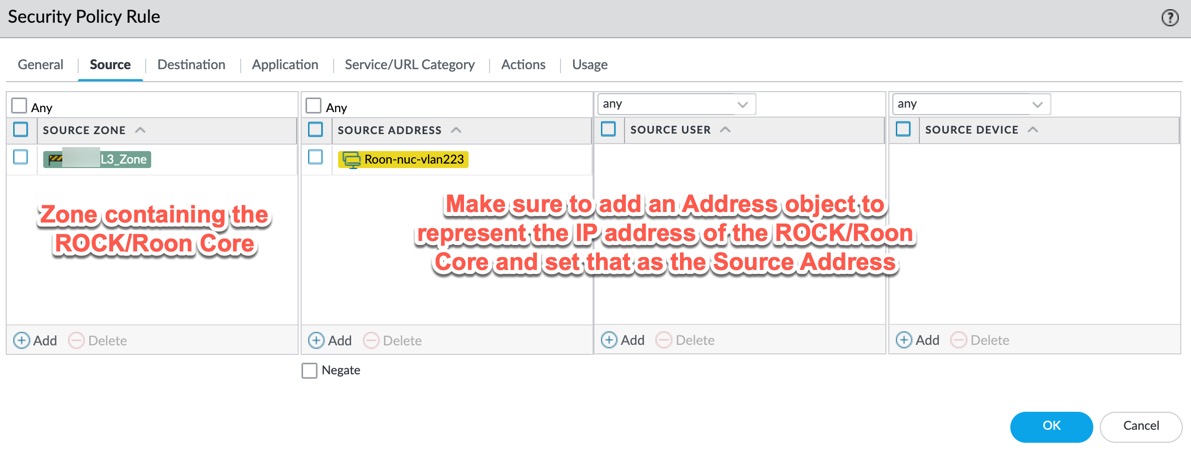
Navigate to Policies -> Security and Add a new rule
-
Specify a name - in my example I use ‘Roon_to_Trust’ and leave the Rule Type as ‘univeral (default)’
- On the Source tab, specify the Security Zone where the ROCK/Roon Core lives and select the Address object that represents the ROCK/Roon Core in the Source Address field
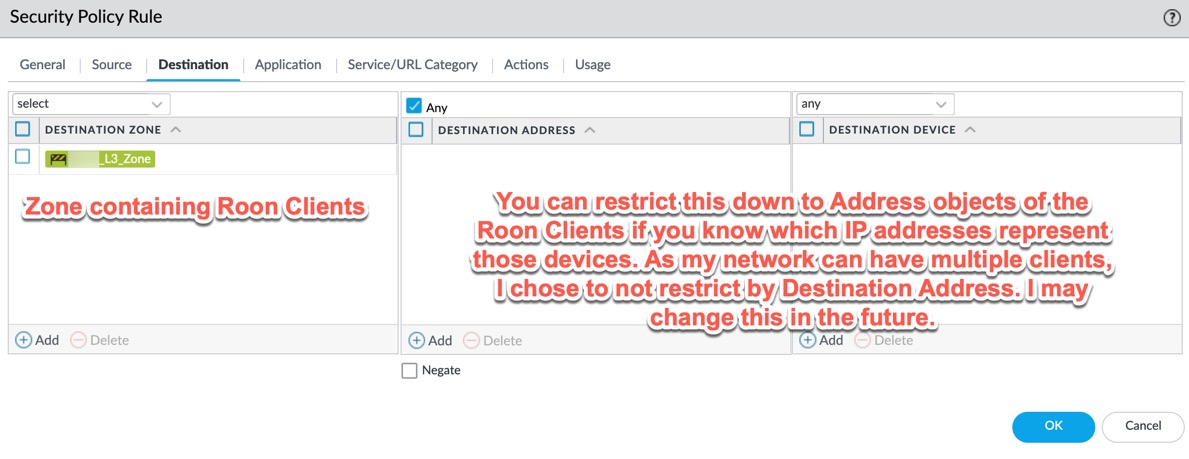
- On the Destination tab, specify the Security Zone where the Roon Clients live - you can restrict the Destination Address if you know which IP address(es) will be running the Roon Client - I left mine set to ‘Any’
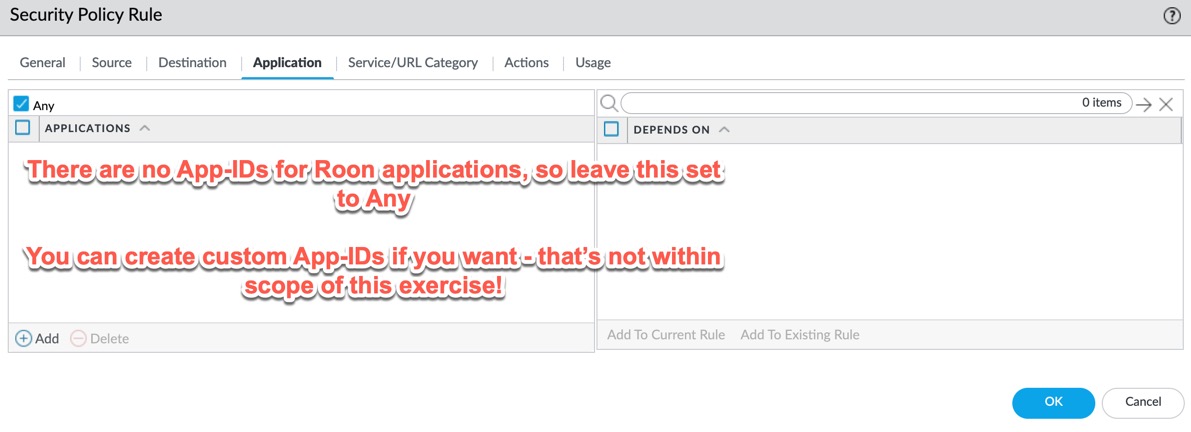
- On the Application tab, leave it set to ‘Any’ as ther aer no App-IDs for the Roon protocols - you can create App-IDs if you want but that is not within the scope of this documentation
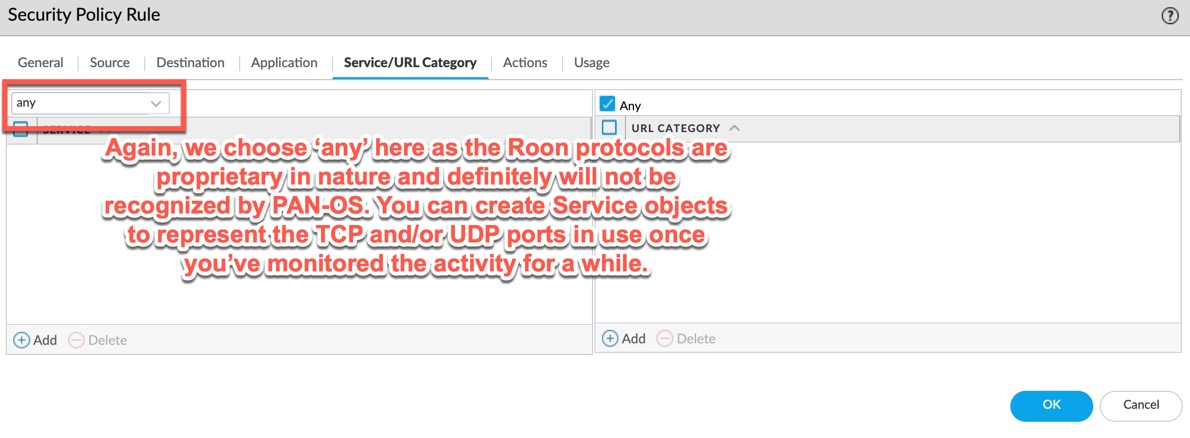
- On the Service/URL Category tab, change ‘application-default’ to ‘any’ as the Roon protocols are proprietary. PAN-OS will likely drop the traffic as it doesn’t recognize it. You can create Service objects for the layer 4 TCP/UDP services if you want, but that’s up to you. It is recommended that you do that - monitor the logs for a while to make sure you know which protocols/ports are used or refer to the Roon documentation
- On the Actions tab, set the action to Allow and Log at Session End
- Click OK, then Commit your changes
Go back to the Roon Client and see if it connects. BINGO! It works!!! MISSION ACCOMPLISHED!
*** Note that the ROCK is set to obtain its IP address via DHCP, but I have a DHCP reservation set for 192.168.223.104 for the MAC address of the Ethernet adapter in my Intel NUC. That way, I know the IP address will always be the same.
 It’s really designed to live in a single broadcast domain. Doing much different is either going to be a headache or remove enough security to question why you’ve got two domains anyway. At least, that’s my opinion on it after watching this debate and looking at various configs for a while.