Ubuntu Roon server install tips

Thanks so much, Martin.

NUC arrives in the next week so quite excited to get going!

1 Like

My NUC is scheduled to arrive in the next hours and I’m excited to start getting my teeth into this and getting it set up.

One thing I’m still a bit unsure about is if/how I specify which disc/drive Ubuntu Server, and Roon Server install themselves on.

My NUC will have a 250GB M.2 drive, and a 2.5" SSD…

I know my music files should be stored on the 2.5" SSD, but unsure about where the Ubuntu and Roon should sit.

It may all just work using the above instructions, but as it’s something I don’t understand thought better to ask than not.

Any advice appreciated.

The OS and Roon will be installed on the 250GB M.2 drive. The SSD will be solely for data and can be mounted to /media or any other valid path, e.g. ~/Music (where ~ is your home folder.)

I suggest you install the SSD after the basic install is complete (after a sudo shutdown -h now.) This will make the install so much easier for you.

I’ll provide you with the steps to format and mount the drive afterward. I also expect you will want to share the drive using Samba so you can copy new files across your network.

1 Like

Once more - thank you very much Martin.

The NUC will be coming ready built, so I assume the SSD will already physically be in there - but not sure if it will be installed or not (?)

If it is already installed leave it that way. You’ll just have to be alert at step 8. Partitioning when you select the disk. In the second image two drives will be listed, so make sure you select the 250GB one!

@Martin_Webster (or anyone else with some thoughts) Great info here but I’m kinda stuck and could use some words of encouragement on this, lol. I created this thread a few days ago for ref.

So I have 20.04.2 LTS server installed, core installed etc. However, this has been a bit long in the tooth to be honest. I’m basically building this up as a dry run / get it working and sort of planned on doing it all over again - I like to learn this stuff and don’t want to give up, but it is really time-consuming googling every command since I keep hitting road blocks. Which is how you learn I get it, but….

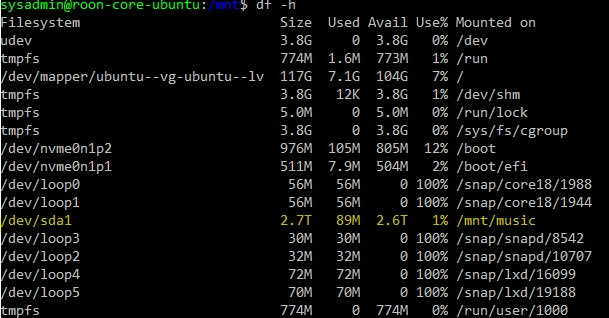
I threw in a second disk as I wait for my new one to be delivered. I wanted to mimic the steps I would need to perform a format, partition, mount, edit the fstab file and put in the unique ID to auto mount etc…and eventually copy all the data from my NAS to this drive. I’m kinda stuck on this secondary drive setup and how to access it and share it. Best I can surmise is that in this enviro, ubuntu creates a pointer to the drive via a folder you specify in the fstab file (Unlike Win where you access the drive directly). I created a folder called music in my “/mnt$” profile. .

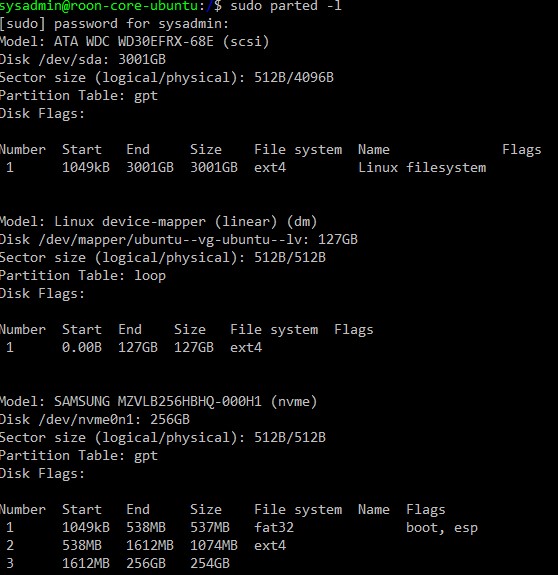
So I ran through numerous exercises to create a partition + format. This is what I have and the "/dev/sda” is the drive in question (temporary/test until new one arrives), assuming everything else is as it should. I took the defaults during install for LV, maybe one partition for the system drive would be better for me? Anyway, I can rebuild all of this again, so it doesn’t matter if I hack it up.

I did install using Martin’s excellent detailed steps initially, but the system would never get past the bios, and just hung there. I read somewhere that it may be due to UEFI. Anyway, I then just reinstalled using ubuntu server following the roon linux setup.

ubuntu disk2

Hello @Swisstrips! From the screenshot it would seem that you have decided to mount the new drive to /mnt/music.

This is probably the way to go although I’d mount the drive to /media. [My setup uses LVM for the system drive (SSD) which has partitioned for /boot, /boot/efi, / (root) etc. and ZFS for my data volumes (spinning disk.)] For my CCTV I added a separate drive as follows.

First step is to correctly identify the drive.

sudo lshw -C disk

Warning: The consequences of misidentifying the drive may be catastophic and result in data loss!

Partition the drive.

sudo fdisk /dev/sda

Enter p to display the partition table. Use d to delete existing partitions and c to create a new partition, e.g.

Command (m for help): n
Partition type
   p   primary (0 primary, 0 extended, 4 free)
   e   extended (container for logical partitions)
Select (default p): 

Just go with the defaults for whole disk. Press w to write the changes.

Now assuming your drive is currenlty identified as /dev/sda go ahead and format it.

sudo mkfs -t ext4 /dev/sda1

Now create mount point.

sudo mkdir /media/music

Now you want to ensure the drive is mounted at boot. So let’s list the drives by UUID:

ls -Flai /dev/disk/by-uuid/

For /dev/sda1 copy the disk ID. Now edit /etc/fstab and add the following line (replacing the ID with your one.)

sudo nano /etc/fstab

# SATA drive for music
# /media/music was on /dev/sda1
UUID=4b8be667-e62f-4754-85d7-7c80a282dce5 /media/music ext4 nosuid,nodev,nofail 0 0

Finally, mount the drive.

sudo mount -a

That’s all.

2 Likes

Hi @Martin_Webster, thank you for taking the time to respond, appreciated.

I follow most of what you suggested. One last :slight_smile: question about sharing, so I can access this new drive (music folder) from Win, NAS. CIFS and SMB are installed but any tips, suggestions on getting that music root share and permissions applied?

Regards

1 Like

Yes, you can share the drive. Do you have Samba installed already?

Yep, both CIFS and Samba, I assume sharing this is the proper thing to do for a number of reasons.

Okay, so all you need to do is create the share. But first, you’ll need to think about file permissions and who can access the ‘music’ drive.

You’ll probably want to own the filesystem, so type the following.

sudo chown swisstrips:swisstrips /media/music or sudo chown -R swisstrips:swisstrips /media/music if you’ve already added some files/ .folders.

Now if you want to create a share for your sole use then this should work; you’ll need to add your login/ password to your PC/ Mac keychain.

[music]
  path = /media/music
  valid users = @swisstrips
  browsable = yes
  read only = yes
  guest ok = no

If you want to provide guest acces then this will probably do it.

[music]
  path = /media/music
  browseable = yes
  read only = yes
  guest ok = yes

And if you want read/ write access then use writable = yes and read only = no in the blocks.

Finally, restart Samba.

sudo systemctl restart smbd && sudo systemctl restart nmbd

Thank you.

1 Like

Just for clarification, will running the apt-get update / apt-get upgrade commands on Ubuntu server update the Roon core package build or is this only done from the GUI controller side of things (e.g. in settings > about > build update)?

No… Roon is not installed or updated by the Ubuntu package manager.

This is the way I have always done it for my server running on Ubuntu.

Thanks. Just getting used to this enviro.

New server is built up, entire library copied local and ready to migrate shortly! Hoping I have everything configured properly :pray:

Not sure how to approach this, but according to the official migration steps, both cores have to be on the same/latest release.

Review:

  • I built up a new ubuntu server within the last week, core 1.7 build 710 installed, all local library files copied from NAS to this new server on secondary internal HD
  • new sever has never been connected to from a roon client
  • my production core server is win10 1.7 build 571

I am wanting to migrate / cut over to new server and decommission win10 server. I have current back up of win10 1.7 core.

Do I

  1. update win10 core and client to latest 1.8 build. Then perform/force a manual backup
  2. “re-run” the roon server install script on new server to updated it to latest 1.8 build
  3. follow migration steps

Any thoughts guidance would be greatly appreciated.

I would do it as you lay out in your post, as the database structure has changed from 1.7 to 1.8. So yes, better to update your old Roon core to 1.8, then back up the database (to at least two different locations or two devices), and restore the database backup into the new 1.8 core instance.

OK. To clarify, to update the Linux core as it is right now, just run re-run the roon install script (safe to do so)?

sudo ./roonserver-installer-linuxx64.sh

I think you can try to connect with a 1.8 Remote to the 1.7 core on your Linux box, and the Remote will give you the option to upgrade the Server on Linux…

All you need to do is go to Settings > About and load up the new version there.