What’s happening?
· Other
How can we help?
· None of the above
Other options
· Other
Describe the issue
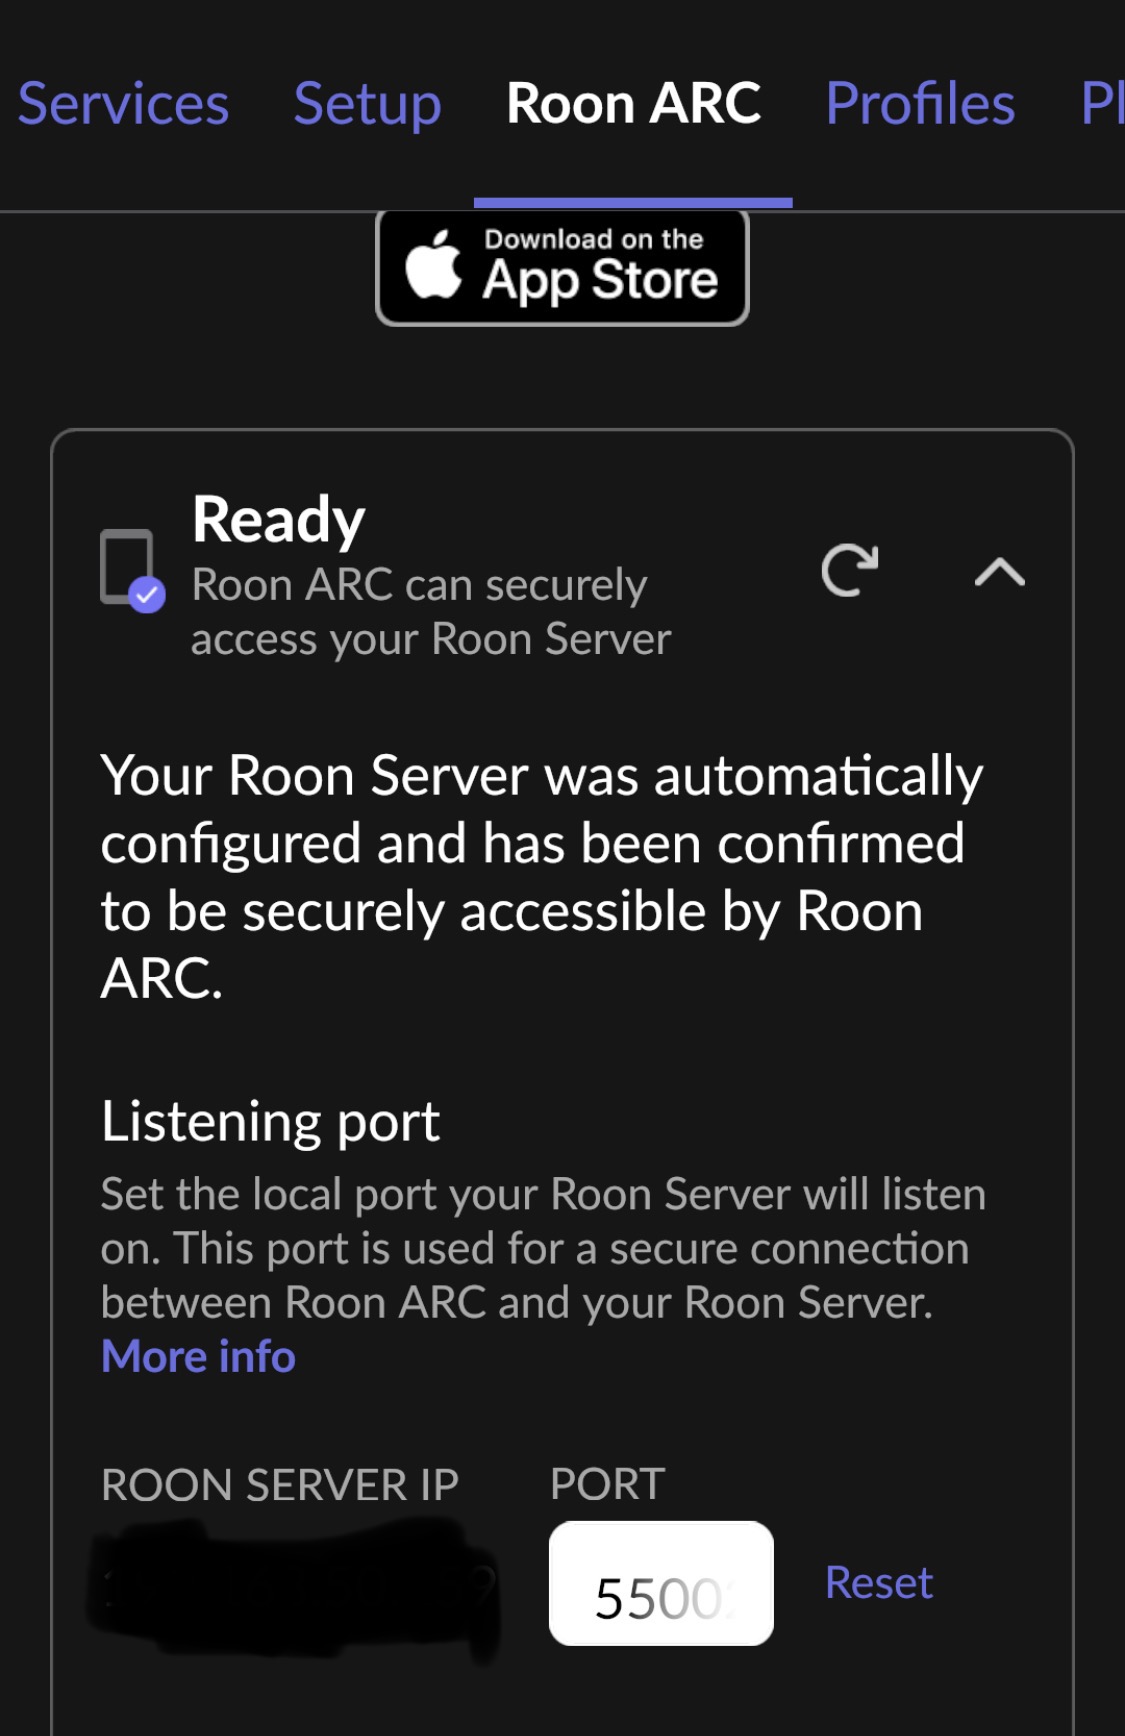
Roon ARC port forwarding
Describe your network setup
Asus XT9 Main Router with LUMOS ISP Modem/Router
· Other
· None of the above
· Other
Roon ARC port forwarding
Asus XT9 Main Router with LUMOS ISP Modem/Router
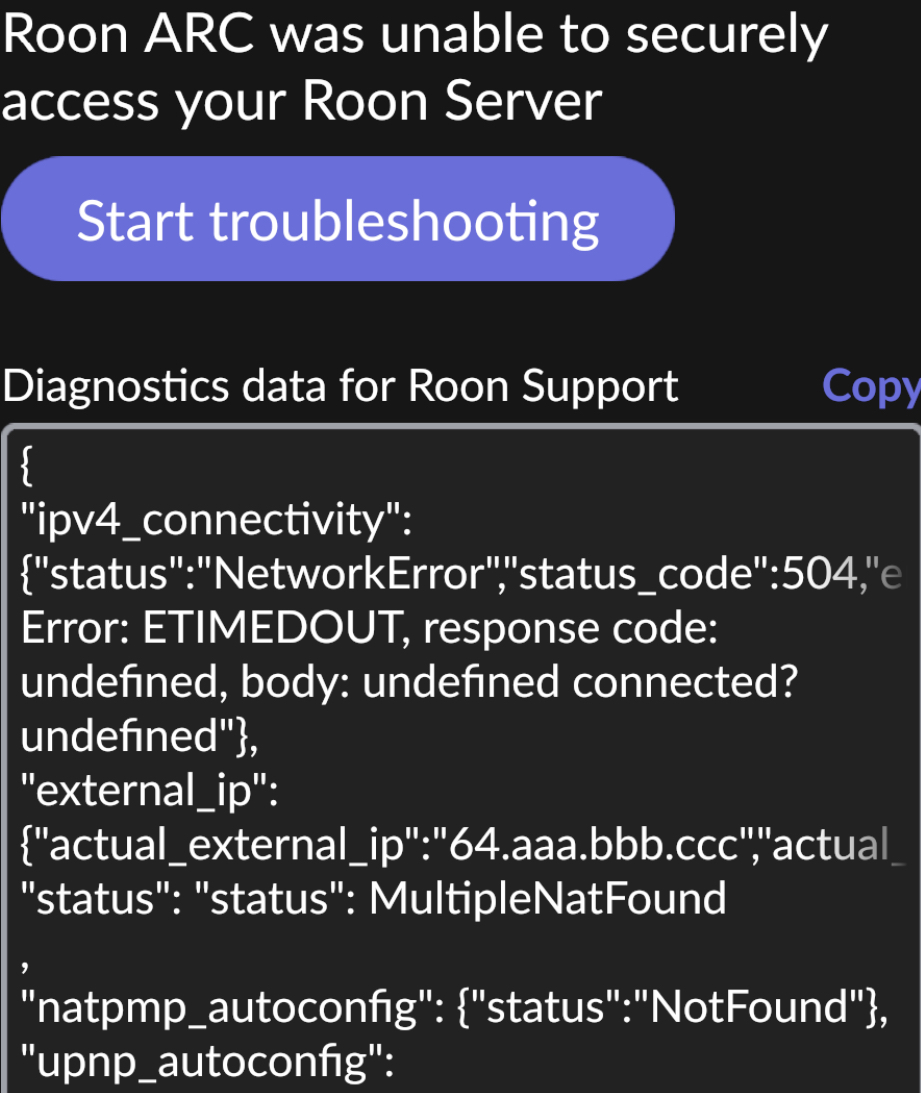
The ‘MultipleNatFound’ part of the diagnotic data displayed above means one (or both) of two things:
The first issue definitely relates to your situation with the ASUS XT9 as well as the LUMOS Moden/Router. However, fixing this (I’ll describe how below) will not fix the issue if the second also applies to your situation.
The second is largely out of your control although some ISPs that use CG-NAT will supply a proper public ip address (often static) that supports port forwarding at an additional cost. It might be worth asking your ISP if they can supply a public ip address that supports port forwarding.
Assuming that the multiple router issue is the only issue that you have (your ISP does not use CG-NAT), then there are four possible solutions - one of which will work even if the ISP does use CG-NAT.
If the LUMOS ISP router supports it, put it into ‘bridge mode’ or ‘modem only mode’. This will prevent it from providing router services (NAT, DHCP etc). This will not work is your ISP is using CG-NAT.
Put the ASUS XT9 into ‘access point’ mode. Don’t do this in addition to the step described in (1) above. This means that the XT9 will work simply as an ethernet to WiFi bridge and will not offer router services. This will not work is your ISP is using CG-NAT.
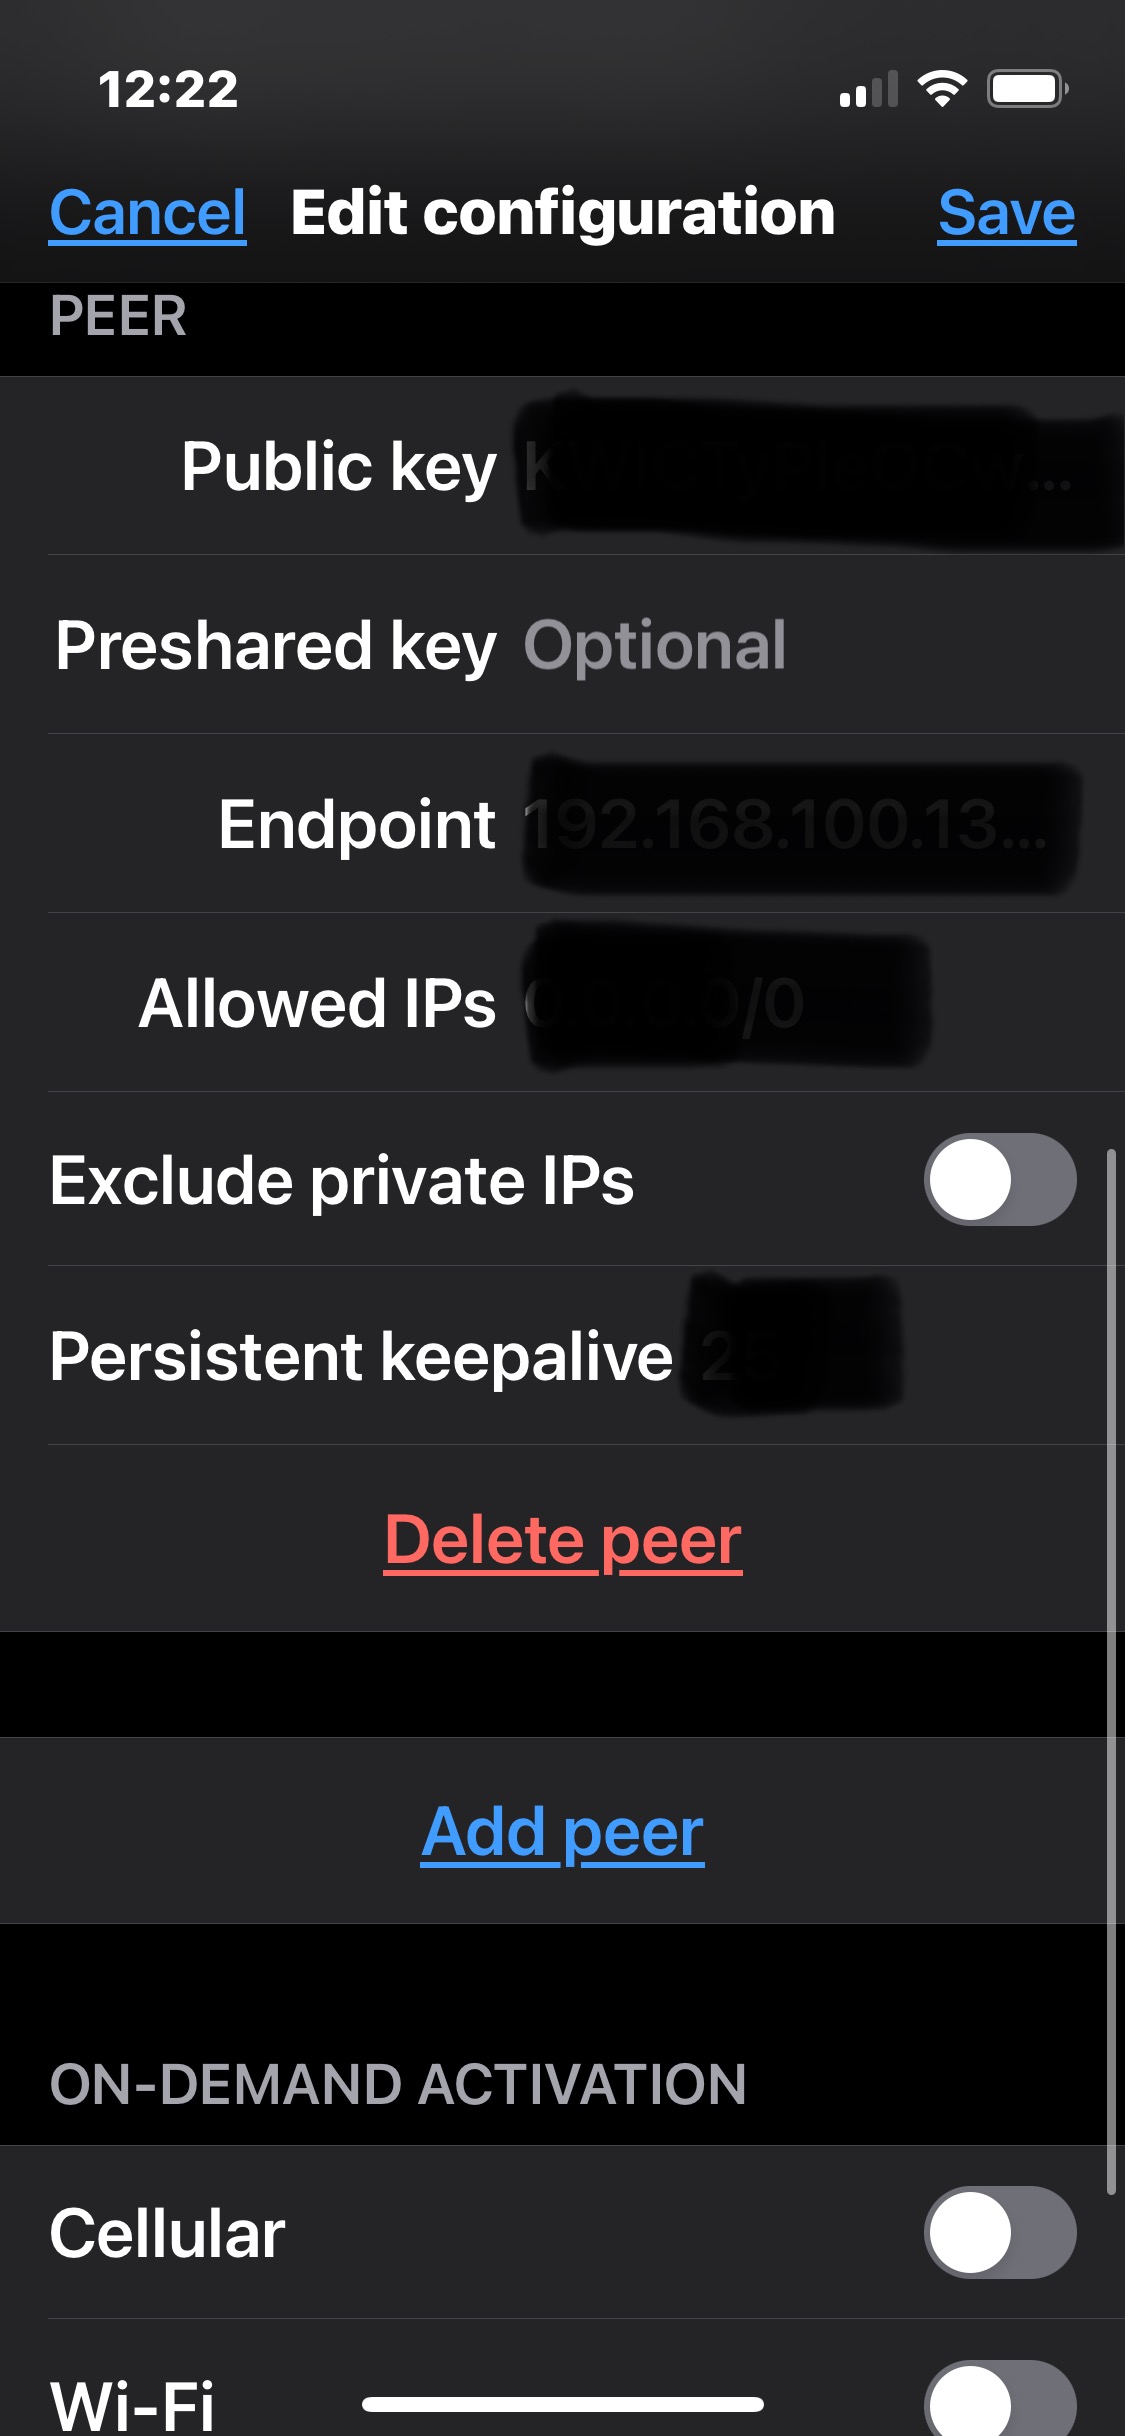
Setup double port forwarding. This will not work is your ISP is using CG-NAT. To proceed with this method:
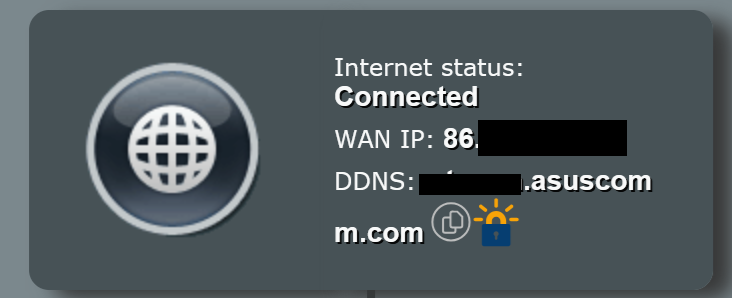
3.1. On the LUMOS Modem/Router set up a port forwarding rule to forward TCP connection on the ARC port (displayed on the Roon ARC settings page from which you have supplied a screen shot) to the WAN side ip address of the Asus XT9. I’m not familiar with the XT9 router but the ASUS routers that I have used, on the main page (after logging in), I see the WAN ip address as below:
Use Tailscale. This is the only solution that will work in the presence of CG-NAT. The link supplied links to a page which describes in general terms how to set up tailscale but be sure to follow the links to the installation instructions appropriate to your Roon Server Platform. The only Roon Servers that can not have Tailscale installed directly upon them (and for which there consequently are no specific installation instructions) are the original Nucleus, the Nucleus Plus and ROCK installations that use BIOS boot and will thus not upgrade the RoonOS operating system beyond build 259. For this systems, to use Tailscale, you have to set it up on a separate computer (possible a Raspberry Pi or similar) connected by wired ethernet and configure it as a Subnet Router.
Note: Whenever you set up a manual port forwarding rule (for example on either of the routers in solution (3), it is a good idea to also setup (in the same router) a DHCP reservation for the Target device (the Asus router or the Roon Server) such that it always allocates the same ip address. If you don’t do this, then, especially after a period when everything is turned off, the device may be issued a different ip address and then the port forwarding rule will cease to work. The same can be achieved by configuring a static ip address on the device (the XT9 or the Roon Server) but this method can lead to awkward to resolve connectivity issues at a later date if, for example, the subnet (the first three of the four numbers in the local device ip addresses) is changed - which may happen if you install a new router, for example.
Note 2: If you go the solution (2) route, then all your devices will be issued with a new ip address (eventually - you may want to power cycle or otherwise force the device to get a new ip address).
Note 3: With the first two solutions, you will still need to setup port forwarding. In the case of solution 1, the port forwarding will be setup on the ASUS XT9. For Solution 2, it will be setup on the Lumos Modem/Router. The easy way to do this is to enable uPnP on the router but you can also set up a manual port forwarding rule (as in the second part (3.2) of the 3rd solution. Just as with solution 3, if you set up a manual port forwarding rule, you should also configure, on the same router, an DHCP ip address reservation so that the Roon Server ip address does not change.
Note 4: If you adopt any of the first three solutions and you still can’t get port forwarding to work, your ISP may be using CG-NAT. You can find out if this is the case by going to a website (like https://whatismyipaddress.com/ and comparing the ip address shown with the WAN side ip address of the router that manages the initial NAT translation (The ASUS XT9 for solution 1 and the Lumos Modem/Router for solutions 2 and 3).
Thanks Wade. My scenario is such that my ISP (LUMOS) is using CGNAT. My Roon Server is the Nucleus Plus model. These two conditions override port forwarding and operating my LUMO/ISP router in bridge mode (as a resolve for the double NAT error). I’ve opened a service case with LUMOS/ISP to move from a CGNAT to a PUBLIC IP address. LUMOS has indicated this change may be ‘free’ or an additional charge would be applied. LUMOS will get back to me on those details.
Either way at least I know where the fault resides. I enjoy Roon but ARC has been a dismal failure since launch for my set up. And I’m just getting to the bottom of why it’s the case (within the span of having two ISP over the years).
You could setup Tailscale (Solution 4 above) now - it will work even with CG-NAT and it will continue to work once CG-NAT is removed. Doing this would give you the freedom to stick with the CG-NAT service if you don’t want to incur an additional cost penalty.
If CG-NAT is removed from the equation, you will still have to sort out your ‘two routers on the local network’ issue by adopting one of the first three solutions I described above.
Hi Wade. Does Tailscale work with the Nucleus Plus model that I have?
Tailscale cannot currently be run on the Nucleus itself. You can run Tailscale on a separate computer (which has to be left on 24/7 so many people use a Raspberry Pi) and configure it as a subnet router.
There is a guide at:
with links to install instructions.
Failing that, some routers have Tailscale or Wireguard available which can be configured and acts as a subnet router. Wireguard is virtually identical and in operation to Tailscale, and, whilst not officially supported, works well.
Ok. The ASUS Zen XT9 router has Wireguard available as a VPN. Are there any known step by step configuration instructions to set it up? Ex. With screen shots per step instruction
Not that I’m aware of. But it was not difficult when I did it on my Asus Routers (initialy on an RT-AX88U but more recently on an RT-BE88U).
If necessary, and no one else supplies such a guide in the interim, I can produce a step by step guide for you with screen shots from my BE88U tomorrow - I’m afraid that I haven’t time tonight ![]()
The only warning that I have in respect to this is that I have been running asuswrt-merlin on my router for the last 2 days (and intend to continue doing so) so it’s not the standard firmware - but I don’t believe the Wireguard configuration is different between the merlin firmware and the original firmware.
You may also find that the colour scheme is somewhat different between your XT9 and my RT-BE88U so there may be cosmetic differences.
Ok thanks. I’ll keep watch.
OK. Here it is:
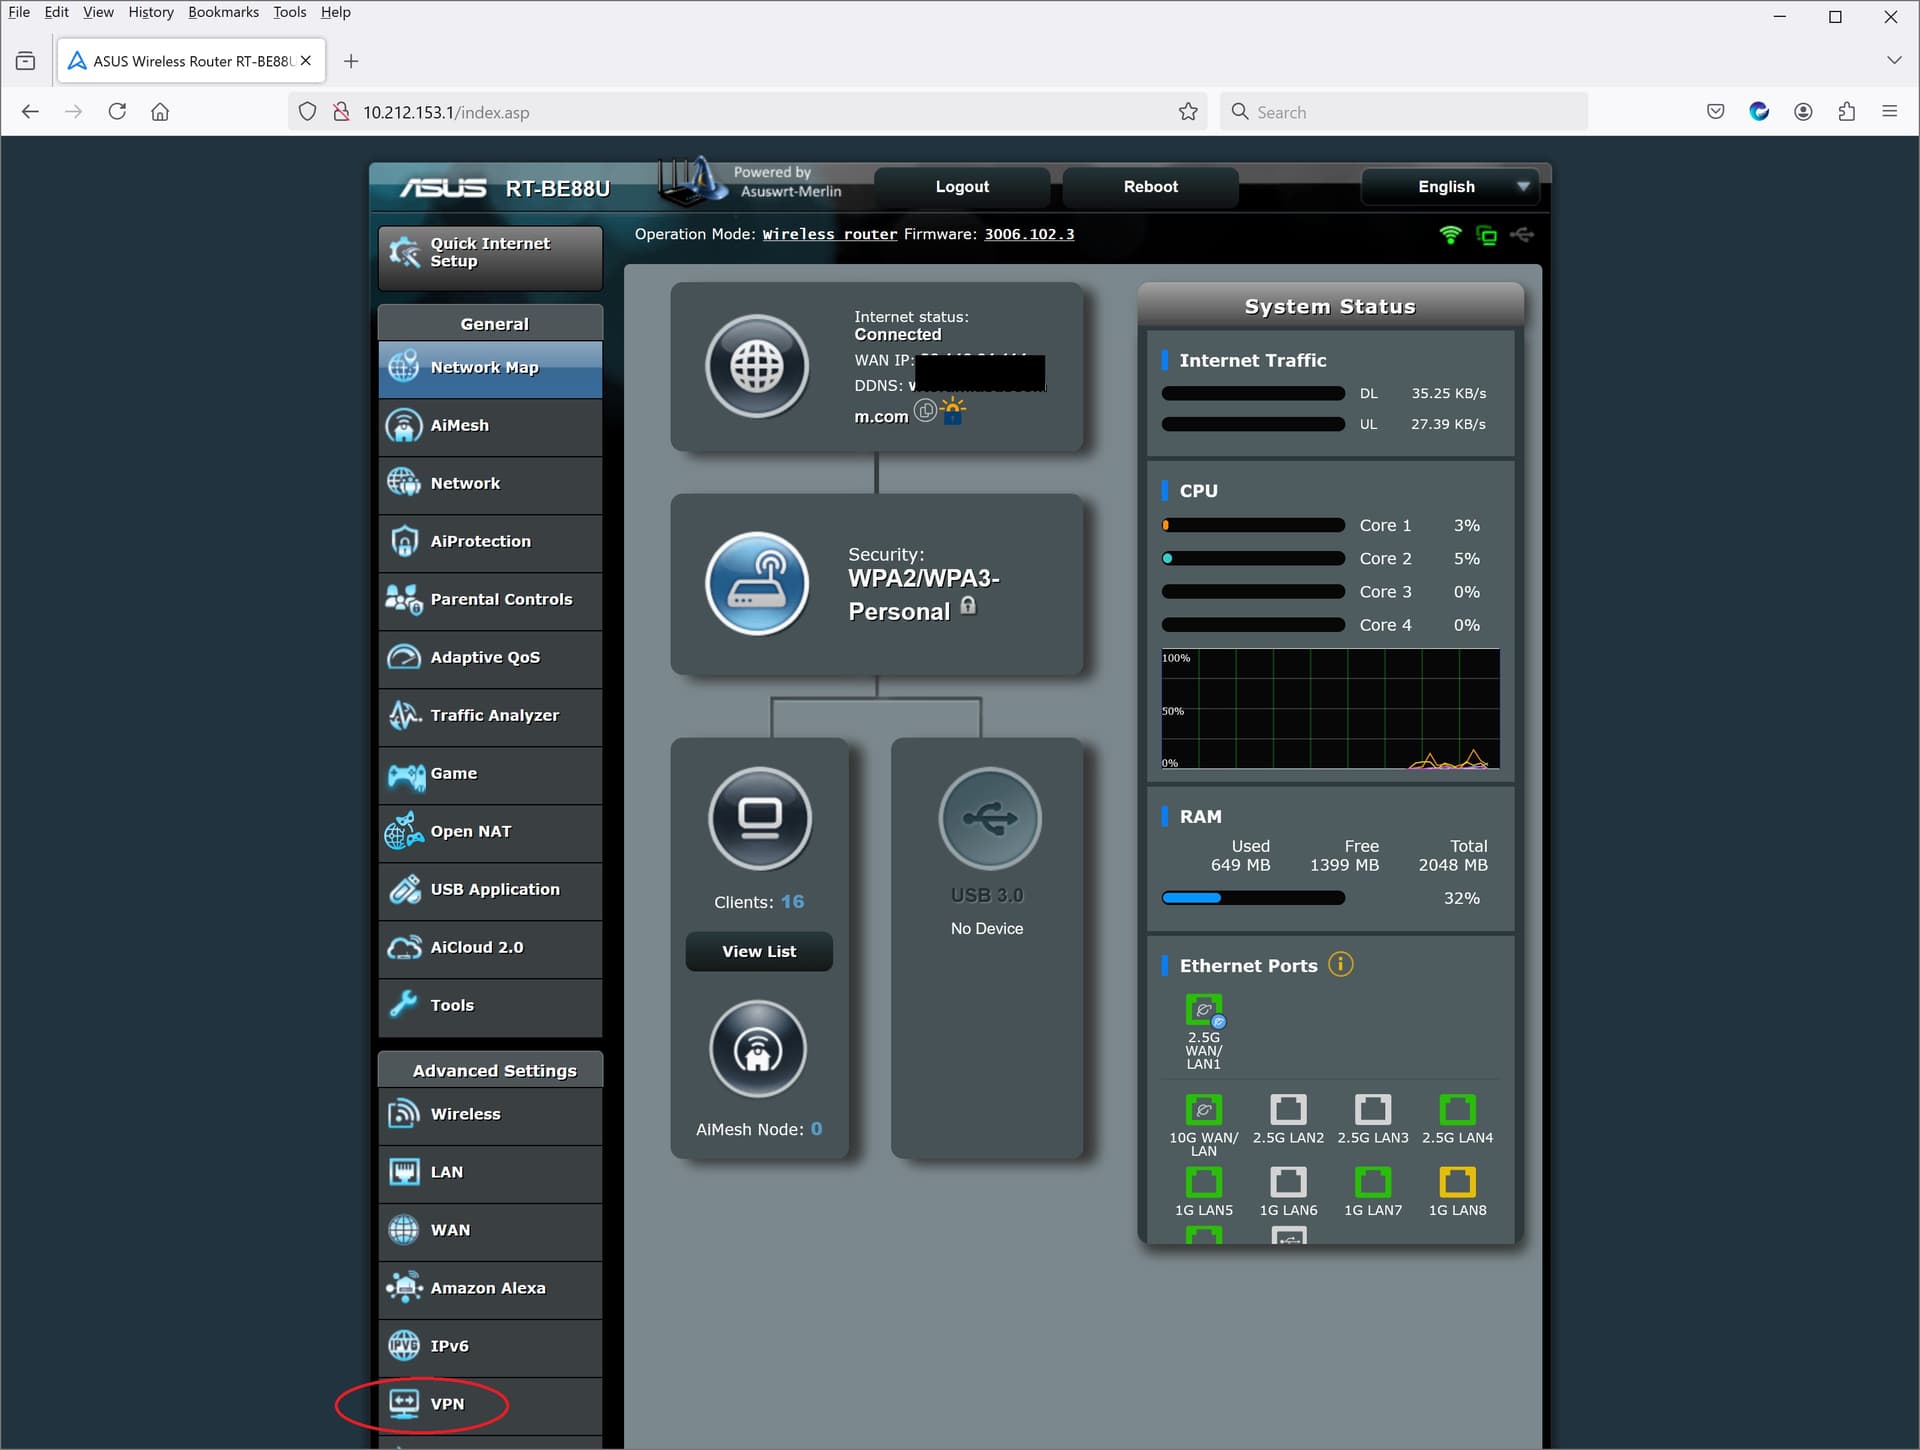
First select the VPN tab on the ASUS router interface:
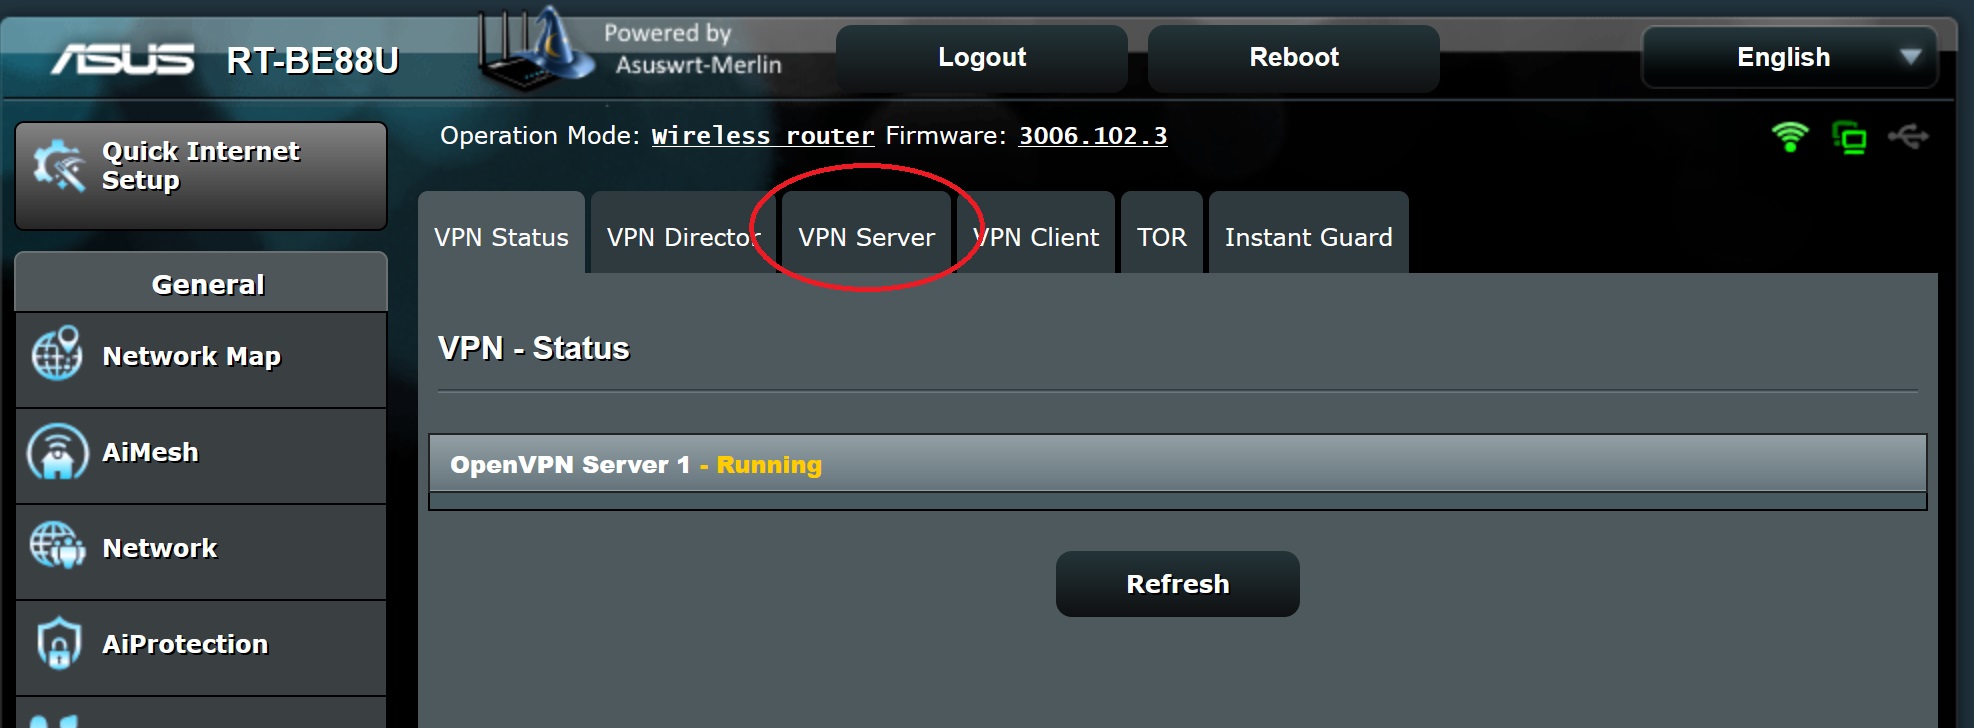
Then select the “VPN Server” property sheet:
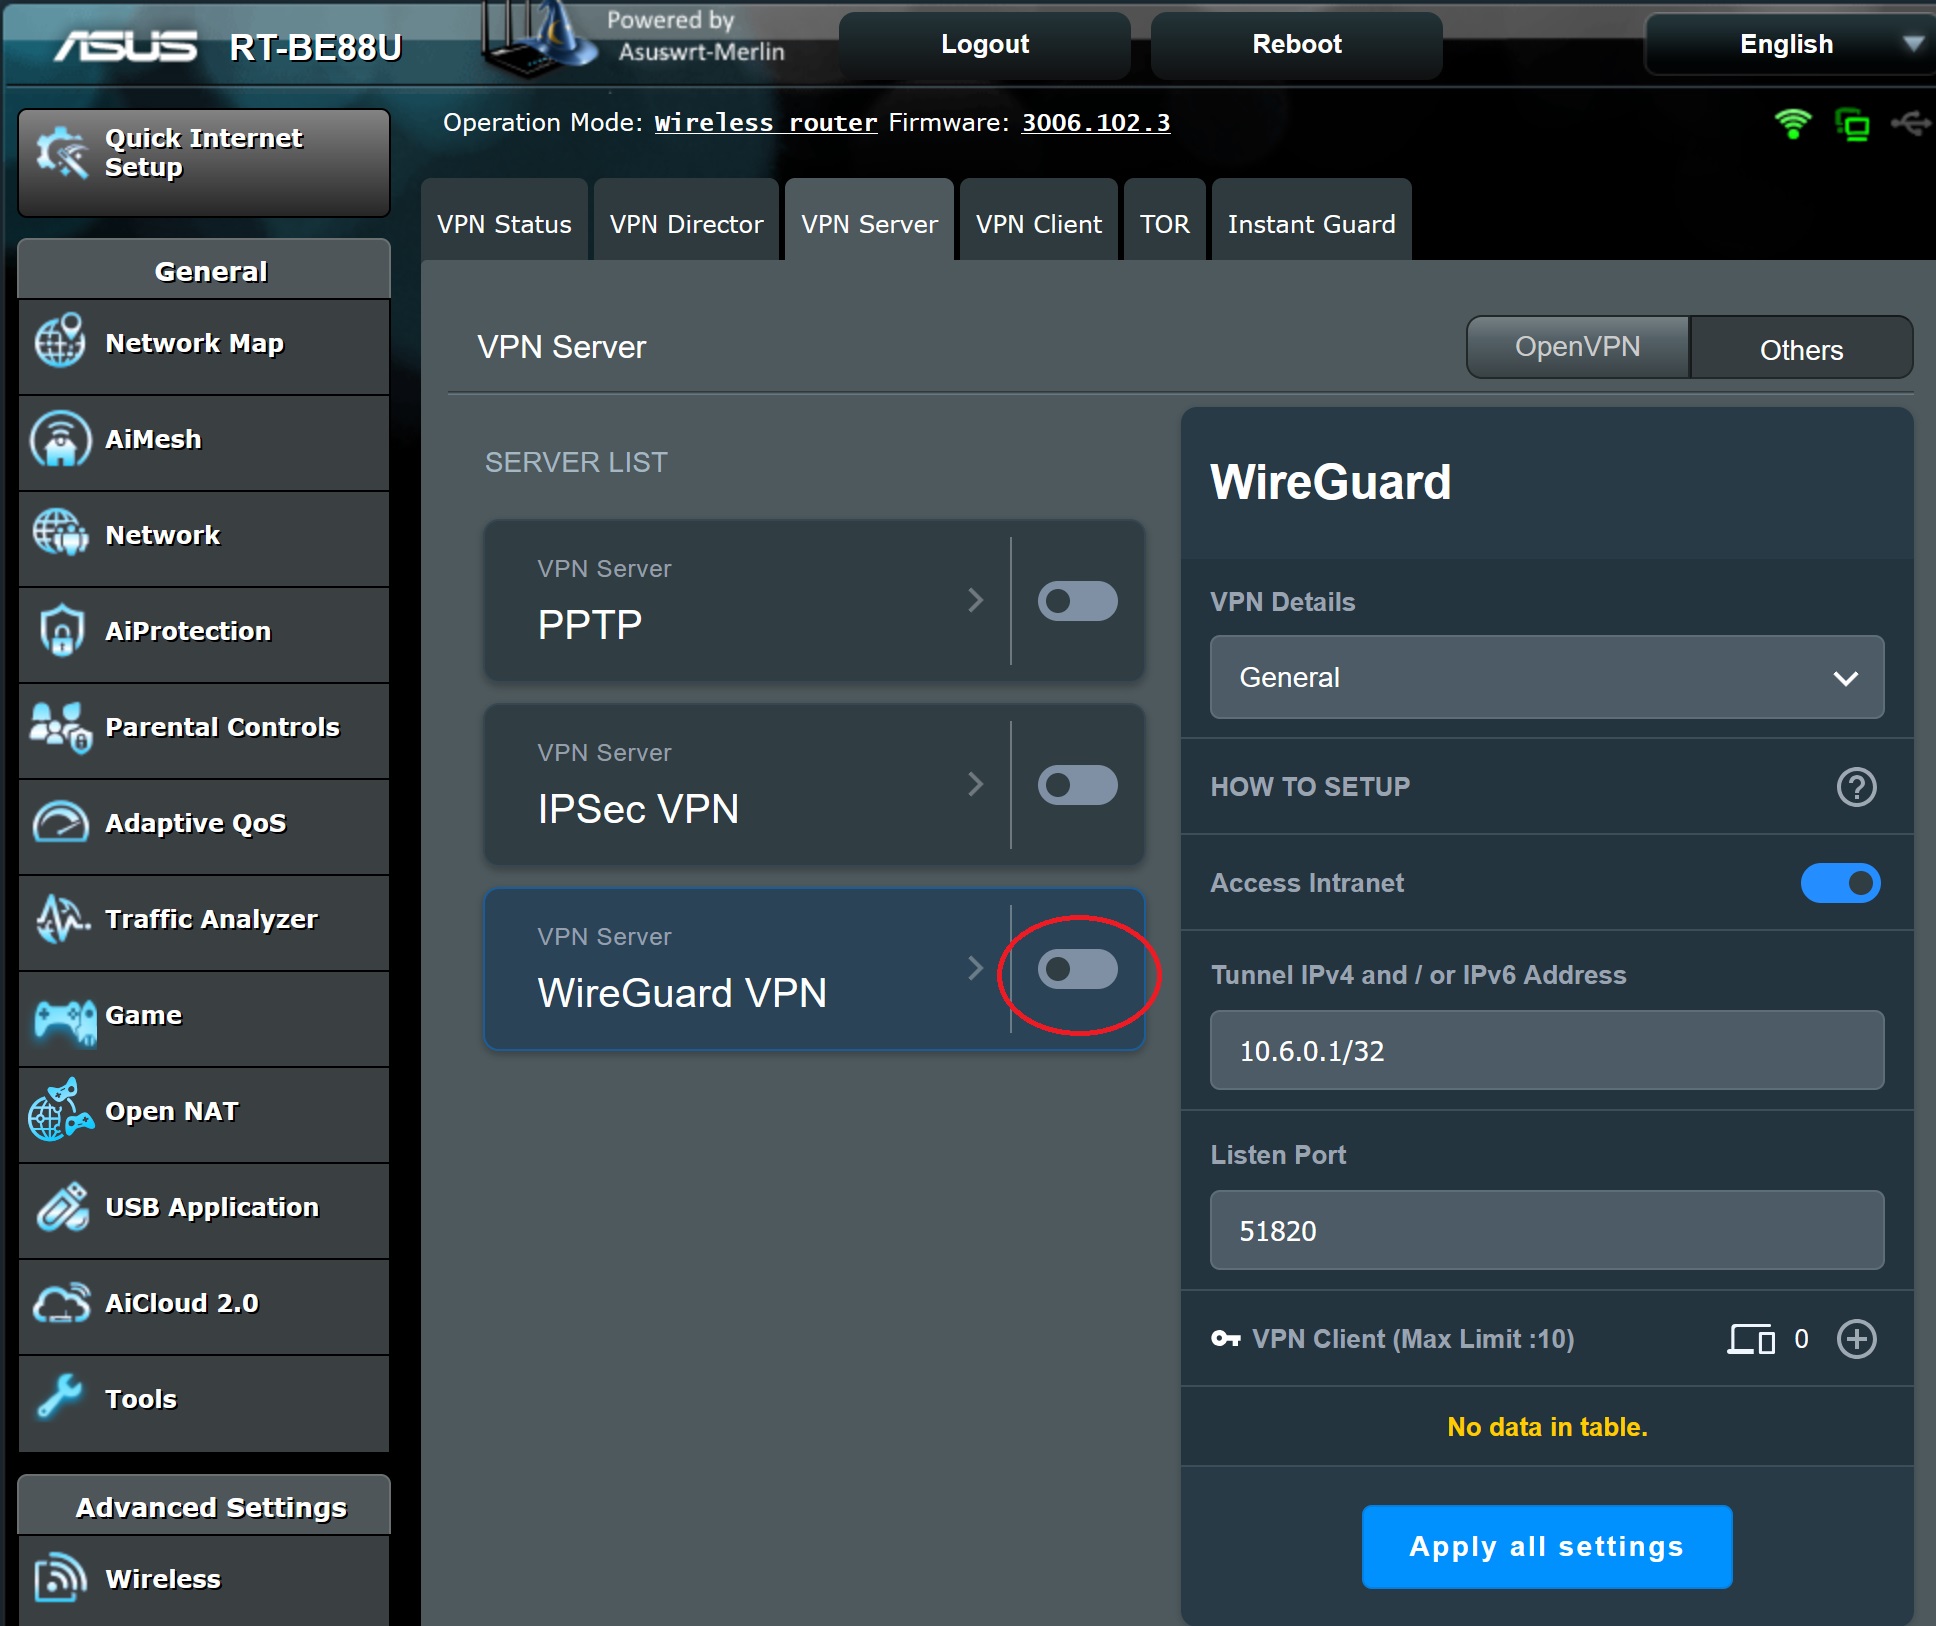
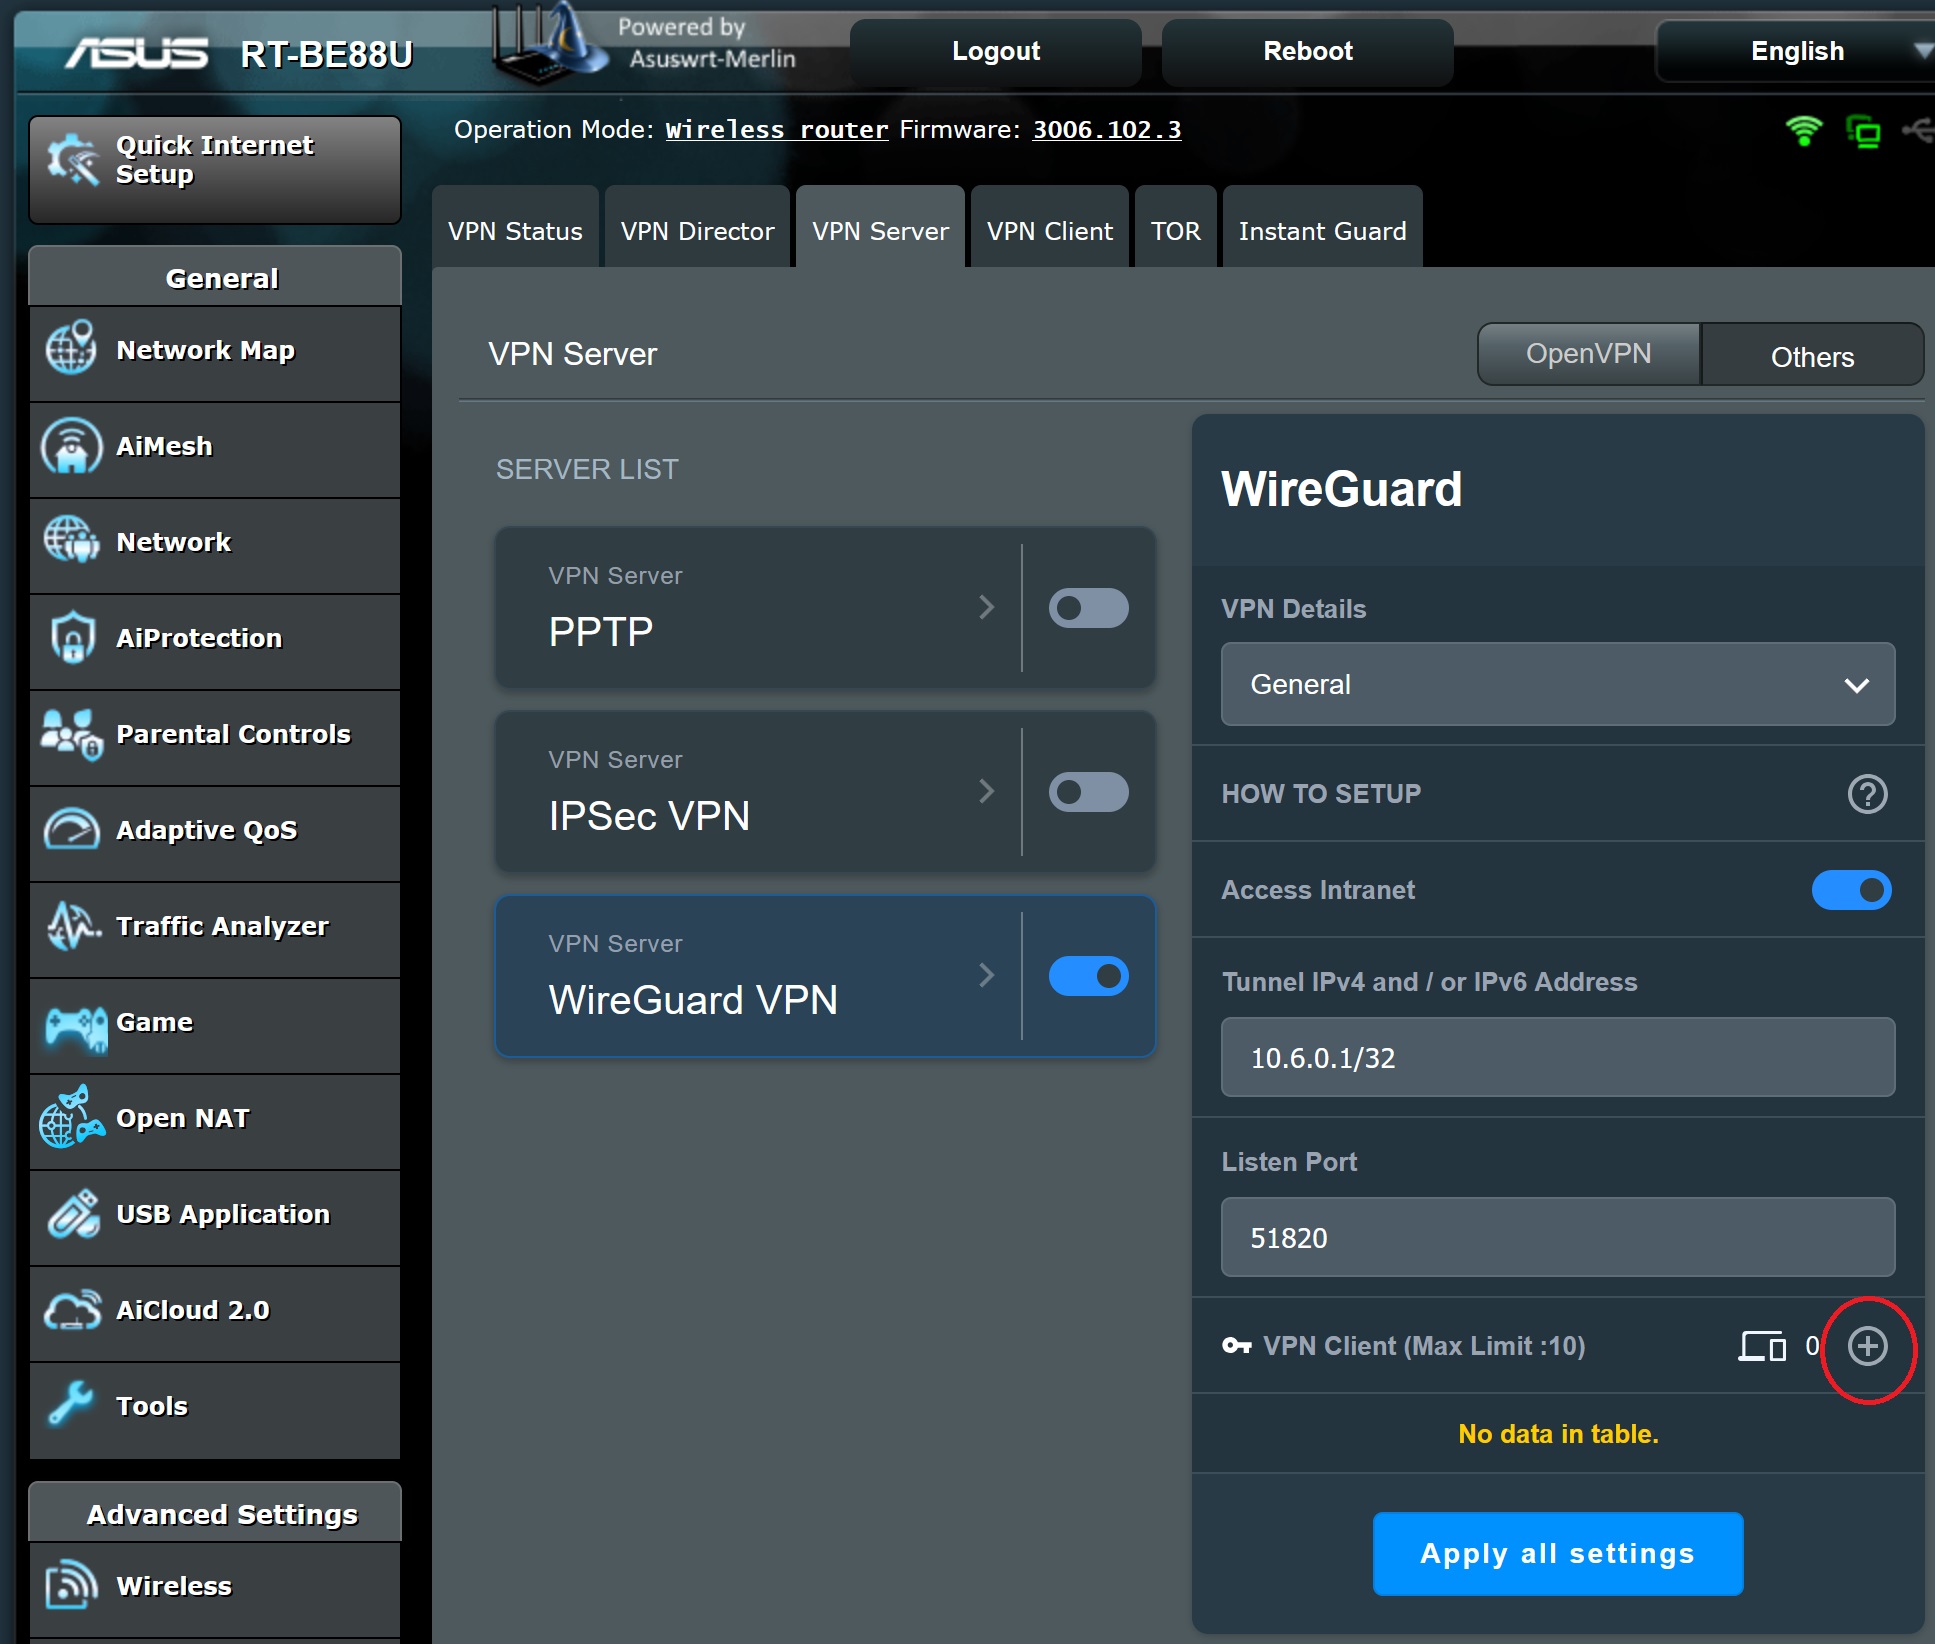
You do not want to set up an Open VPN server, so select “Others”:
In the list of available VPN types, turn the Wireguard VPN on:
You can “Apply all settings” at this point so that they don’t get lost.
Then, for each phone or tablet to be connected (maximum of 16), add a vpn client by doing the following:
On the router configuration, select the ‘+’ button to add a new clients
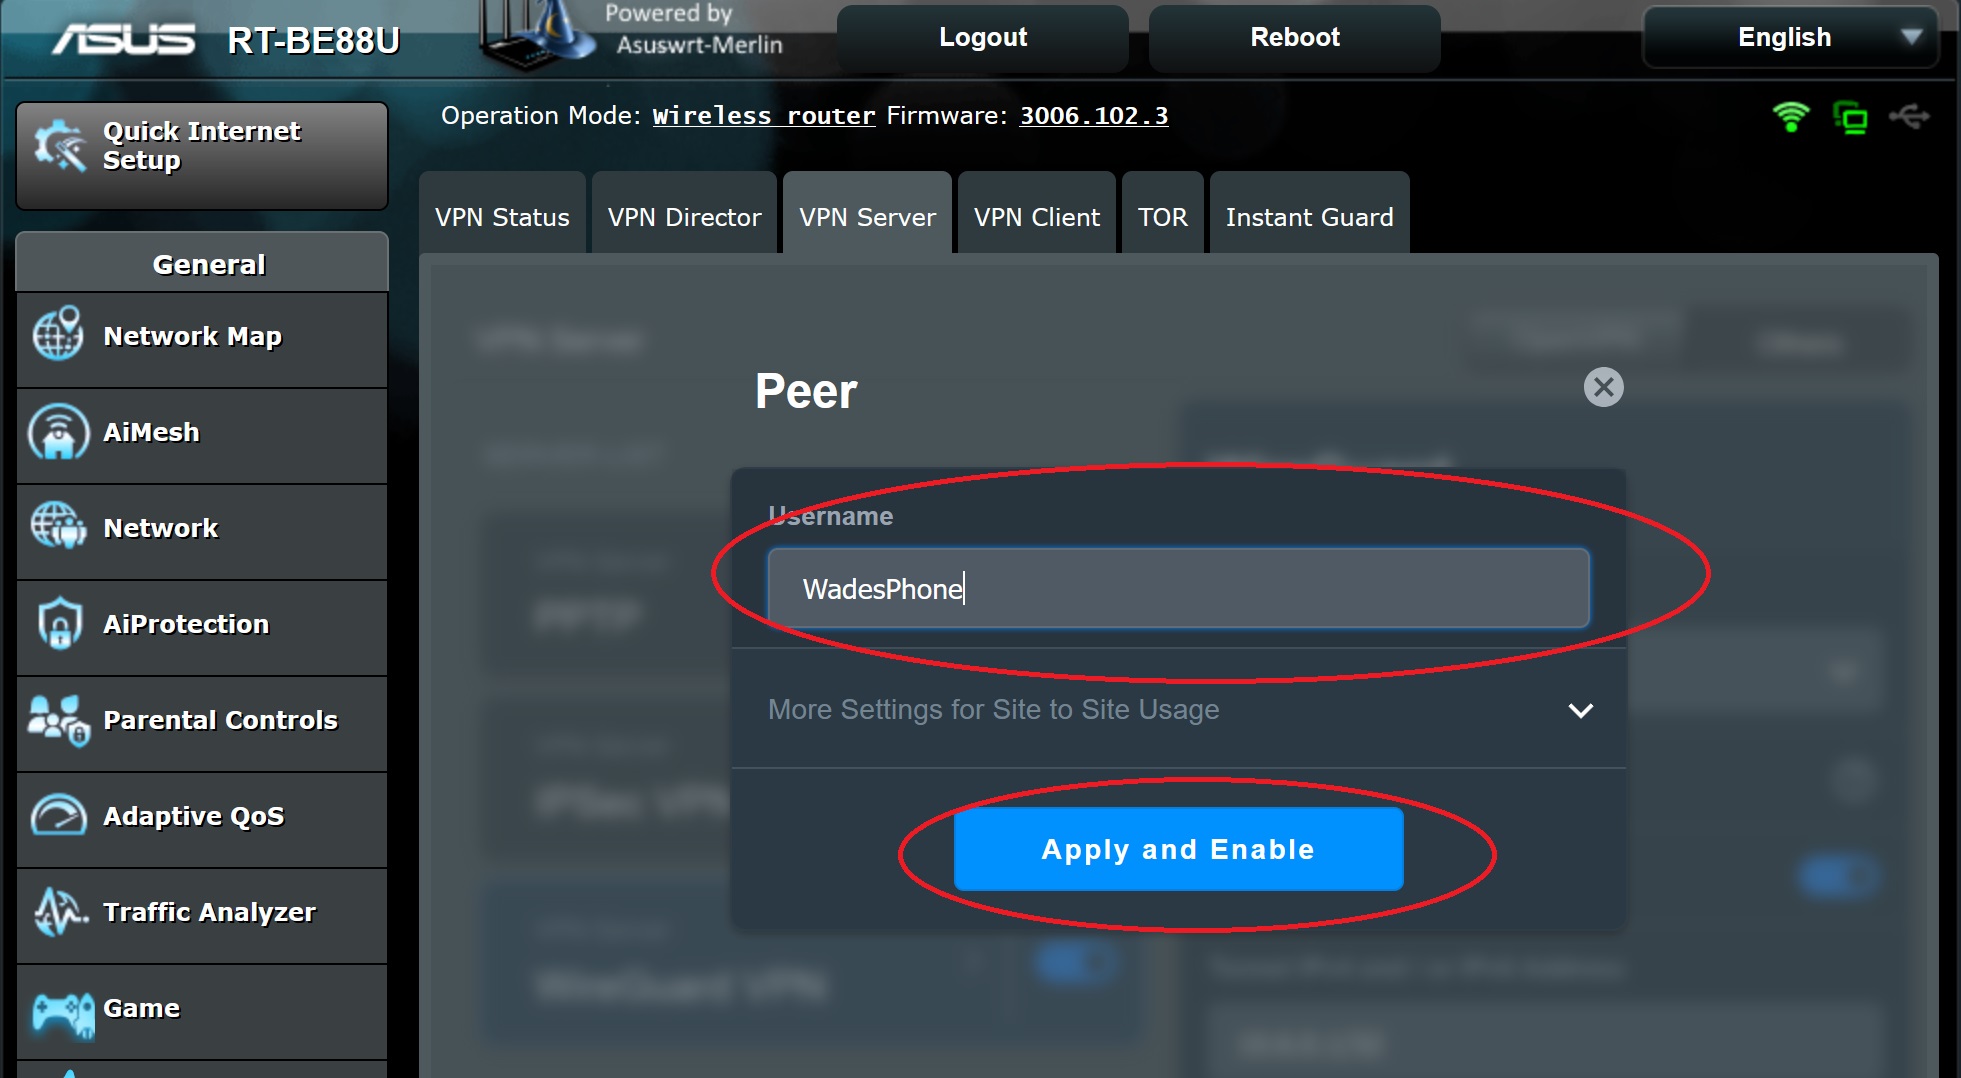
You should then see the ‘Peer’ setup page. Give the Peer a name, I chose WadesPhone, and then click on ‘Apply and Enable’.
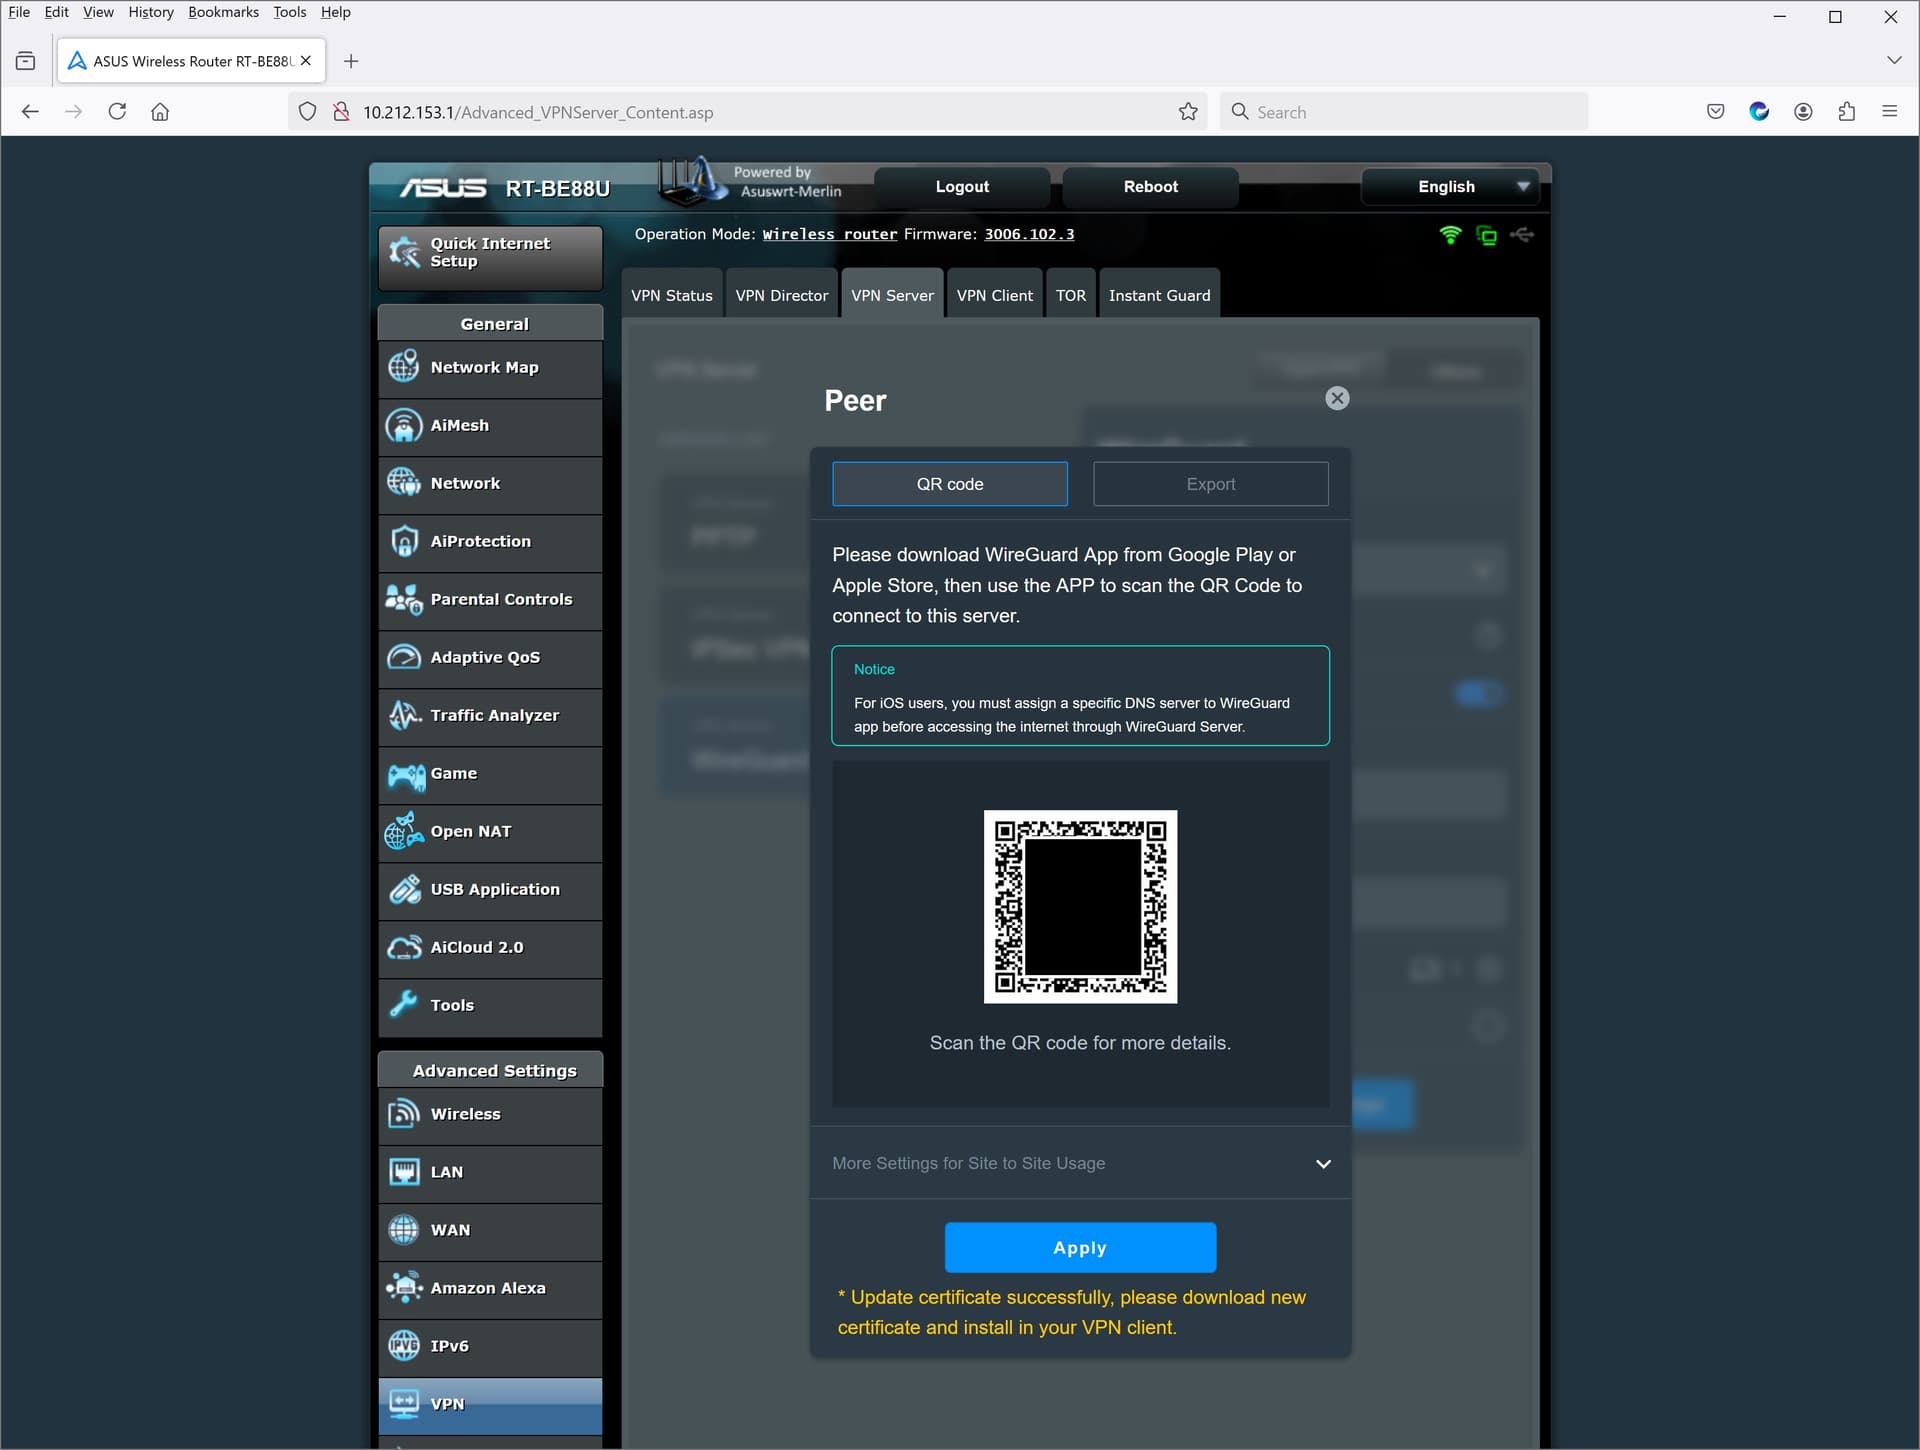
You should then be presented with a display showing a QR code (I have obfucated the centre of mine):
At this point, you need to go to your phone or tablet to setup the wireguard client before you dismiss this screen with the “Apply” button.
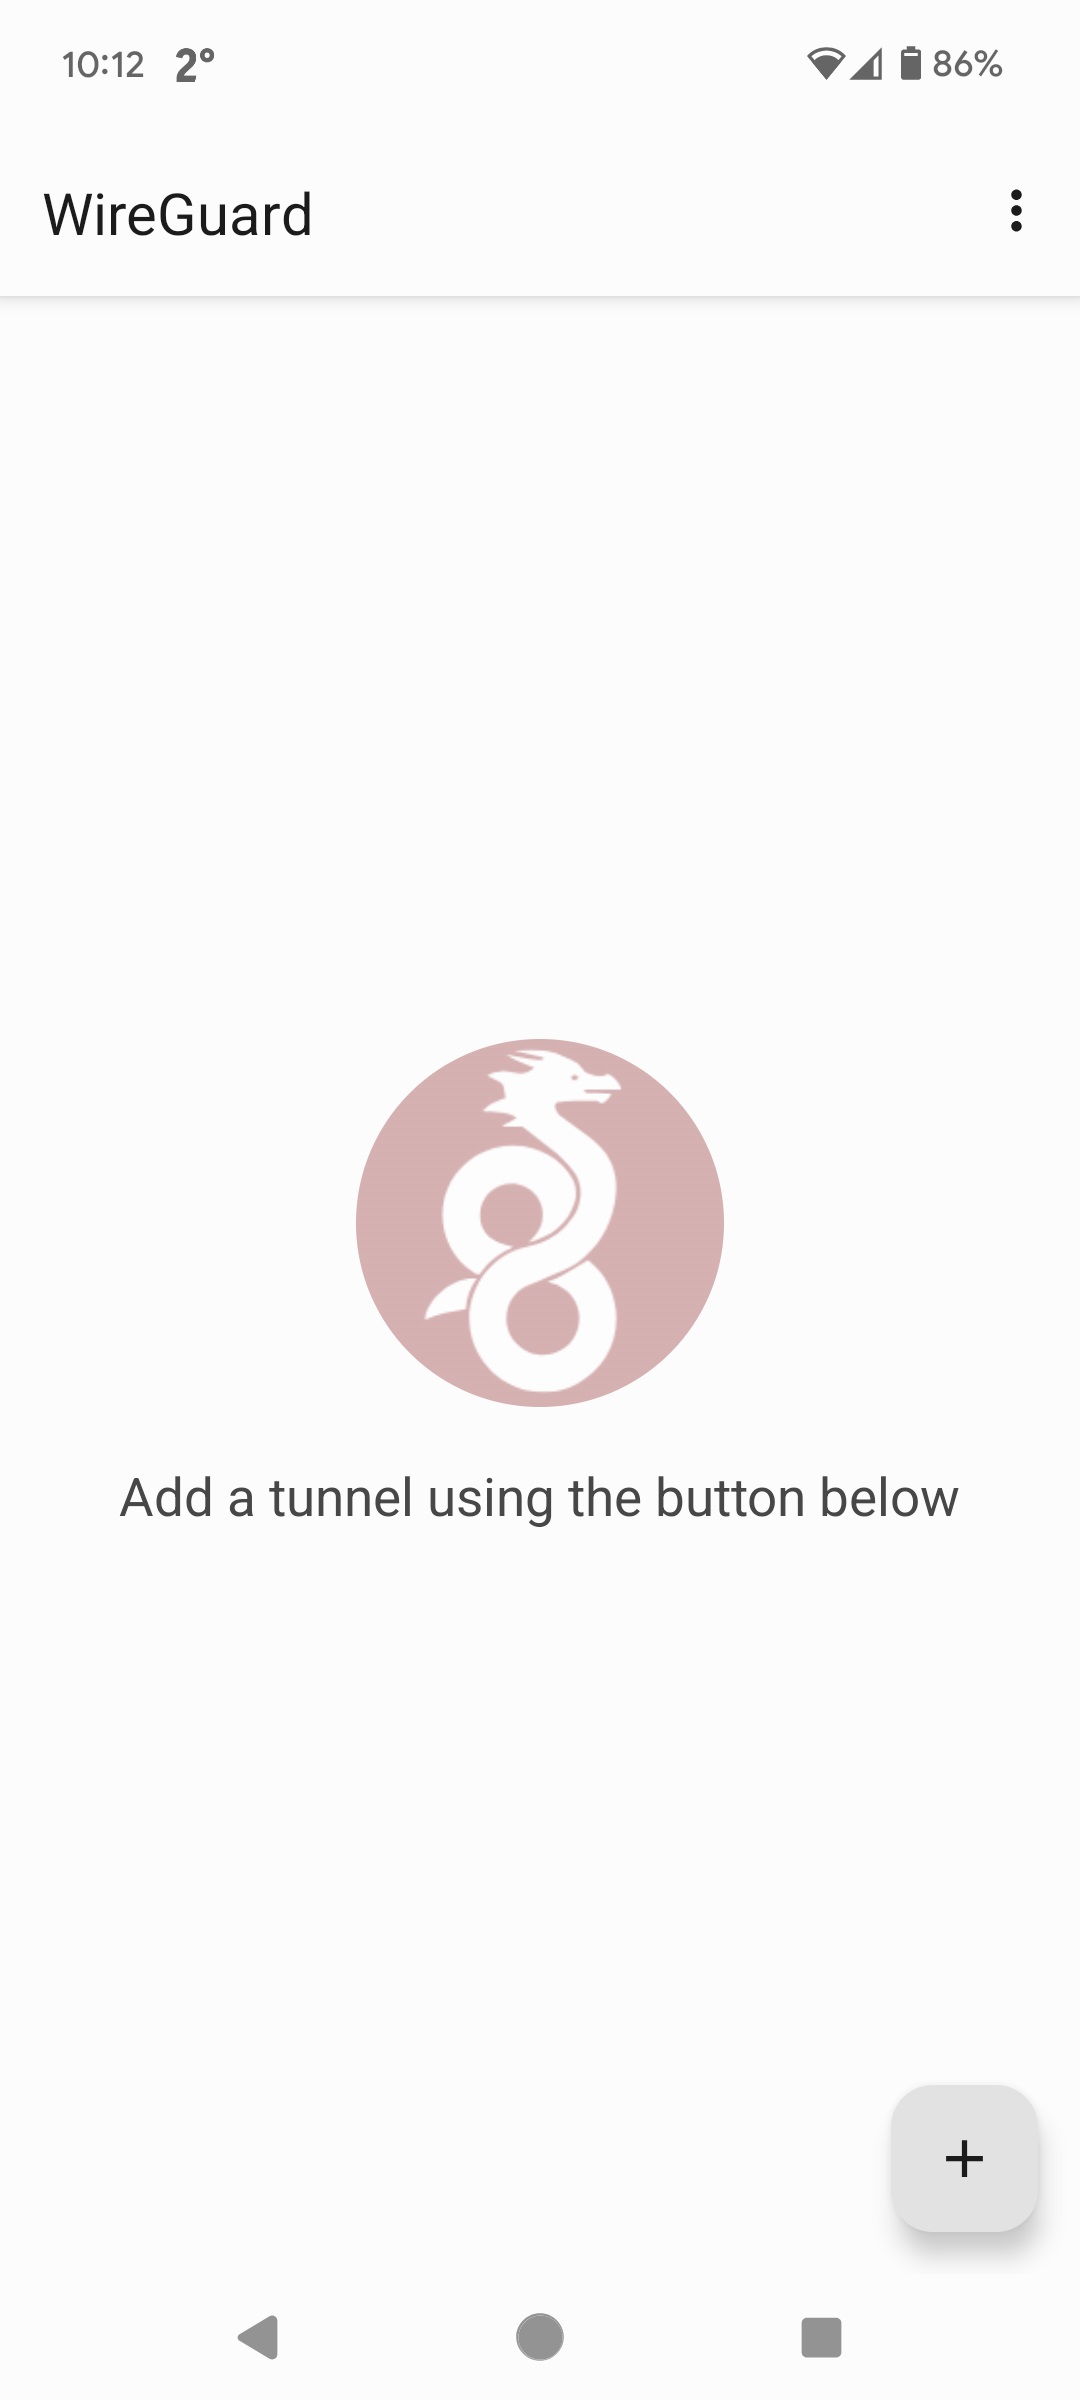
On your phone or tablet, install the Wireguard client application. I am using Android so all my screen shots will reflect that, but hopefully, the process will be the same for IoS if you use an iPhone or iPad.
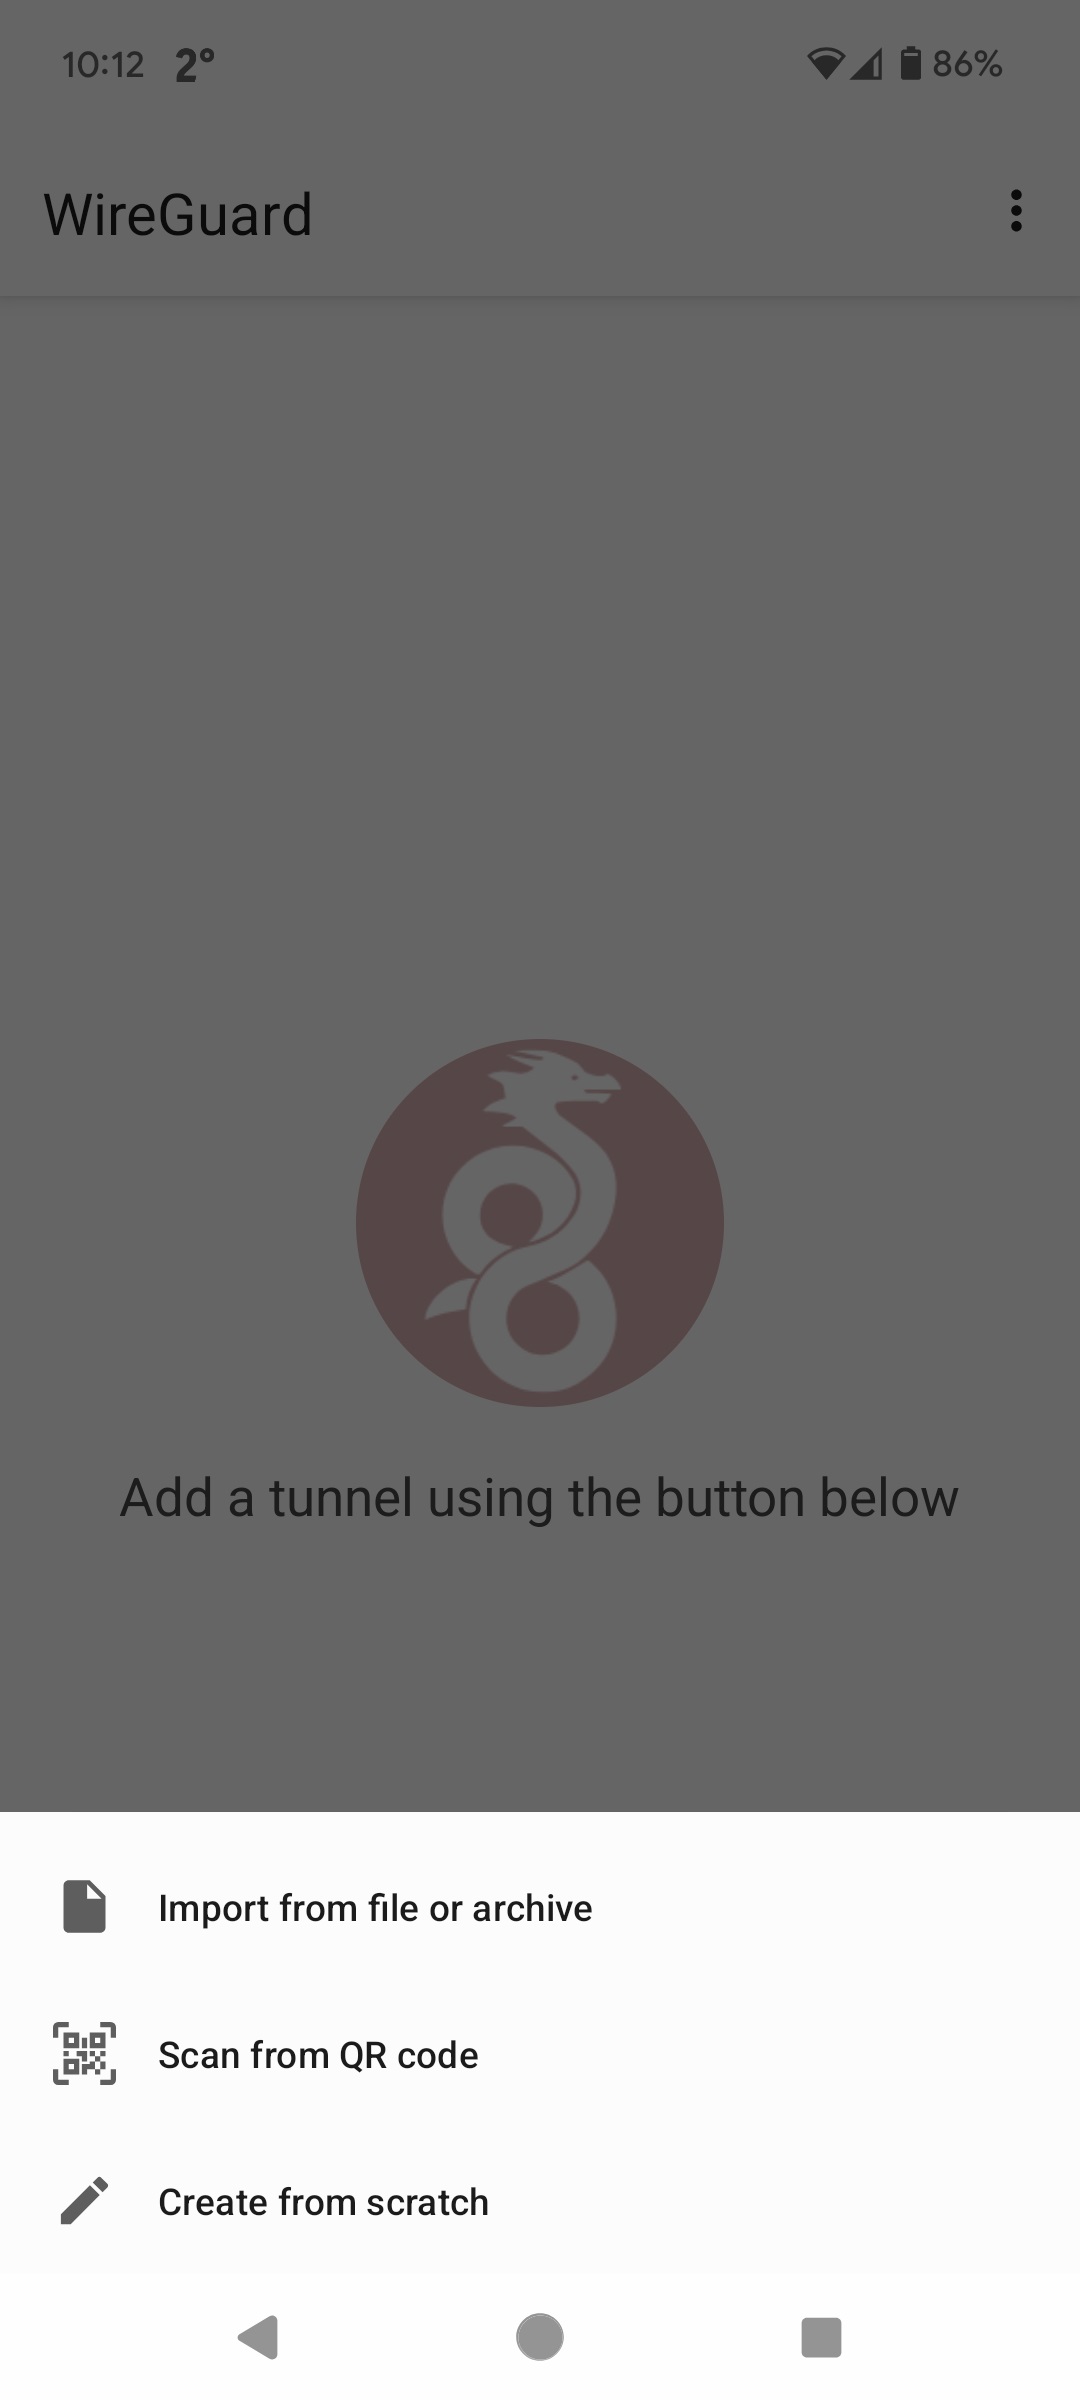
Start the Wireguard app on the phone/tablet. It should look something like:
Click on the ‘+’ button at the bottom right to add a tunnel and then select “Scan from QR code”:
This should give you the opportunity to give your tunnel a name. Name it as you like and then select ‘Create Tunnel’:
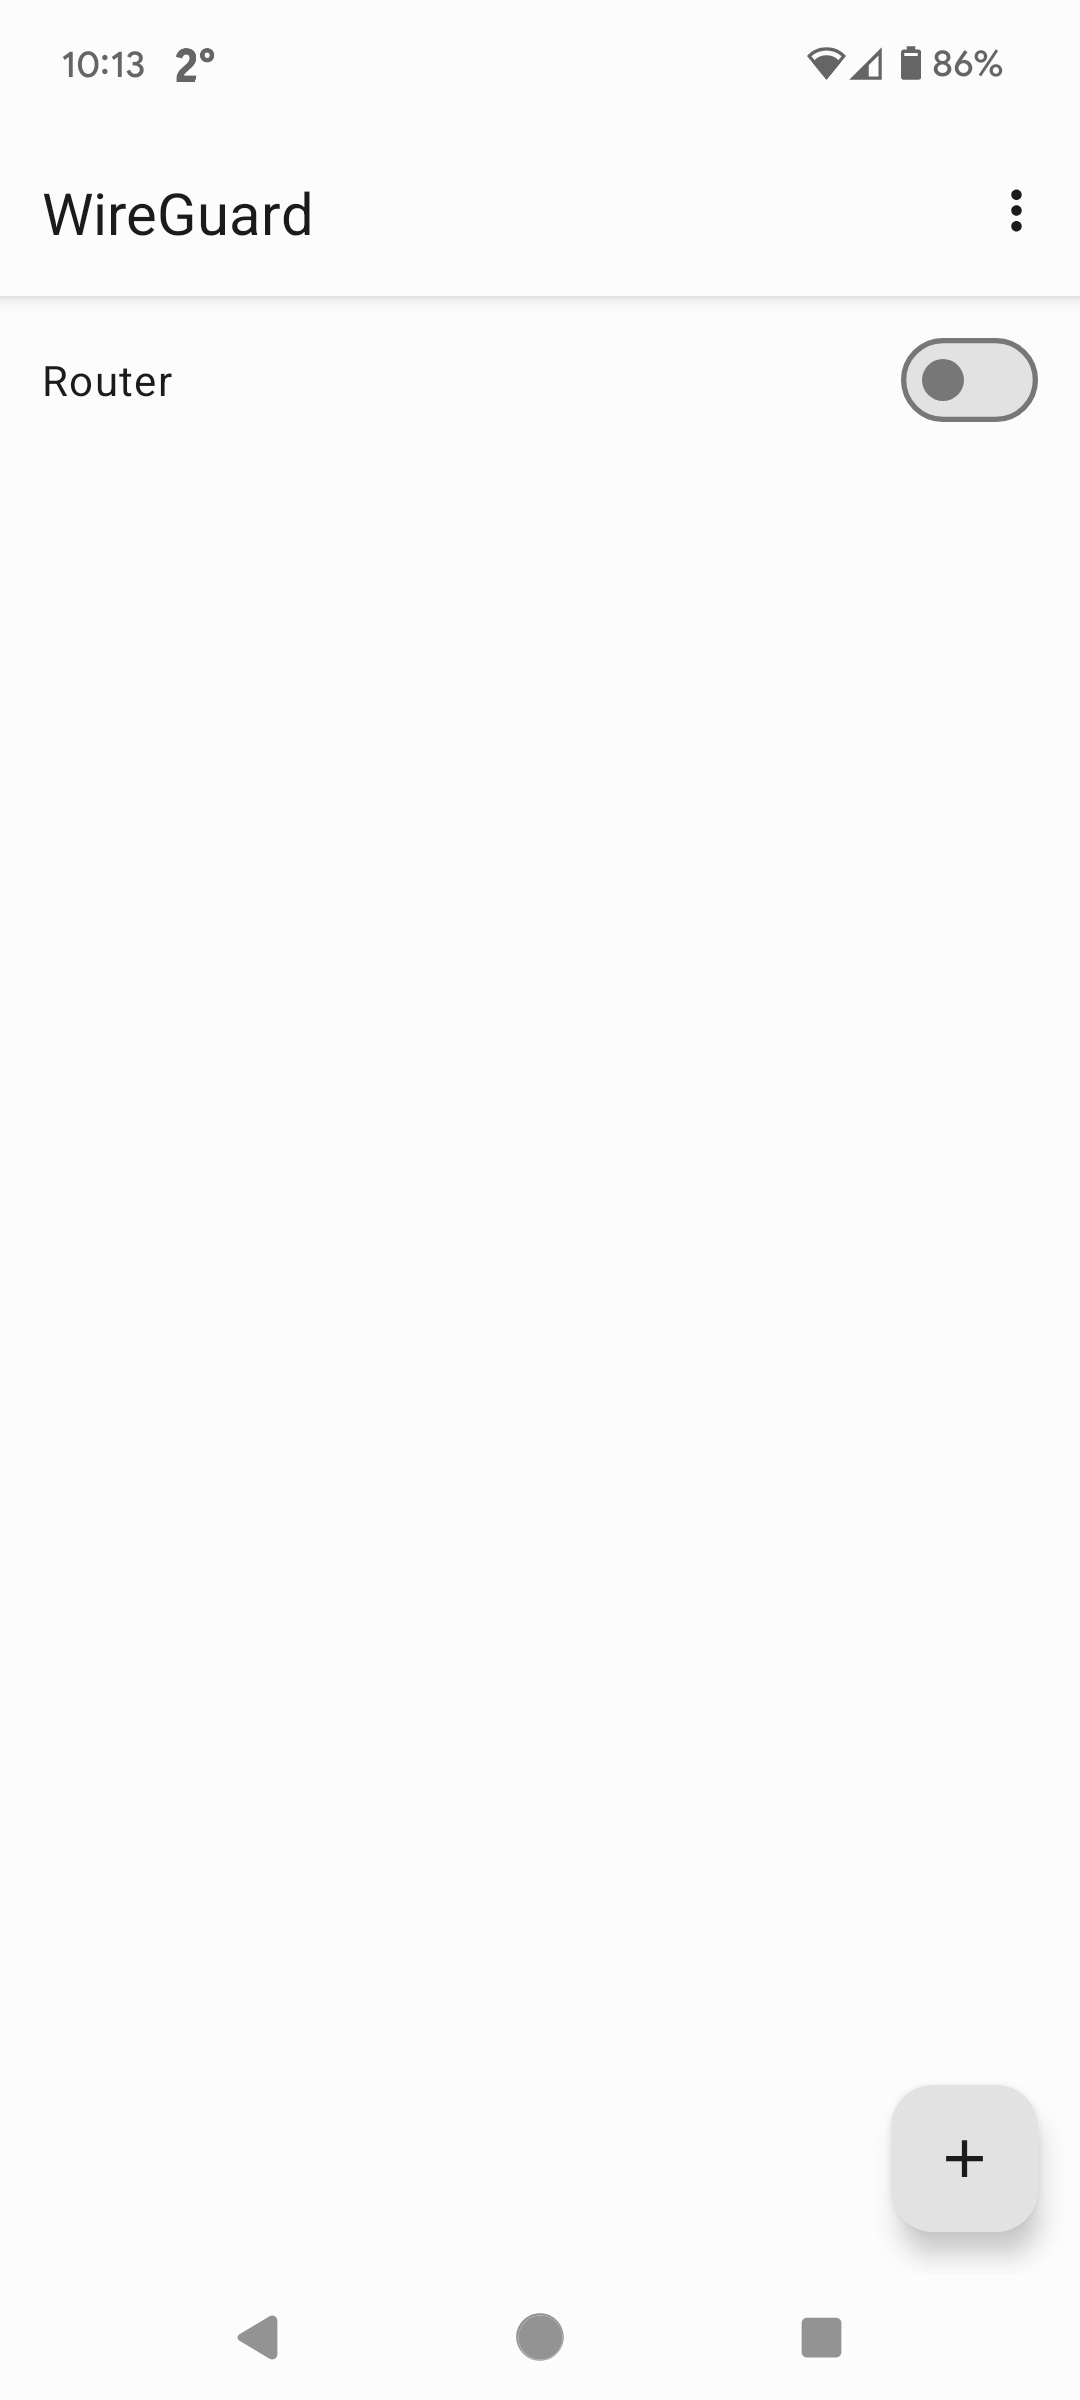
You should then see the newly created tunnel listed in the main Wireguard app screen.
Now you can go back to the router screen with the QR code and select ‘Apply’ to apply the settings. You can then dismiss the QR code screen using the ‘close’ button (x in a circle) at the top right. The will take you back to the main Wireguard settings where you will need to click on “Apply all settings” to save the newly created client tunnel.
The basic Wireguard VPN setup is now complete.
You could stop at this point and just turn the VPN tunnel on (using the toggle at the right of the tunnel name) when you need to use ARC away from home and turn it off when finished (you will see a little ‘key’ symbol in the notification window when the tunnel is turned on.
However, that is not ideal because, for example, it will stop wireless Android Auto working and it will mean that all traffic is directed over the Wireguard VPN tunnel back to your router before going any further - which you may not want.
For a better setup, which will leave the Wireguard VPN tunnel only being used by ARC (everything else ignores the tunnel), you need to configure the Wireguard client for ‘split tunnel use’. The following steps show you how to do this:
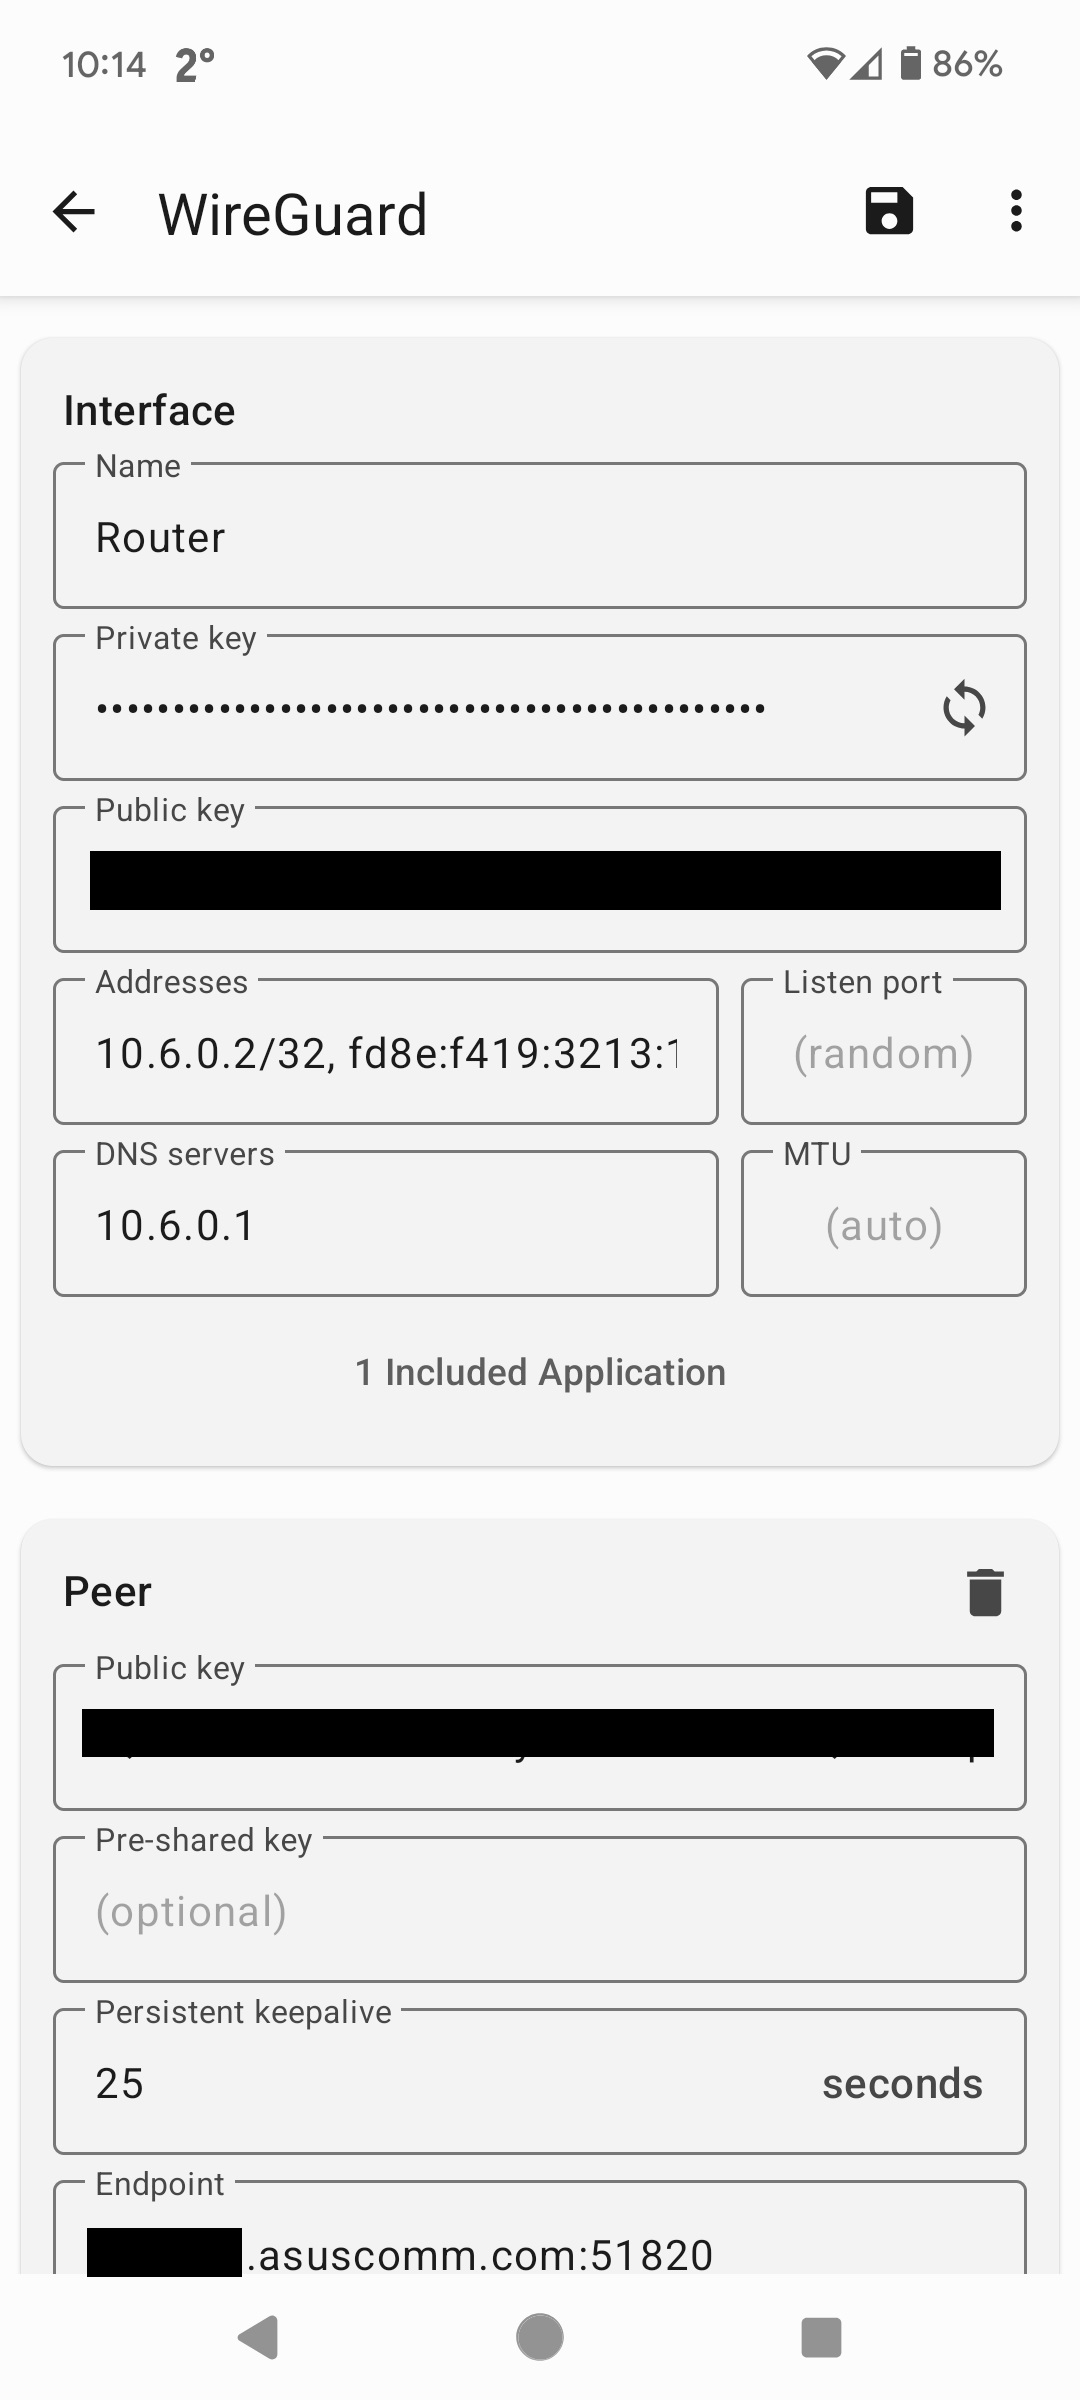
First select the tunnel by clicking on the tunnel name (in this case “Router”). You should then see the tunnel details like:
Click on the pencil icon at the top right to edit the tunnel. You should then see:
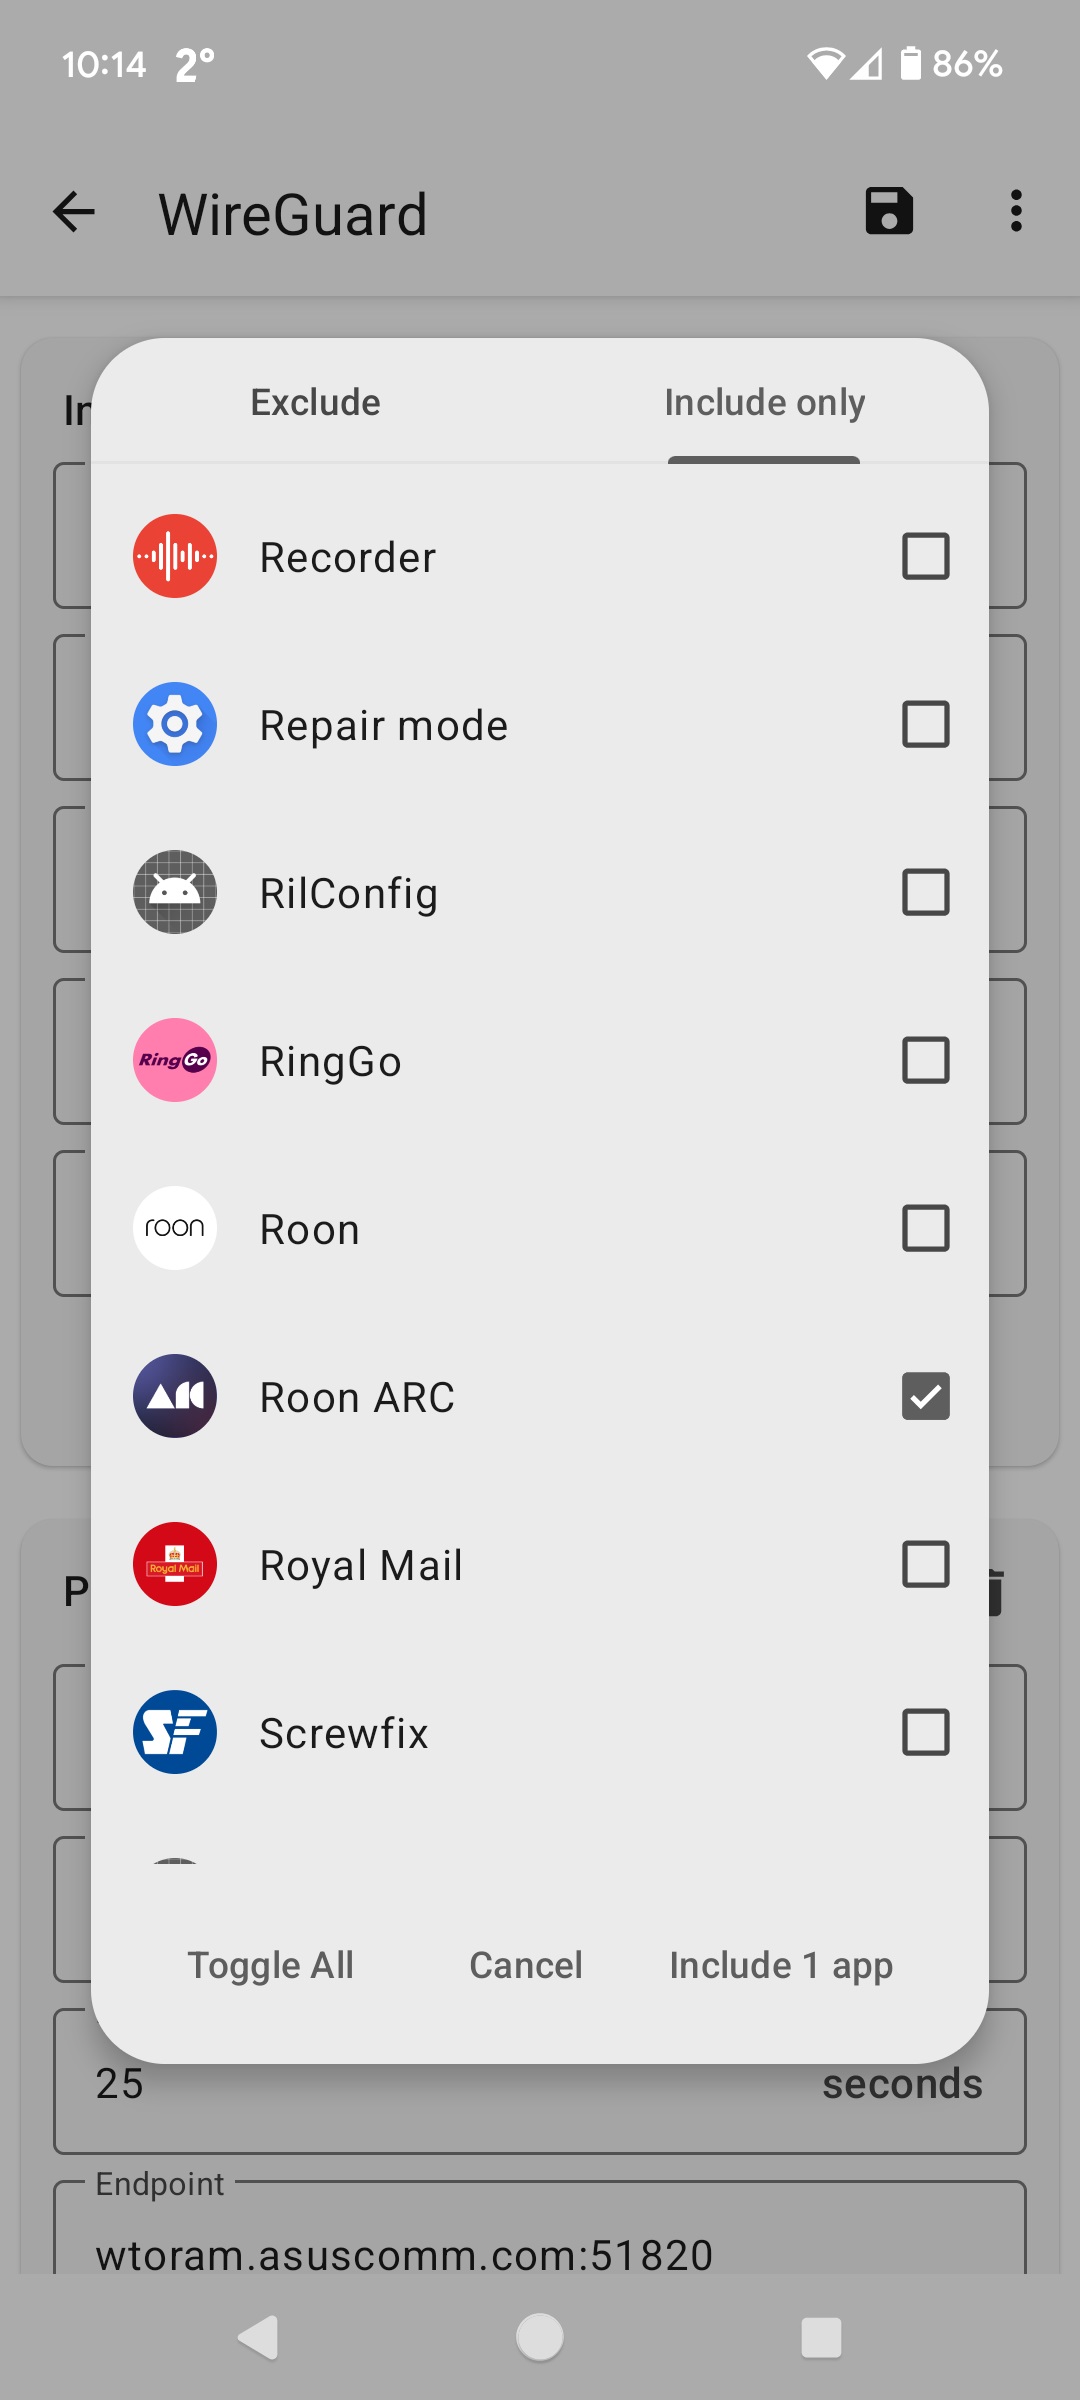
When you see this you can click on the ‘All Applications’ bit to give you screen where you can select the application that you want to use the tunnel, or, alternatively, the applications that you don’t want to use the tunnel. I use the former:
Select the “Include Only” tab at the top, then make sure that ARC (and possibly any other application that you may want to use the tunnel) are checked and then click on “Include x app” (Note the ‘x’ represents the number of applications selected (in my case ‘1’).
You should then see the new tunnel settings:
Check that the 'x included Applicaitions" is shown and correctly reflects the number of applications you checked in the previous step and then importantly, click on the save ‘floppy disk’ icon at the top right of the screen.
Note: it you are not using a DDNS service, the Endpoint setting (just visible at the bottom of the above image) will show the WAN side ip address of your router. If this is the case, you will have to change this setting whenever that ip address changes. Thus a DDNS configuration will help reduce the maintainance required.
Once you have saved the tunnel settings, it should take you back to the main wireguard screen.
Now, you can use the toggle to turn the Wireguard tunnel on whenever you want. If you set it up fo only include ARC the way I have, you can leave it permenantly on. Alternatively you can turn it on only when you need it and turn it off when finished.
Awesome Wade. I appreciate the effort you’ve placed into this. I hit a brick wall to exclude the other applications. I don’t see the ‘all applications’ that you’ve displayed on the VPN app. Therefore I cannot select the Roon Arc to operate only in the exclusive fashion that you’ve described in the instruction.
Footnote: I’m able to connect to Roon Arc with WiFi deployed. I cannot connect to Roon Arc when I toggle off WiFi (poor connection is yielded—see pic below). Also…do I need to keep the path forwarding rule toggled on or does it no longer matter if a VPN client path is being utilized to gain remote access?
I’m sorry but this looks (from what I can see on internet searches) like a difference between the IOS and Android wireguard clients. I don’t have any IOS devices so I can’t really help.
Having said that, with a google search, I did find one reference to Wireguard on IOS that suggested that the ‘per application’ feature was only available on Android - not IOS ![]()
Maybe someone else maybe able to help?
In the meantime, turning the Wireguard tunnel on and off as and when you want to use ARC will work in most situations. If may cause issues with wireless connected Carplay though in the same way as it causes issues with Android Auto if Android Auto is not excluded.
I’m sorry I can’t help further.
No worries. At least I’ve taken this as far as I can (despite the results). Maybe further development of Roon ARC can possibly offer a solution to the Roon Arc app itself for the community of users currently locked out by ISP CGNAT? Albeit this appears to be outside of boundaries or Roon support.
Update: My ISP/LUMOS is now stating there isn’t a CGNAT issue. The support tech indicated it’s limited to the double NAT error. The ISP indicated the solution is to put the LUMOS router into bridge mode. I have an open case. Fingers crossed.
Hey @Kevin_Smith,
Thanks for writing in! And a big thank you to @Wade_Oram for such detailed help here!
Certainly let us now how the above goes!
If it hasn’t been glazed over yet, it may be worth taking a closer look into using Tailscale - here’s more info:
The connectivity fault with Roon Arc is now resolved. Solution: ISP router/modem was placed into bridge mode (along with the aforementioned port forwarding rule applied). Thanks to Wade for taking the time to assist me with sorting this out.
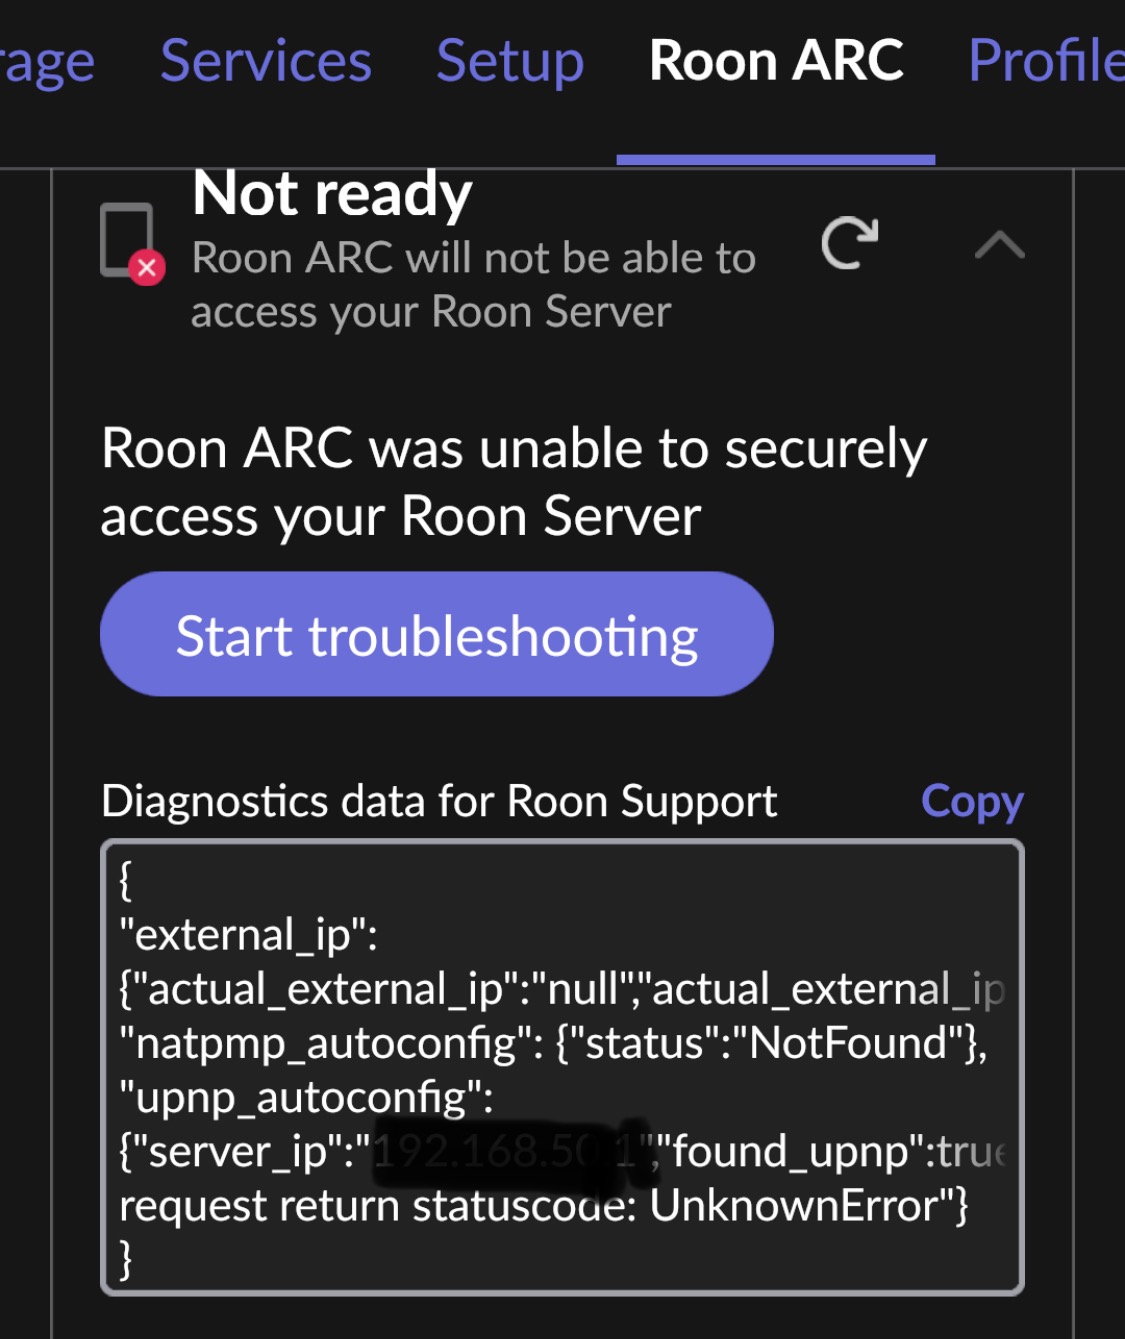
In the screen shot above, can you press ‘Copy’ to copy the diagnostic text to the clipboard and then paste it into a reply here.
There is no need to obfuscate any of the ip addresses shown in the pasted text.
The ip addresses that present a security risk are already obfuscated. The ones that aren’t obfuscated are local network ip addresses (typically beginning with 192.168.) which are useless to anyone trying to mount an attack from outside of your network.
{
“ipv4_connectivity”: {“status”:“NetworkError”,“status_code”:504,“error”:“error: Error: ETIMEDOUT, response code: undefined, body: undefined connected? undefined”},
“external_ip”: {“actual_external_ip”:“64.aaa.bbb.ccc”,“actual_external_ipv6”:“null”,“router_external_ip”:“null”},
“natpmp_autoconfig”: {“status”:“NotFound”},
“upnp_autoconfig”: {“server_ip”:“192.168.50.1”,“found_upnp”:true,“error”:“doaction request return statuscode: UnknownError”}
}