Parametric Equalizer – How to use

Is there any sort of documentation for the parametric equaliser? I don’t mean that text which mainly just tells me that this is a really, really brilliant feature that I’m going to have an absolute blast with, but one that explains how I can use this option and what the individual switches and controls in the window mean. In particular, I’d be interested to know what the slider marked with a magnifying glass does.It seems to me that this is by no means immediately obvious.

Is there any text that explains these things and doesn’t assume I already know everything I’m asking about?

@Werner_Hintze consider starting with…

There’s also many great discussions in the forum discussing the use of Roon’s DSP features. Here’s a couple examples:

I don’t actually want any ‘fun’. I just want to know what the switches and controls in this window are all about. In particular, the control with the magnifying glass. Is there anywhere where it’s explained simply, clearly and directly what they’re for?

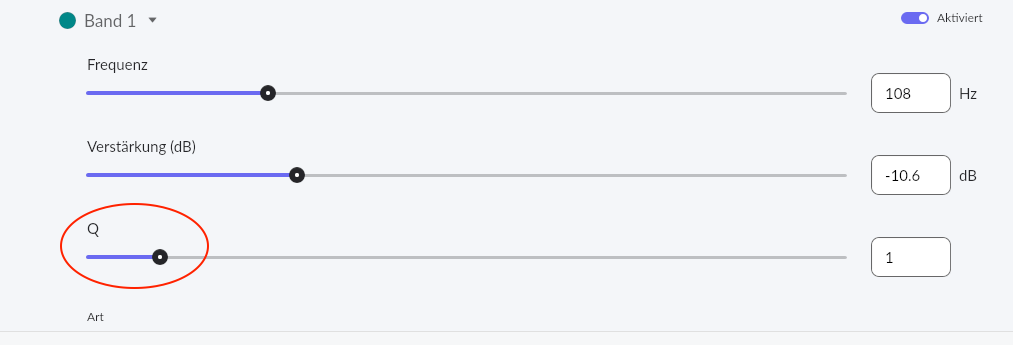
If you could share a screenshot of the magnifying glass you are referring to it would help.

If I’m understanding correctly, the magnifying glass you are referring to is actually the Q factor control. Q factor affects how widely that EQ band affects frequencies around the defined frequency. A low Q (small number) will have a broad effect to either side of the center frequency chosen. A larger number will narrow the effect to either side of the center frequency chosen.

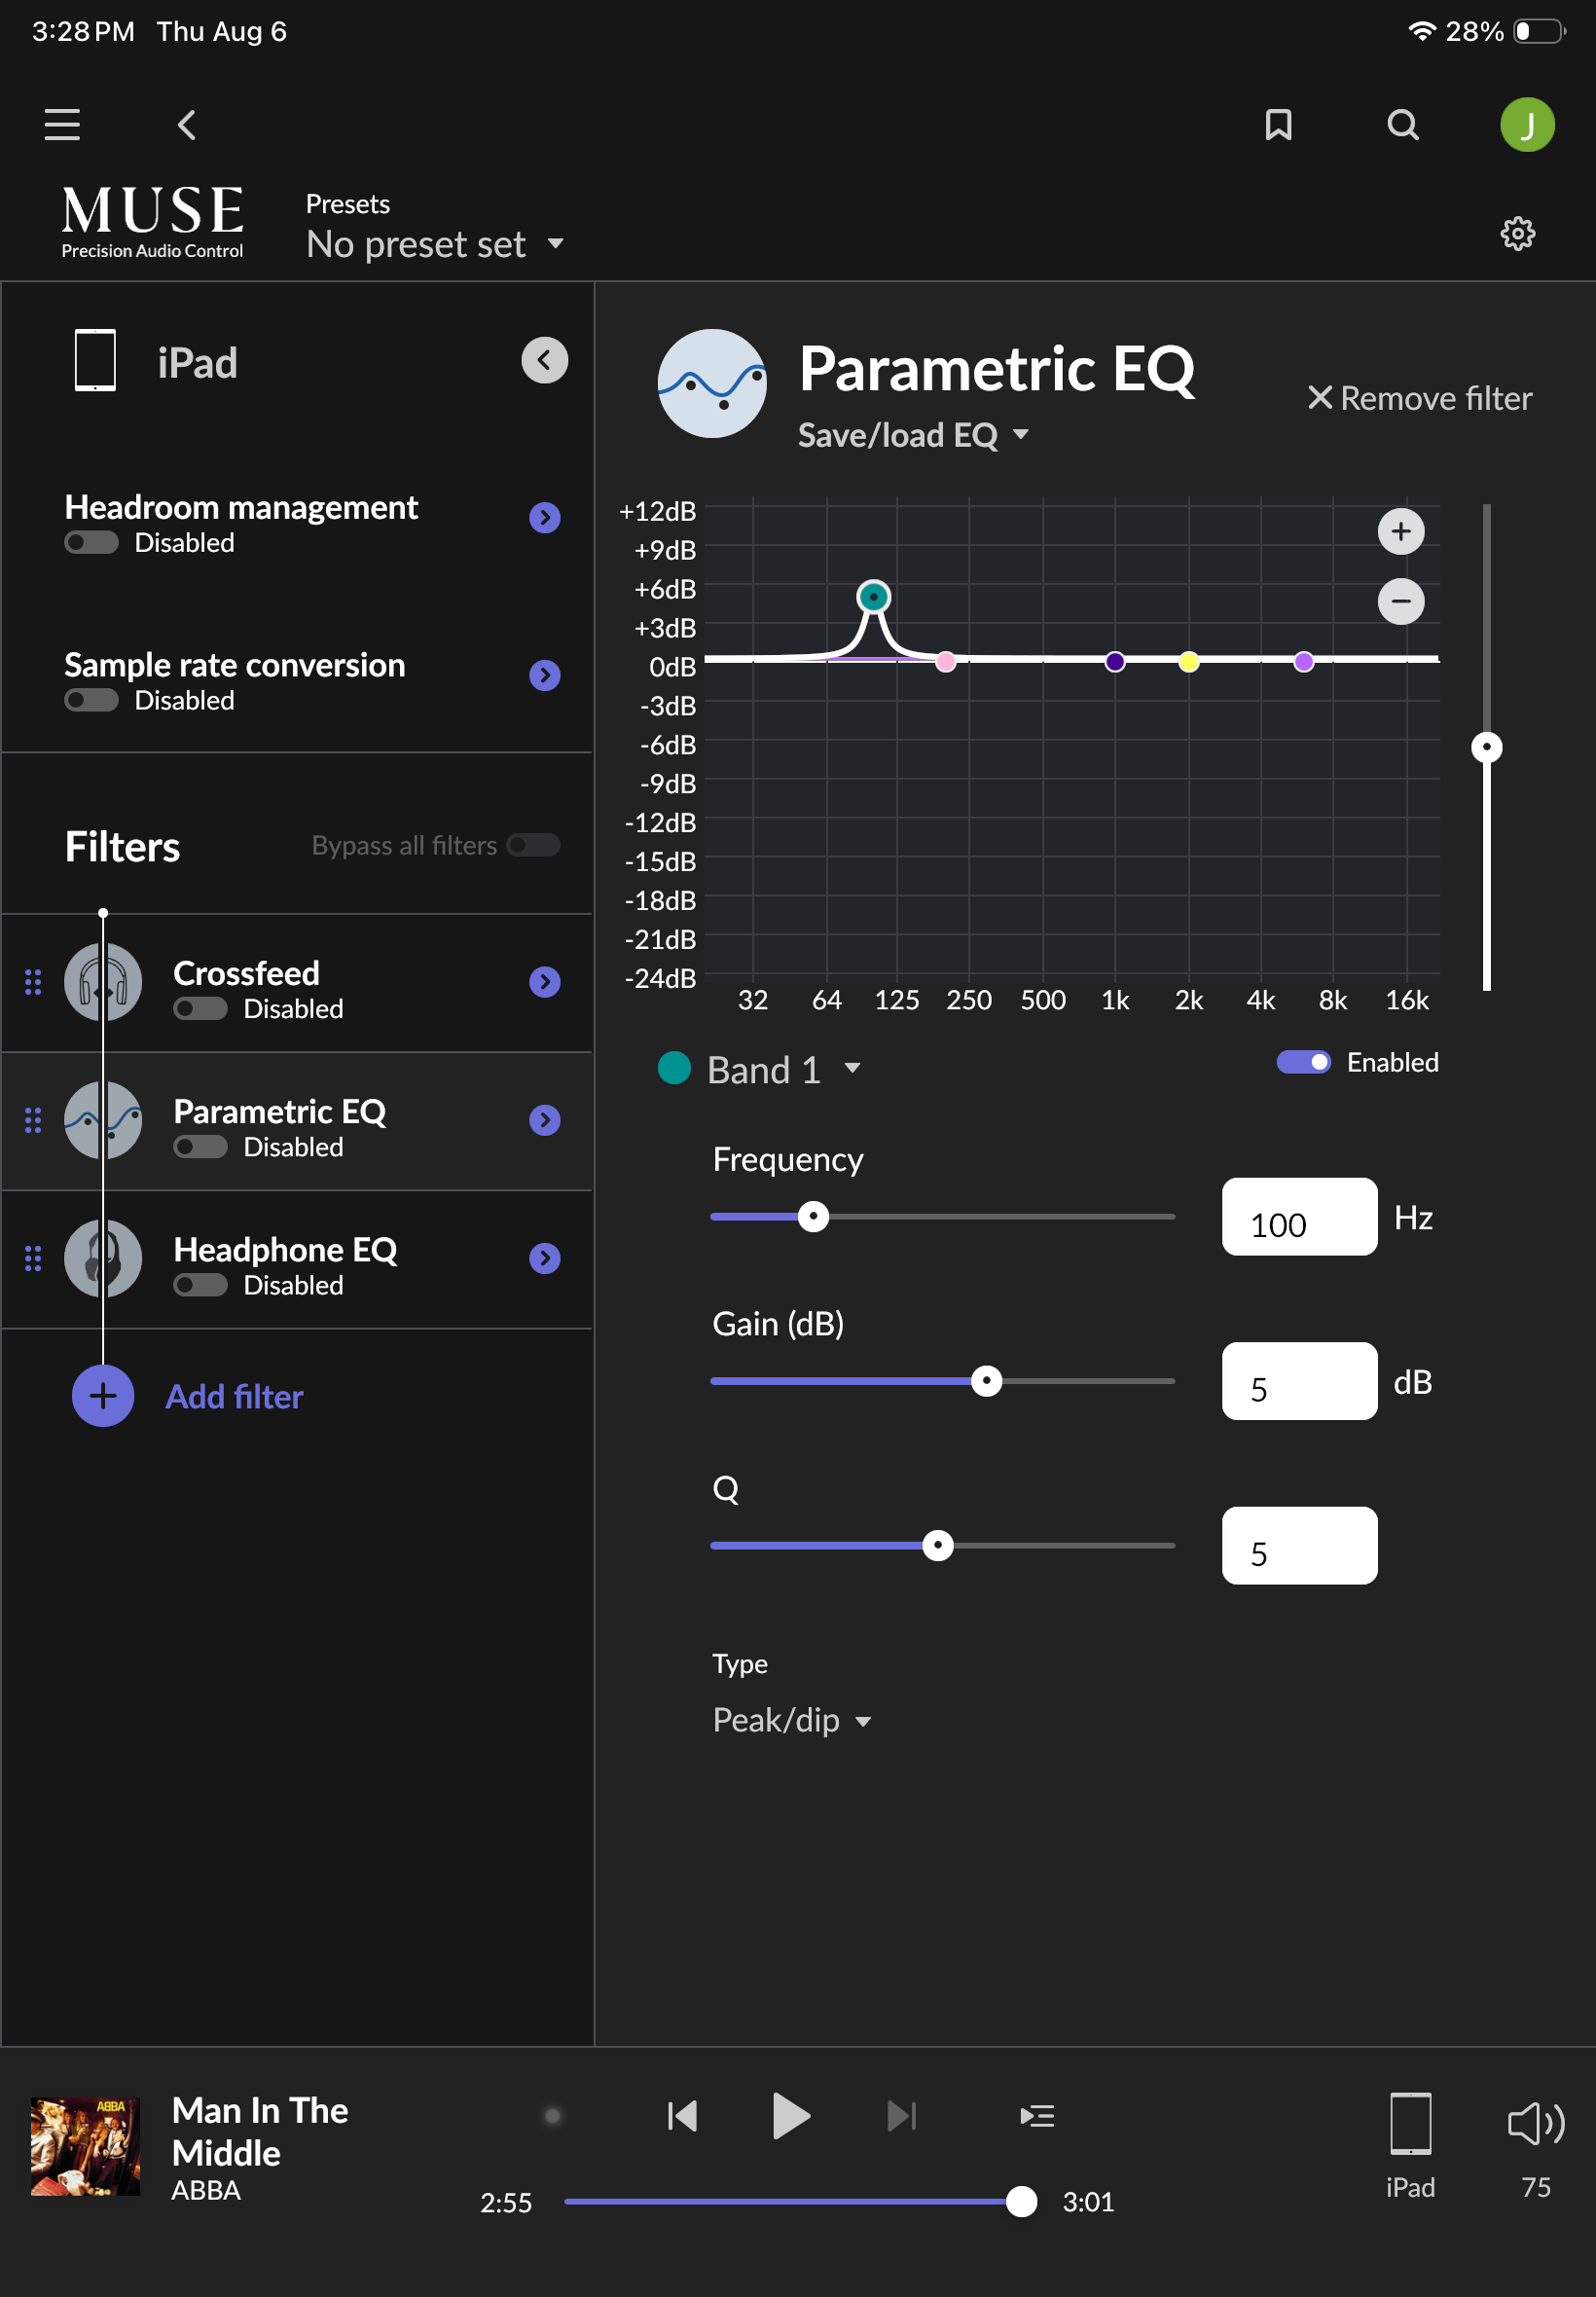
For example, in this pic you can see I boosted 100hz (using the Peak/Dip filter option) and set Q to a low number (0.5). You can see how there is a bit of boost also applied to the frequencies well to either side of 100hz

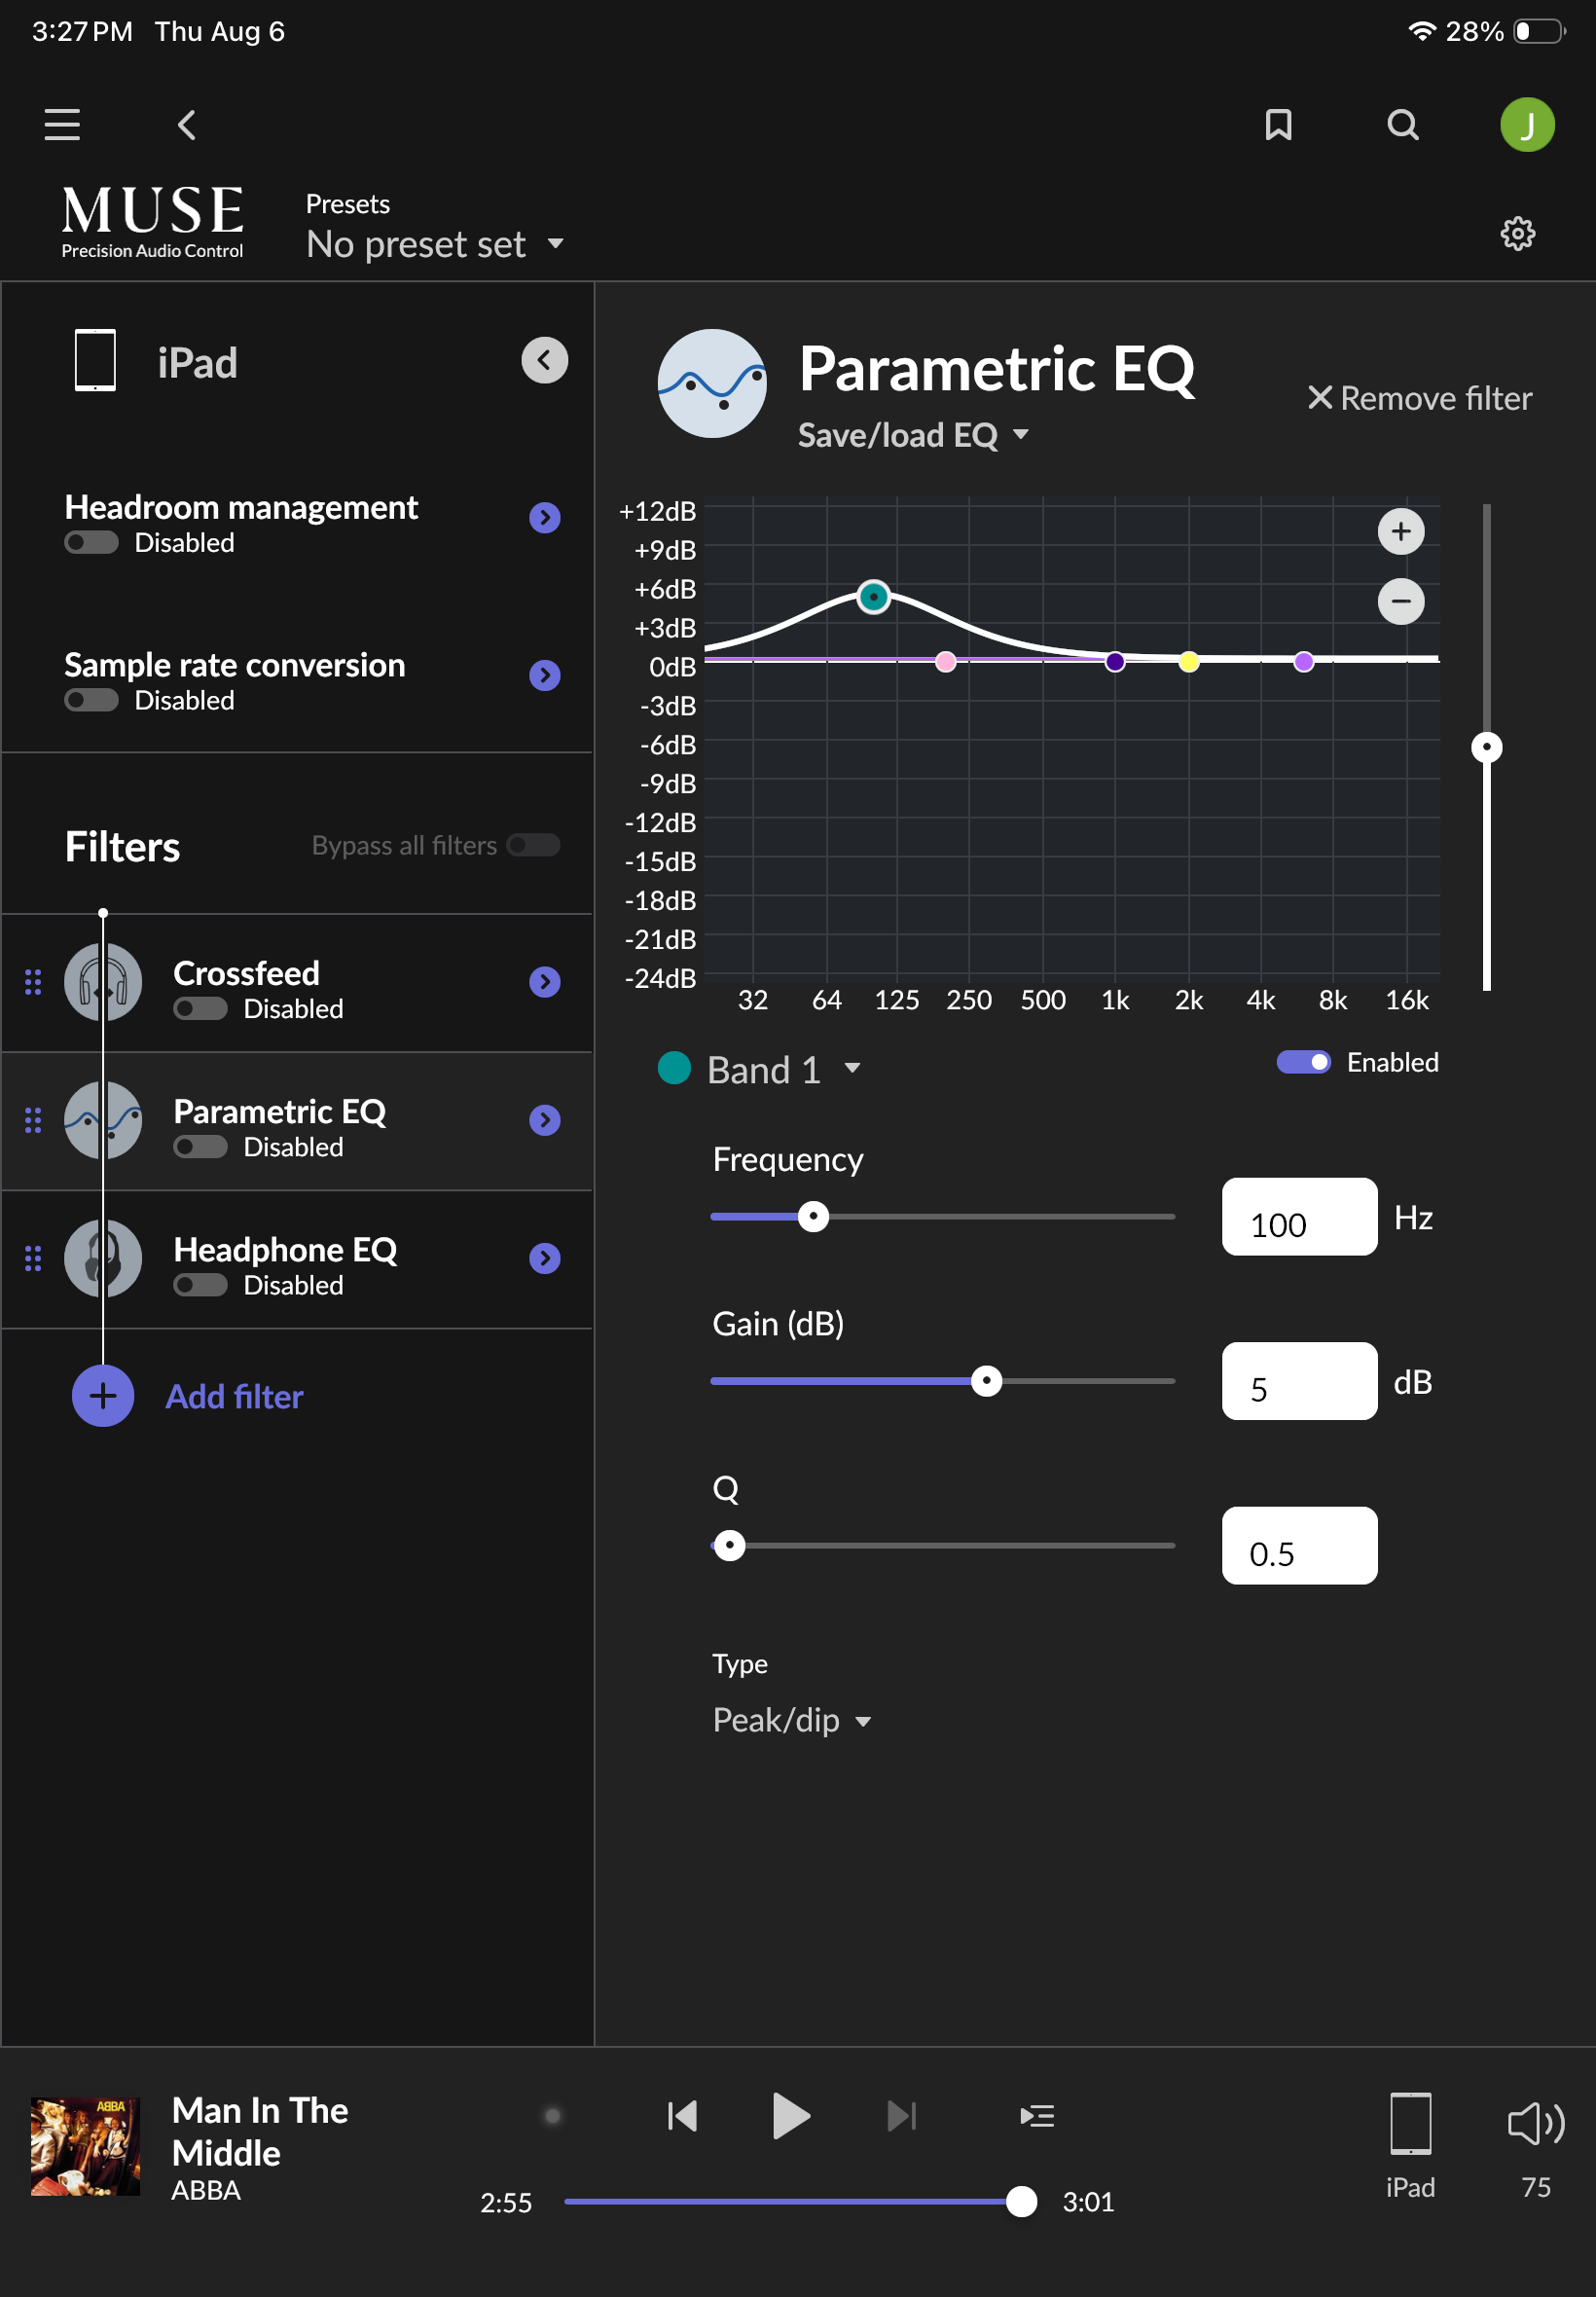
When I change the Q slider to a larger number (5 in this example), you can see the effect on each side of 100hz is much narrower.

[Moderated] Here’s the screenshot:

I see. Thank you very much! I’m not sure I understand it (and I don’t think I’d notice any difference if I adjusted the slider), but at least that’s a clear and, in a way, understandable answer. The question remains as to why Roon doesn’t feel it’s necessary to inform its paying customers about this…

But we don’t need to discuss that here (it’s pointless anyway). Thank you very much for your help.

See the examples I added to my post above.

I share your frustration with the lack of details Roon provides for many of its features. I’ve often only learned by trial and error or asking other Roon users on the forum. Unfortunately, it has always been this way with Roon. I guess they figure if you need help you will post in the forum.:roll_eyes:

I reckon they simply aren’t interested in the slightest in how their customers get on with the software. After all, anyone who’s having difficulties has already paid. And that’s what matters in the end.

But be that as it may: I now have an idea of what this slider does. I can see it in the graph, though I’m still finding it hard to hear any effect – which is, after all, what really matters. But it’ll sort itself out (or not – in which case, it doesn’t matter). At least I now know which direction to head in next.

https://en.wikipedia.org/wiki/Audio_equalization#Parametric_equalizer

@Werner_Hintze - sharing 2 external links that describe the Q factor when using parametric EQs and their practical values:

The following is copy/pasted from https://rftools.io/blog/equalizer-q-factor/

Practical Guidelines for Choosing Q

After spending way too many hours tuning systems in all kinds of spaces, here’s what actually works in the field:

  • Q = 0.5 to 1.5 — Broad tonal shaping. This is your go-to for gentle mix-wide adjustments, like rolling off some low-mid mud or adding a bit of air up top. These filters sound natural because they affect a wide range smoothly.

  • Q = 2 to 5 — The workhorse range. Most room correction falls here. It’s narrow enough to target specific problems without creating weird artifacts in the surrounding frequencies. Feedback suppression typically lives in this zone too.

  • Q = 5 to 15 — Narrow notches for surgical work. Great for killing a specific resonance or feedback frequency. But watch out — these can ring like a bell if you push them too hard with gain. The filter itself can become audible as a resonance if you’re not careful.

  • Q > 15 — Extremely narrow. Mostly used in automatic feedback eliminators or for measurement purposes. You rarely dial these in manually because they’re so specific that slight frequency shifts (like temperature changes affecting the room or speaker) can make them miss their target entirely.

Here’s something that doesn’t get talked about enough: the audible impact of an EQ move depends on both Q and gain together, not just one or the other. A +6 dB boost at Q=1 can sound way more aggressive and obvious than a +10 dB boost at Q=10. The wide filter affects more of the spectrum, so even though it’s not boosting as much, it changes the overall tonal balance more dramatically. The narrow filter might be boosting more, but it’s doing it in such a small slice that the overall character doesn’t shift as much.

When you’re doing room correction, start with broader Q values and work your way narrower only if needed. It’s tempting to reach for surgical precision right away, but most rooms benefit more from gentle, broad corrections than from a bunch of narrow notches. Save the high-Q moves for truly problematic resonances that measurement confirms are narrow in bandwidth.

I’ll strongly disagree here! It’s my impression, and belief, that the Founders, Developers and somewhat Harmon (although probably only through persistence from Danny and others at Roon) have always considered Roon to be a social software. The Roon Community is the heart of Roon. Proof of that is here in this thread, that is only a few hours old at this point.
@Giles_W and @Dadoo have both provided EXCELLENT information to help you gain a better understanding of what options you have within the software.

Excellent! :+1:

I understand your frustration because I have had it to but I have also seen that acoustics is physics, a science that requires me to study. Roon has supplied us with some powerful tools and I especially like the graphics.

This explanation was actually very good Werner, along with the screen shots. I’ll do my best to expand on it a little…
The “Q” is the bandwidth around whatever frequency you have that “dot” selected for. In Saturn’s screen shots, it’s set for 100hz… getting down towards the lower end of the bass spectrum. It’s set to increase that frequency by 5db. The Q bandwidth will affect how broad a spectrum that 5db boost will affect. In the upper picture, it’s a broader bandwidth… meaning that 100hz will be raised by 5db, and then gradually decrease across the frequencies that bandwidth covers. You’ll see that bandwidth, looking like a bell curve, starts to get back to unaffected up to around 1K, and down to very low, below 32hz. Pretty broad.

In the lower screen shot, the bandwidth is much tighter, with 5db gain centered at 100hz, but then quickly tailing off on either side so that it’s back to zero just above 125hz and 75hz on the lower side. This is often referred to as a notch… not something you’ll want to do very often. Usually a notch is used to filter out a prominent frequency that’s creating a problem in a recording… not something you’ll see much on typical official releases, but might show up in some live recordings and such.

The Q control is what really distinguishes a parametric from a standard graphic EQ… where all the frequencies are assigned and have a preset bandwidth (Q) that is an “average” amount and overlaps a bit with the frequencies on either side. As well, the parametric lets you change the main frequency of each “slider.” So where you might typically find 10 sliders or more on a graphic EQ, a parametric might only have 4 or 5 because of its flexibility.

Some keys to keep in mind… generally speaking, less is more unless a recording is really out there. And, pro tip, think about reducing a key frequency first rather than raising a bunch of them. A properly targeted cut can really clean up a lot of problems. 400hz can sometime be dramatic.

The thing that’s missing here that can really be helpful is an overlaid spectrum that can show you in real time where certain frequencies might be either deficient or dominant. But, of course, the best thing is always to let your ears guide the way.

A way to start training yourself with a parametric is to pick a frequency, lower it by a lot (say 10db), hear what you hear, then play with the Q to hear what that does.

Hope that helps!
A high-Q parametric filter in lower frequency regions will only lead to dramatically audible effects, if it is serving a specific purpose, for which a recording engineer or sound reinforcement technician would deploy it, and if the frequency is set correctly (to the frequency at which the acoustic effect in question is peaking). That is usually to counter a peak in frequency response, fighting a narrow-banded resonance effect, mitigating a narrow band of dominant bass, or alike.

If you don´t have such effect at play in your system, like bass booming at a specific frequency in the room (or massive flaws in the recording), you don´t need such parametric filters. If you want to hear the effect just for self-education purpose, I recommend to listen to some chamber jazz with dominant, picked double-bass playing a variety of notes. You usually hear that some notes sound ´fatter´ than others, this you can counter with the parametric filter, once you know the exact frequency.

Things are a bit different with higher frequencies, particular 1-5K bands, for which our ears are very sensitive and we can even hear subtle, narrow-banded changes in. Unfortunately these affect not fundamental notes, but overtones, so to identify the change in timbre/tonality, a certain level of experience with mixing and mastering is helpful.