Good news for it’roXs! users! The extension has been converted to the new format, meaning that the latest version can now be installed via the Extension Manager.
installation based on docker succeeds but no extension manager showing up
Hi Jan,
my Roon Core is running on my Windows computer.
I’ve created the docker container from the command line in my wsl (based on Ubuntu 20.x) and used your command with inlined commands for group id and timezone:
The extension is not able to discover the core, I expect, because the Windows Subsystem for Linux is on a different VLAN or subnet. This is also why it is not working when Docker for Windows is used. The Roon API requires the core to be on the same subnet in order to discover it.
Do you depend on WSL for other stuff? Running Linux in VirtualBox will give a working configuration.
I now updated my QNAP NAS to use the new v1.0 version. Installing the Roon Extension Manager using the docker compose method went smooth. Sadly it seems I’m unable to run the Web Controller extension from the Snapshots. Trying to start it just results in a “Terminated”-message – expected, as the default port (8080) is already in use (default system access port). Previously I was able to reconfigure the port used by providing a local configuration file but I couldn’t figure out how to do this now.
I just released a Snapshots update (v0.1.3) that supports the use of a local.conf file for the Web Controller. It is a bit of a backdoor, as the file has to be supplied via the command line, but probably you did something similar before.
If you have a local.conf file with a custom port number then you can copy that file to the installed instance of Snapshots:
After that the Snapshots extension has to be restarted, causing the activation of the custom port. To restart from the command line:
docker restart roon-extension-snapshots
This configuration file survives any future updates.
Can you share a short description and some screenshots on how to do this on the QNAP, can it be done via its web interface? I can then include it in the Wiki to help other users.
Thank you very much, the Web Controller extension now works. With the installed Text Editor app
a user has all the GUI-tools needed to do this without utilizing the command line (recommended procedure for average users). Use Text Editor to create the file and save it to its proper location in the exported volume (/Container/container-station-data/lib/docker/volumes/snapshots-config/_data/roon-web-controller). That is how I did it and it works.
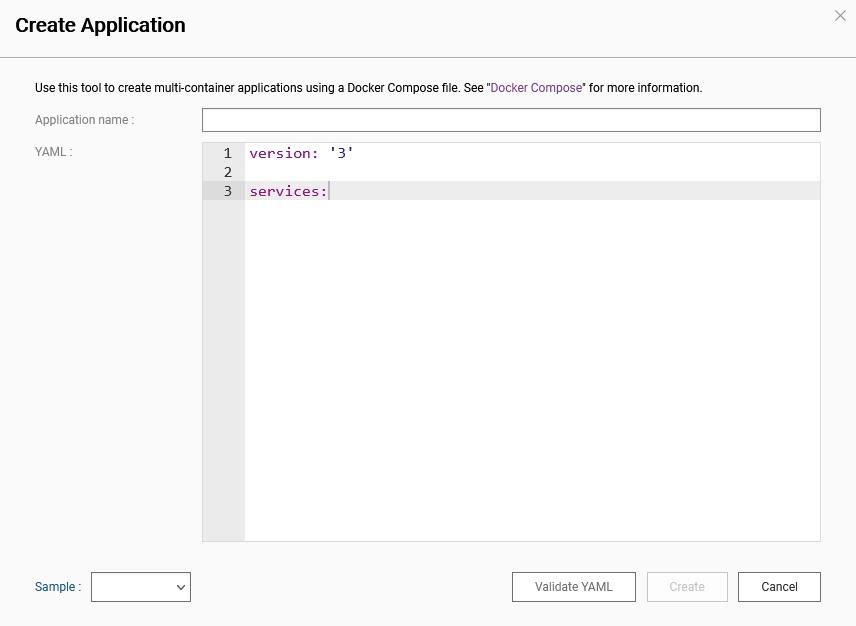
Creating applications using Docker Compose is done by opening the Container Station app, choose Create from the sections on the left side and click on +Create Application.
Now the user has to define an application name (the first input field from the top) – one can choose the service name for example (default: rem), replace the variable names (${DOCKER_GID} and ${TZ}) with their respective proper values (${DOCKER_GID} is 0 on my QNAP NAS) and delete the logging section (my QNAP NAS doesn’t use journald). That’s what I did. Is this correct so far @Jan_Koudijs?
I ended up with:
I’m really struggling with getting R-E-M installed properly on my allo dietpi - after a lot of messing around this afternoon I bit the bullet and did a clean install of dietpi, this was initially a v7 image but I successfully updated to 7.3.2 using dietpi-update.
Unfortunately I’m still coming up against the docker problems mentioned above when I try and install REM - it constantly fails on this part of the install.
I’ve tried logging in as root, tried the method which worked above of logging in as dietpi then sudo su - to get to root
nothing seems to let me install the manager - any suggestions?
But experienced users should feel free to use the command line instead.
Note: Support in Container station is just for apps created using Container Station. Nothing has to show-up or work at all for containers installed via other means (like for example a command line command).
I might have to get in contact with the DietPi developers to get clear what is going on here.
What you could try is installing Docker via the dietpi-software tool and then following the generic Linux install steps to install the Extension Manager.
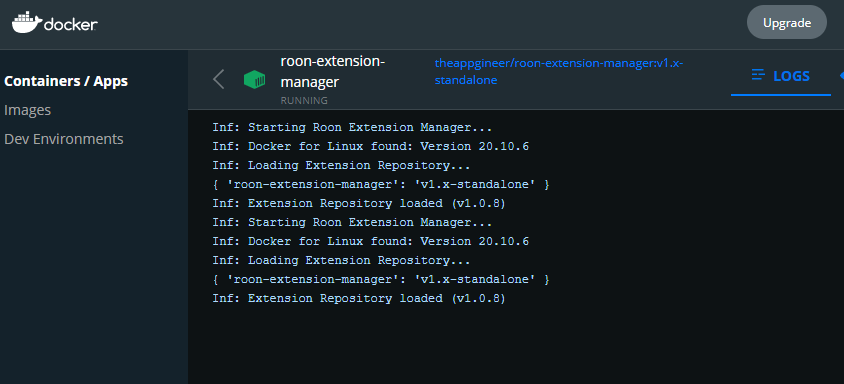
@Jan_Koudijs finally looking to move over to the latest v1 version. I have 0.11.9 currently on my QNAP running in docker via container station. I have tried to install the latest version but it just wont start at all. I am completely stuck, not that up on docker so any help here would be helpful.
Simon I finally did the update on my DietPi last week and I have to say it went fairly smoothly. Just launched several updates.
I hadn’t thought about running it on my Synology though
I don’t want to run another devices really as I have more than enough in use currently. So running on the Nas is essential to me as it’s how I run it now.
Sorry I meant that I had not thought about putting in on Docker on my Synology.
I might think about that and retrieve another Pi back as it currently only runs DNS and extension Manager
One less device in the network then, its there from the days it was running as a streamer for me, but it has been so reliable that I have not taken it out of service.
To do the upgrade you first have to stop and remove the old Extension Manager from your QNAP (if not done yet).
Probably the easiest approach for installation is to follow the QNAP instructions provided by @BlackJack in post 50. I Still have to include this information in the project Wiki
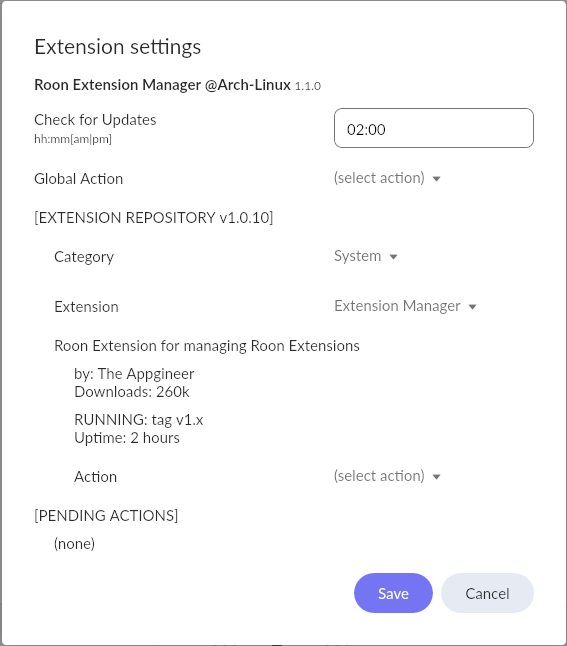
Up till now it has been the case that during the Check for Updates all the running extensions got restarted, even if there was no update available. This has now changed, only if an update is available the extension will be stopped, updated and restarted, but otherwise the extension just continues to run. The effect of this is that if an extension runs stable it can run from update to update.
As an indication of extension stability the Extension Manager now shows the uptime of the running extensions, a short uptime might be an indication of underlying issues.
Lastly a second stat has been added, being the number of downloads of the extensions as reported by Docker Hub. This number can be used as an indication of extension popularity.
I’m having difficulties getting the Extension Manager Generator building a Docker image of my extension.
I’ve tried several different attempts but without success.
I get the following error message when running ./build.sh :
invalid argument “guymaurier/roon-extension-simaudio-moon-:latest-amd64” for “-t, --tag” flag: invalid reference format
The name of the extension is roon-extension-simaudio-moon .
Any idea what could cause this situation?
Thanks,
Guy