Quit a difference! I’m not a pro in these things, but what about those dips around 50 till 150 Hz?? Are those room related? When a specialist was doing a Dirac live measurement and adjustment here, he was referring to “room related” dips and spikes. You have an opinion about this?
Looking at the size of them, they are most likely room nodes. You can’t really correct for them as they’re due to cancellations related to the room’s dimensions. Sometimes moving speakers around can help by moving the null away from the listening position, but since this is also our living area, there’s limited scope for speaker placement changes! I’m already pushing my luck with the WAF. I don’t think the wide baffles are entirely to her taste, but she’s putting up with them…
2 Likes
OK I see. but altogether the graphs are looking good, knowing that a flat line is the optimum. I like that you corrected along the shape of the line which is speaker specific as I learned…
1 Like
Nice ! No plan to add sub/s ?
[quote=“Graeme_Finlayson, post:208, topic:242001”]
got my geek on and set up the back-tilt, level, toe-in and distance with a digital angle-finder, laser level and laser “tape” measure.
[/quote] My method is not as sophisticated as yours. I lean a plank, taller than each speaker behind and agaist the listening chair, and use a lazer pointer from each speaker, marking each speakers angle with blue tack and adjust accordingly. Works a charm. I also have the center point between each speaker marked on the floor in front of the listening chair and then measure the distance from each speakers footer to the center point, thus ensuring that toe is exactly the same to the nearest millimetre. I find the strads respond to such precision. I am constantly amazed how many audiophiles dont apply these basics properly
Errr, no. Would probably help with the room nodes, but that’s a line I’m not going to cross… 
1 Like
I know, and it’s so cheap and easy to do. A great stereo image requires proper phase and time-alignment and the same listening axis to each speaker. Half an hour of well-invested effort getting the distances and angles the same delivers hour after hour of listening pleasure!
3 Likes
Not only to help with room modes but accurate playback levels of 20-60Hz region of music.
There’s no way she’d let me add a couple of 12" subs to the room!
At the suggestion of a forum member from Stereonet, I tweaked the filters with more aggressive gain and included the notches in the adjustments. I have had to allow -10 dB of headroom management in Roon to prevent clipping, but then I have so much gain available in the HPA4 that it doesn’t really matter.
EDIT: My -120 dBFS test track is still audible!
Now we’re talking:
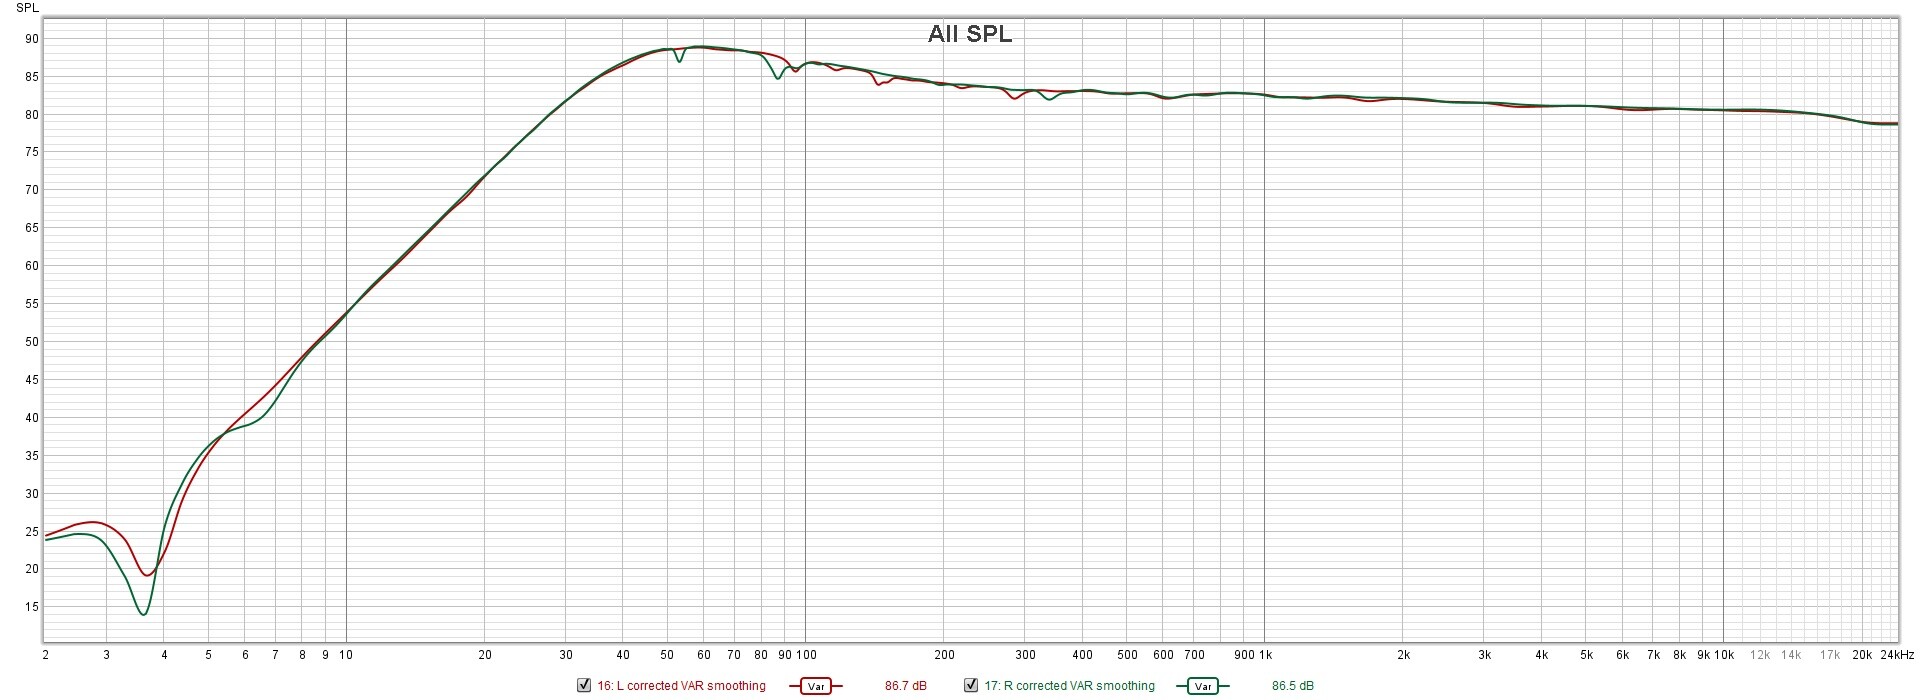
It’s also allowed me to select a -18 dB/octave bass roll-off rather than the -24 dB/octave I had previously, which gives better bass extension. I kept the target response to the right of the measured response when generating the filters, so that the bottom octaves were adjusted subtractively rather than additively to avoid overdriving the bass units.
I’ve just been playinig around with the suggested test tracks in the pdf instructions for the REW inversion method. “Bubbles” by Yosi Horikawa is simply mind-blowing!
8 Likes
Are you applying the adjustments to Roon or the PEQ within your preamp? I am awaiting my microphone for REW and was planning on using the adjustments within my Classe. If I will get better results with the filter in Roon then i would love to understand more. Sorry is this is a “rookie” question.
1 Like
The FIR filters generated within REW are applied as convolution filters within Roon’s DSP engine (Muse). The benefit of doing it this way over PEQ is that you can also deal with phase and timing issues.
In short, you will get far, far better results in Roon.
This is the thread that explains it all and how to do it:
Creating convolution files for Roon in the new Room EQ Wizard (REW) with Inversion
There’s a great YouTube video by OCA and an in depth pdf giving step-by-step instructions. The last steps in Rephase (which I highly recommend) are the icing on the cake.
In my post COVID brain fog, I had the pdf open in my work laptop, and REW and Rephase open in my personal laptop to enable me to work it all out.
The results are nothing short of spectacular.
Before starting, I would recommend familiarising yourself with the suggested test tracks in the pdf. Then you have a baseline to compare with the final filters applied.
With my first set of filters, the TV on “Amused to Death” wasn’t placed correctly - it was to the left, but it wasn’t distinctly to the rear.
With the final filters and plugginng my way through thte full Rephase adjustments, it just dropped into place. There’s also the faint sound of crickets chirping front right.
The difference before and after on “Bubbles” was simply breathtaking.
5 Likes
Thanks so much for the info. I am a bit bummed to not used the PEQ of my integrated, although I am excited to hear the results you achived with you new speakers. I have many challenges with this loft room so any advances will be exciting to hear.
DSP is one of those functions in Roon that really sets it apart. I’d be curious to understand how big a proportion of its userbase exploits the feature properly. For me, this week’s results alone were worth every single penny of the lifetime subscription.
I’m nearly £5k invested in the PMS in materials plus Lord only knows how many hours of my life. What I heard when I first fired them up was good.
What I’m hearing now is like nothing I’ve ever heard before.
Endgame.
(BTW, none of this is due to driver break-in. The drivers were broken in months ago before the speaker build even started. Mid and bass drivers were subjected to 4 hours of 40 Hz at pretty much maximum excursion)
PEQ will take you part of the way, but with FIR filters done properly and applied via Roon’s convolution engine you get the whole enchilada.
4 Likes
Wow. That is really interesting to know. The resolution of my setup now is amazing so to think I can make adjustments of that magnitude to the overall balance and frequency is getting me very excited.
I am taking the wife to on vacation next week but will be excited to work on my measurements when i get back.
As always I appreciate your willingness to share you knowledge.
Oh, what cpu and RAM in your core? When doing upsampling with my i3 it seems to stuggle.
Set aside some time to yourself when it’s quiet (you want low ambient noise for the measurements) and don’t hurry the process. The initial measurements don’t take that long - it’s all the post-measurement stuff that hurts your brain!
My core runs on a multi-purpose Synology Rackstation. It runs all of our security cameras, Roon, Plex, acts as a file-server and handles on- and off-site backups.
CPU is an Intel Xeon E3-1230 v2 (4 core, 3.3 GHz) CPU Mark metrics seem to place it in the higher end i5/ lower end i7 bracket. RAM is 32GB, DDR3.
CPU usage always seems to be very low.
1 Like
From what I saw you haven’t used RePhase yet?
So your impulse responses spit out of REW are simply generated from parametric EQ.
ie you would have same result as using PEQ in Roon.
What RePhase spits out is very different of course
Thanks for your kind words. If you want to delve even deeper into the rabbit hole, you might wanna watch this one:
1 Like
I have, I just didn’t show the steps.
Firstly I generated the new minimum phase filters in REW using @OCA’s detailed instructions, then I generated the corrected L & R and exported them as .txt, opened them in RePhase, made the adjustments for timing, crossover and port frequency and Q, and then generated the PhaseFix.wav file to apply back into REW to the minimum phase filters.
My final filters include all of the RePhase adjustments.
2 Likes
Thank you for giving up so much of your time to produce the videos and instructions. The results of the corrections are nothing short of spectacular.
I’ll work through your speaker phase correction video over the weekend 
1 Like