Hi, folks.
Synology recently released a DSM upgrade which introduced compatibility problems with the Roon package a number of community members, including me, run. I’m using this opportunity to switch to running Roon in a Docker container. I put together this walkthrough to hopefully help anyone else considering going down the same path.
This walkthrough utilizes the container image produced by @Steef_de_Bruijn, who I want to thank for his work. That work made this possible, and it’s sincerely appreciated.
My setup is quite simple - no plugins, no complex network shares, one music folder. That’s what I cover here.
Let’s get started.
If you are already running Roon on your Synology NAS, and you would like to maintain your settings and usage history, start by making a current backup at Roon > Settings > Backups > Backup now. Make a note of where your backups are stored.
If you are currently running Roon as a Synology package, go to Package Center and uninstall the Roon Server package.
While you’re in Package Center, install the Docker package if you don’t already have it installed.
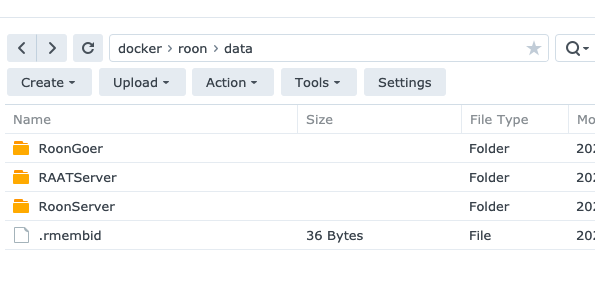
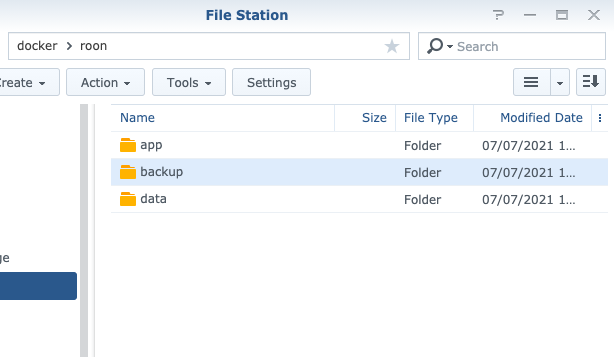
In File Station, decide where you want to store the folders that your Roon docker image will interact with. These are “app”, “data”, and “backup” folders which are specific to Roon. Don’t worry about your music folder(s) at this point.
I created a top-level folder called “docker” and a subfolder called “roon” which contains the app, backup, data folders. When you’re done, it should look something like this:
If you have previous Roon backups, now is a good time to move them over into the new “backup” folder you created. Locate the old backups and either move or copy them into the new backup folder. There should be a folder with a unique identifier for its name and a file called “roon_backup_root”. Both of those just go into the new backup folder.
Next, run Docker from the app launcher. Select “Image” in the left navigation bar, and the click Add > Add from URL
Enter “steefdebruijn/docker-roonserver” in the Hub Page box, and click “Add”. Should look like this:

You’ll be asked to choose a release tag. Choose “latest” and click “Select”:

You should now have steefdebruijn’s docker image in your Image list. Select that image and click “Launch”. This will launch the container creation wizard.
In the first screen, give your container whatever name you like.
In the first screen, give the container whatever name you like. I called mine “roon”. Then click “Advanced Settings”. We’ll go through Advanced Settings tab by tab. Don’t click “Apply” until you’ve applied the correct settings in each tab.
Advanced Settings - I didn’t change either of the settings here.
Volume - Here’s where we’re going to map the folders you made earlier. You can also map your personal music folders at this time.
For each of the folders you created, click “Add Folder” then choose the folder on your NAS and set the mount path to be either /app, /backup, or /data as appropriate. Do not make them read only.
Depending on where you placed the folders on your NAS, your “File/Folder” paths may not look the same as mine, but your Mount paths should always look the same as mine for these three folders.
If you want Roon to scan music on your NAS, then you need to map your music folders in as well. You can use whatever mount paths you like for your music - you’re going to select these manually from within Roon later. I have one music folder and I just map it into “/music”.
Here’s what that tab looks like for me:

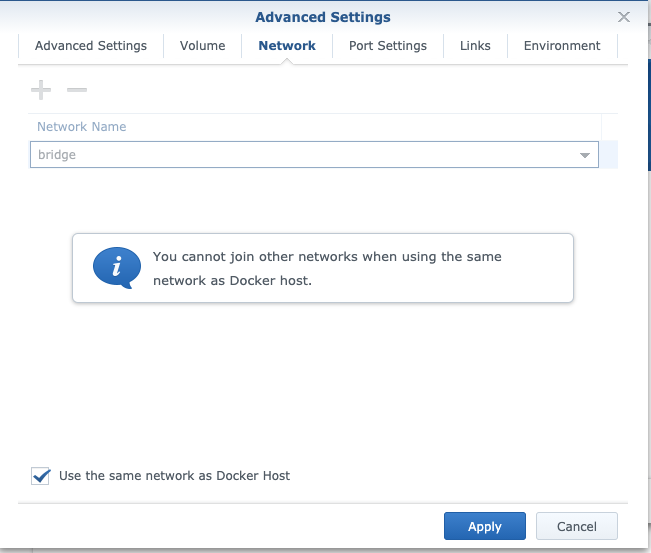
Now switch to the “Network” tab. Check the checkbox called “Use the same network as Docker Host”.
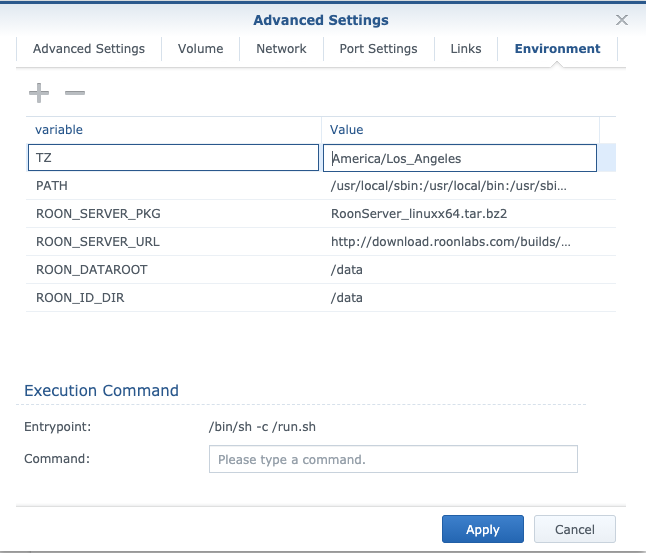
Ignore the Port Settings and Links tabs. Switch to Environment. Click the + sign and add a new row where the “variable” is “TZ” and the value is the the standard TZ name of your timezone. A list can be found in the TZ database name column of the table here: List of tz database time zones - Wikipedia
I’m on the west coast of the United States, so I enter “America/Los_Angeles” as:
You’re now done with Advanced Settings, so click “Apply”. You’ll be returned to the Create Container wizard, where you can now click “Next”.
Review your settings. “Run this container after the wizard is finished” will be checked by default. Leave it checked and click “Apply”
Your container is now running. In Docker, you can switch to the Container section and confirm that it’s up.
On the Mac, PC, or whatever of your choice, run Roon. You may need to tell it to pick a new Core. You should see your Docker container running as “roon”.
Connect to your new Core and login. If you were previously running Roon, and uninstalled to go through his walkthrough, you’ll need to Unauthorize your previous core. Just click “Unauthorize”.
You’ll be asked to Add your music. If you mapped one or more music folders into the container earlier, you can now click “Add Folder” and navigate to them. You’ll probably have to click the up arrow next to the words “Folder listing” to be able to find them. Because I mapped my music folder into “/music”, I just picked that.
Set up Audio devices (or postpone that until later).
Once you’re done with the preceding steps, you can now restore a backup if you made one. You should be able to figure that part out on your own :).
I hope you found this useful. I’m sure I omitted something and made mistakes - please feel free to supplement and correct in comments.
Thanks again to the community for such fantastic support!