I have experimented with REW (Room EQ Wizard) and room correction, and how to apply it in Roon, and decided to write a guide about it. This is what produced best result for me (I sit in a small room with concrete walls), but the way I did it should work well in bigger rooms and for different walls as well. This guide assumes you have a 2.0 or 2.1 system, and works best if you have a specific listening position and you sit in the middle of the sound, with an equal distance to left and right speaker. By the way, 2.1 systems is measured just like a 2.0 system, with the sub-woofer active during the left/right speaker measurement.
REW is free to download and use, so the only money needed to perform this guide is to buy a microphone (preferable a USB microphone). I have no experience about using a non-USB microphone.
Remember to do room correction as the last audio-step. The path to get good sound is something like this (somewhat simplified):
- Get audio equipment and speakers
- Setup good positioning for speakers and a good listening position, see for example this guide.
- Do proper acoustic treatment of your room (or use lots of furniture), see for example this guide or this one.
- Only when the above is done (or at least considered and rejected for whatever reason), should we focus on room correction which is what this guide is all about.
Below is the complete guide, if you want to only do the most needed minimal room correction, jump to the Lite-guide which is after the last step in the complete guide.
Step-by-step complete guide:
1. Buy a USB mic, I use UMIK-1 and that works good (remember to download correction file for your serial number). Connect it to your computer.
2. Download REW from here https://www.roomeqwizard.com/ and install.
3. Start REW, press Yes to select microphone and select calibration file (use the zero degree one). In settings, make sure REW is using the correct input and output.
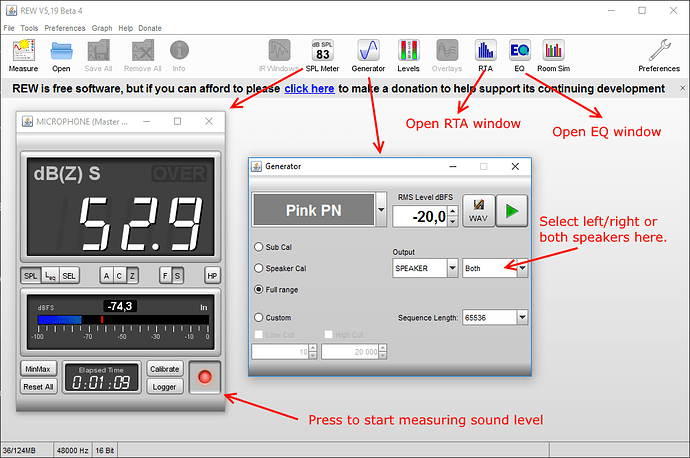
4. Fix sound level by first reducing volume, select “SPL Meter” and start recording, select “Generator” button, choose Pink PN and play it while holding microphone at your listening position. Adjust volume until it’s about 75 dB, then close the “SPL Meter” window and stop the generator from playing. The picture below shows how to do this:
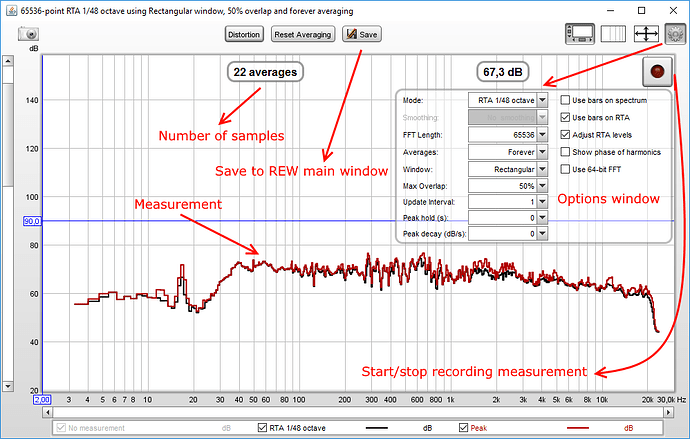
5. I discovered that using the RTA (Real Time Analyzer) in REW and moving the microphone around slightly produced more reliable results, without the pitfalls of higher frequency being too high/low at a specific position. So open RTA, in options make sure to set 1/48 octave, 65536 FFT length, Averages forever, Rectangular window, Max overlap 50%, Update interval 1 and 0 for peak hold and peak decay. Se picture below:
6. Sit at your normal listening position and play the Pink PN sound from left speaker. Now we want to measure the Pink PN sound in RTA while moving the microphone slowly around the listening area, covering a good subset to get good averaging and reliable result. This can be done in many ways, but for me who has a specific listening position I chose to move the microphone as 2 spirals outside each ear, with the center of the spiral at ear height. One of the spiral is on the plane up-down-left-right and one is up-down-front-back. Point the microphone towards the speaker you are measuring while doing this. If you want to cover several listening positions, like a sofa, use some more appropriate move pattern. You can read more about the Moving Microphone Measurement (MMM) this paper.
7. Press “Save” in the RTA window to convert it to a measurement which is then placed in the REW main window. In REW main window, name the measurement with date and “left” or “right”.
8. Repeat 6 and 7 but for right speaker. Remember to press “Reset averaging” in the RTA window before doing a new recording.
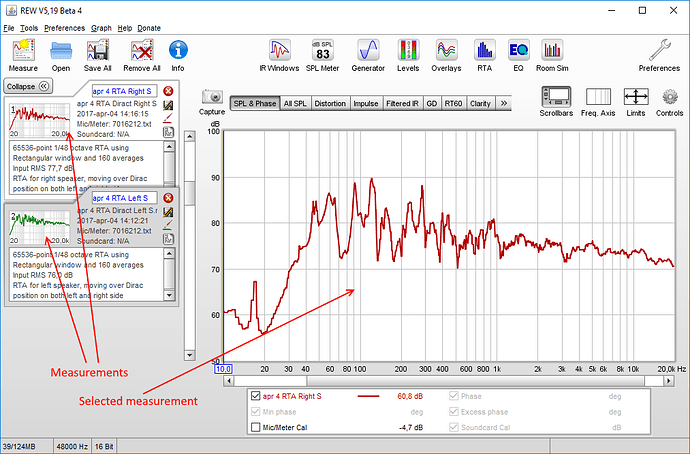
9. Now close all extra windows in REW, leaving only the main window which should have 2 measurements. It should look something like this (but probably better measurements, my room is a nightmare):
10. Select the measurement for left speaker. Press the EQ button
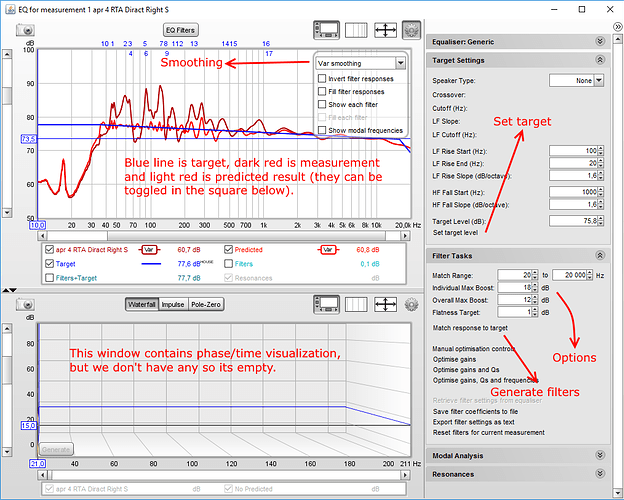
11. In the equalizer window, select “Var smoothing” from options and in the right side of the window, select “Generic” equalizer, “None” as speaker, press the “Set target level” text and finally press “Match response to target”. Now REW will generate filters to flatten out your curve for the left speaker. It should look something like this:
12. Make manual changes to the result, or try different settings in the “Filter Tasks” side-window, until you are satisfied with the result. Be wary of trying to boost deep and steep holes, and if REW does it for you it might be best to manually remove that filter (you can inspect/modify and manually disable individual filters by pressing “EQ Filters” button). Save the measurement to be able to make adjustment at a later time.
13. Repeat 10 – 12 for right speaker. You should use the same “Target level” for both measurements so manually input that in step 11, from the value you had for the left measurement.
14. In the REW main window, select menu “File -> Export -> Export filter impulse response as wav” and save a wav file for each frequency you use in Roon. Use “Stereo” format, 32 bit and check “Normalize samples to peak values”. Remember to assign correct measurement to correct channel (see picture below):

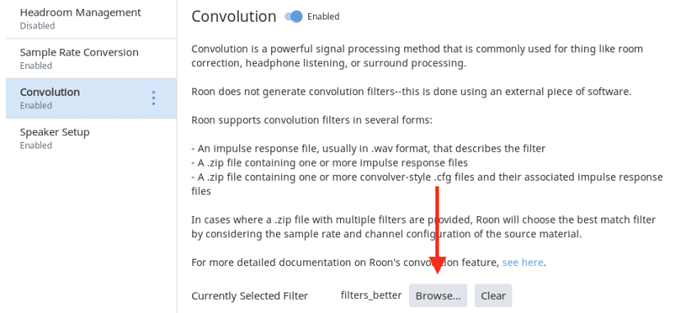
15. Zip all the files you generated in step 14 into one catalogue, and select that file in Roon – DSP Engine – Convolution. Remember to enable DSP and Convolution (check the signal path when playing something to make sure).
16. Here are some optional steps to consider doing, but they are a little more hands-on and not as automated as the previous steps. Also, to keep the size of this guide manageable I haven’t described them quite as fully as the previous steps.
a) To fine tune the frequency correction, you can do one final measurement but this time with both speakers on, and do the measurement with the previous corrections applied. To do this, save the “Pink PN” sound from Generator window in REW, copy the file to your music library and play it from Roon with the previous corrections in place. Then perform steps 5 – 7 and 9 – 12 and add the filters manually in Roon PEQ. You can see the filter-data in REW by pressing the “EQ filters” button in the EQ window. This step is what I did to get the last picture of the measurements below.
b) REW does not correct a measurement once it goes below the target line and never comes up, so if you know your speakers minimum frequencies, and the result after filters does not go as deep down as your speakers can handle, you can manually set a filter to get a little extra bass. To do this, disable one filter in the “EQ filters” window, let REW generate 19 filters and then enable and set that filter manually. Take some care when doing this though, partly to save your speakers and partly to avoid boosting a destructive node. So once done, do some critical listening to make sure everything sounds good. Se picture below for an example of extending the bass that worked well for me and my speakers:

c) Now we are done with the frequency correction, we should focus on time corrections. Sadly there is no free automated or easy ways to do this as far as I know, but one good use of REW is to inspect where in the frequency range there is problems in your room. Do a regular sweep in REW from where your head is, and generate a waterfall or spectrogram to see where you have problems, and then if needed improve your room acoustics or take some other actions. Various impulse analysis can also help. Check this link for help about REW. (Before I had a section about using rePhase here but that turned out to be less useful).
17. If the EQ or filters boosted some frequency (which is likely), you might need to use Headroom management in Roon to prevent clipping, or turn on volume auto-leveling in the Zone settings.
18. Enjoy the (hopefully much improved) music!
Lite-guide
This guide is faster and easier to perform, and will result in less drastic changes. If your setup already produce very good sound without room correction, or you tried the full guide and received a result you didn’t like, this is a good guide to try:
a) Perform step 1 – 5 from the guide above if needed.
b) Do step 6 but with both channels playing from the “Generator”. Continue with step 7, 9 and 10.
c) On step 11, set the target on a flat-level area of the measurement in the 200 – 1500 Hz range, see picture below for an example. Then set the upper limit to adjust to the leftmost measurement that is on target (in the picture that is around 550 Hz). This is done in the EQ window, to the right in the “Filter Tasks” section, second number of Match Range (the default is 20 000).
d) Do step 14, but save as mono instead of stereo, and then step 15.
e) Finish with step 17
If you don’t have your computer connected directly to the DAC, you won’t be able to tell REW to play its measurement correctly. The easiest solution for this is probably to use a USB cable to temporarily connect your computer to your DAC while following this guide. If the computer is far away from your listening position, you might need a friend to help start/stop recording in REW. Another option is to save the “Pink PN” sound from REW as a wav, convert to flac and play it from Roon, just make sure to turn off all DSP in Roon when doing measurements.
If you want to modify bass level or level of higher frequency, you can do that in step 11 by adjusting the HF/LF cutoffs and slopes, before generating the filters. The default values seem to produce good results though. Google “audio house curve” for more information about this. You can even create and use your own specific house curve in a text file and use in REW (settings).
Some of you might wonder why not use the normal way of placing the microphone where your head normally is, and move away while doing the measurement. For me, that way produced a worse result, probably because I sit in a small room and the effect my body and head has on the sound waves becomes relative big. Using sweeps will also give false indications of higher frequencies needed adjustment, due to how short waves the higher frequencies has, and generally speaking a less reliable result. Having said that, if you prefer to use sweeps that do so, both way works.
Below is my measurements, first unmodified, then modified individually and the final result:


 What keeps puzzling me though is this: in order to achieve the last (smoother) curve, basically all that Roon (or any software) can do, is change the bass, the treble etcetera a bit, am I correct? Just to see if I’m overlooking some aspects. I know that ultimately, I will try it anyway – in which case your guide will be of enormous help – but I’m still trying to get my head around it.